

Chapter 1
Introduction
What HOSSPI HMS is, who this manual is for, and how to read it.
1.1About HOSSPI HMS
HOSSPI Hospital Management System (HOSSPI HMS) runs the whole facility from one system. Reception, the consulting rooms, the wards, the laboratory, radiology, the pharmacy and the finance office all work from the same patient record, so information entered once is available to everyone who needs it.
You can use HOSSPI HMS in any modern web browser at app.hosspi.com, or in the HOSSPI apps for Android, iOS, Windows, macOS and Linux. Your account and your records are the same on every device, and so are the steps in this manual.
1.2Who this manual is for
This manual is for everyone who uses HOSSPI HMS at a hospital, clinic, laboratory or pharmacy:
- Facility owners and administrators, who register the facility, set it up and create staff accounts.
- Clinical staff (doctors, nurses, laboratory, radiology and pharmacy teams), who look after patients.
- Front office and finance staff (reception, billing officers, cashiers and accountants).
- Human resources staff and managers, who keep staff records and read reports.
1.3How to read this manual
The chapters follow the order in which a facility starts using HOSSPI HMS: registration and sign-in first, then setup and staff accounts, then the patient journey, and finally billing, accounts and reporting. Read the chapters that match your work, or use the contents to go straight to a task.
- Numbered markers on a screenshot match the numbered steps beneath it: marker 1 shows where to carry out step 1, and so on.
- Words in bold are the exact labels you see on screen, such as buttons, menu items, tabs and field names.
- Fields marked with an asterisk (*) must be completed before a form can be saved.
1.4What you need
- A computer, tablet or phone with an up-to-date web browser (Chrome, Edge, Firefox or Safari), or the HOSSPI app installed.
- An internet connection.
- The email address or phone number of your account, and your password. Staff accounts are created by the facility administrator.
Chapter 2
Registering and signing in
Create your facility’s account, verify your email address, wait for approval and sign in. Also covers resetting a forgotten password.
2.1How registration works
A facility joins HOSSPI HMS in four stages. Only the first administrator registers. Everyone else gets an account from an administrator later, as described in Users, roles and permissions.
| Stage | What happens | Who does it |
|---|---|---|
| 1. Create your account | Enter the administrator and facility details on the registration form. | Facility administrator |
| 2. Verify your email | Enter the six-digit code sent to your email address. | Facility administrator |
| 3. Wait for approval | The HOSSPI platform team reviews and approves the new facility. | HOSSPI |
| 4. Sign in | Sign in with the email address or phone number and password you registered. | Facility administrator |
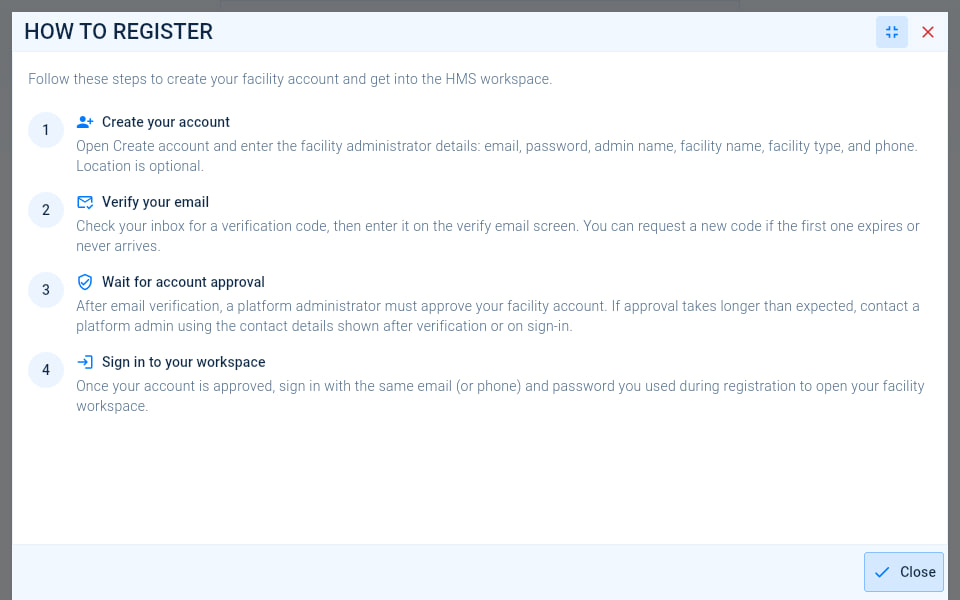
2.2Register your facility
The person who will administer the facility
Go to app.hosspi.com. On the sign-in screen, select Register to open Set up your facility.
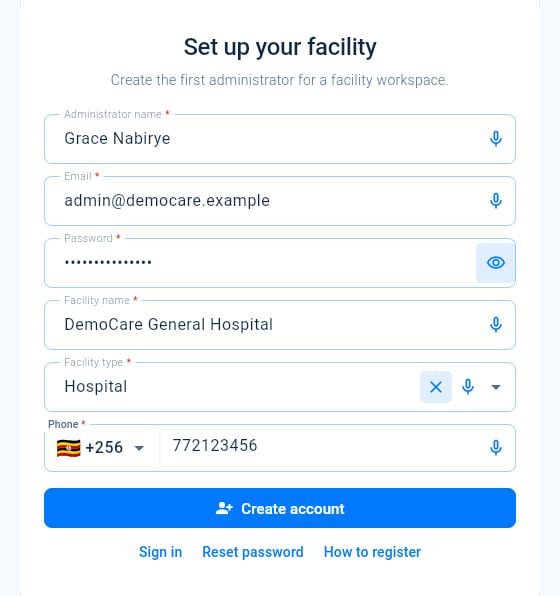
- Enter your full name in Administrator name. You become the first administrator of the facility.
- Enter the email address you will sign in with in Email. The verification code is sent here, so use an inbox you can open now.
- Choose a Password of at least 8 characters. Select the eye icon to show or hide what you typed.
- Enter the name of your hospital, clinic, laboratory or pharmacy in Facility name.
- Choose the Facility type: Hospital, Clinic, Lab, Pharmacy or Other.
- In Phone, choose your country and enter the phone number. You can also sign in with this number later.
- Select Create account.
HOSSPI HMS creates your facility’s workspace and opens Verify your email.
2.3Verify your email address
Look in the inbox of the email address you registered for a message with a six-digit verification code. If it has not arrived after a few minutes, check your spam or junk folder.
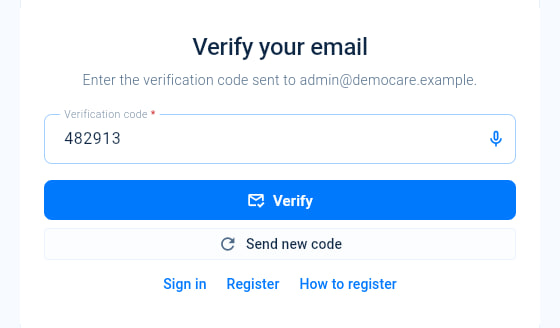
- Check that the email address in the message at the top is the one you registered.
- Type the six-digit code into Verification code.
- Select Verify.
- If the code has expired or never arrived, select Send new code, then enter the newest code.
2.4Wait for approval
Once your email address is verified, the HOSSPI platform team checks the new facility before anyone can sign in. HOSSPI HMS returns you to the sign-in screen and explains that your account is Awaiting approval.
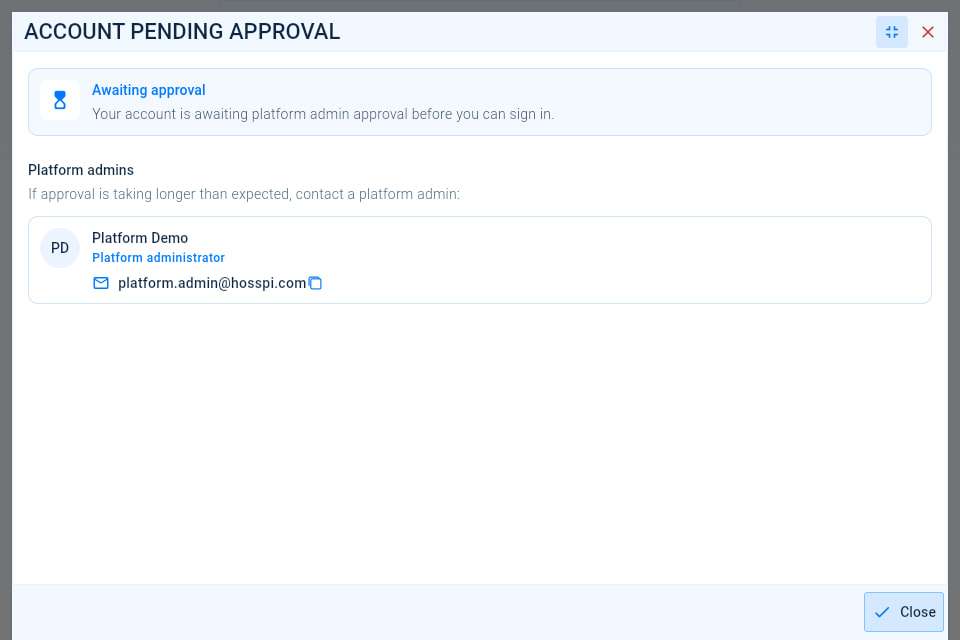
The message lists the platform administrators you can contact if approval takes longer than expected. Select an email address or phone number to copy it, then select Close. If you try to sign in before your account is approved, the same information appears under Account pending approval.
2.5Sign in
Everyone
Go to app.hosspi.com. The sign-in screen, Welcome back, opens.
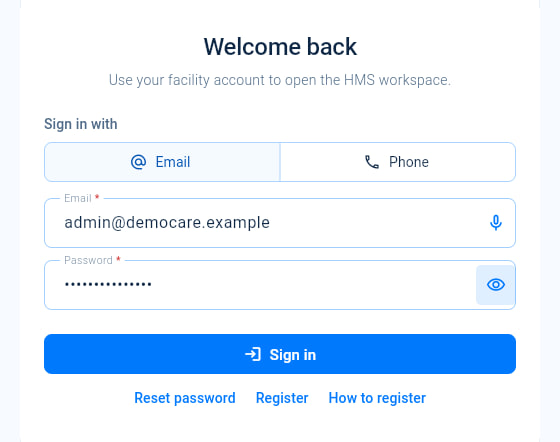
- Under Sign in with, choose Email or Phone.
- Enter the email address, or choose the country and enter the phone number, of your account.
- Enter your Password.
- Select Sign in.
HOSSPI HMS opens your Dashboard, or the page you were trying to open when you were asked to sign in.
| If you see | What to do |
|---|---|
| The sign-in details are not valid. or The password is incorrect for this account. | Check the email address or phone number and the password, including capital letters, and try again. |
| No account for that email or phone. | Check for typing mistakes. If you are a member of staff, ask your facility administrator to create your account. |
| Too many attempts. | Wait until the time shown, then try again. |
| Verify your email | The account has not been verified yet. Enter the code sent to your email address. |
| Account pending approval | The facility is still waiting for HOSSPI approval. Contact one of the platform administrators listed. |
| This facility account has been deactivated. | Contact the platform administrator shown in the message. |
2.6Reset a forgotten password
Everyone
On the sign-in screen, select Reset password. The Reset your password screen opens.
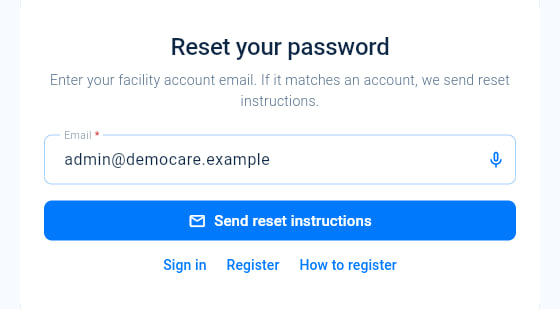
- Enter the Email address of your account.
- Select Send reset instructions. If the address belongs to accounts in more than one workspace, choose the workspace you want to reset.
HOSSPI HMS sends a reset link and a six-digit code to your email address and opens Choose a new password.
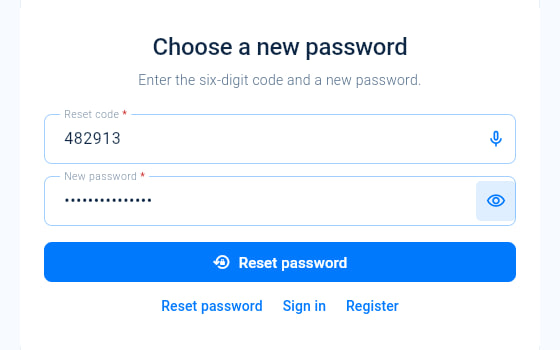
- Enter the six-digit Reset code from the email.
- Enter a New password of at least 8 characters.
- Select Reset password.
The sign-in screen opens with the message Password updated. Sign in with your new password. You can also open the link in the email instead of typing the code; it takes you straight to Choose a new password.
Chapter 3
Finding your way around
The parts of the screen you use every day: the menu, the top bar, your dashboard, your account menu and the tools on every list.
3.1The workspace at a glance
Everyone
After you sign in, HOSSPI HMS opens your Dashboard. Every screen shares the same frame: the menu on the left, the top bar across the top, and the screen you are working on in the middle.
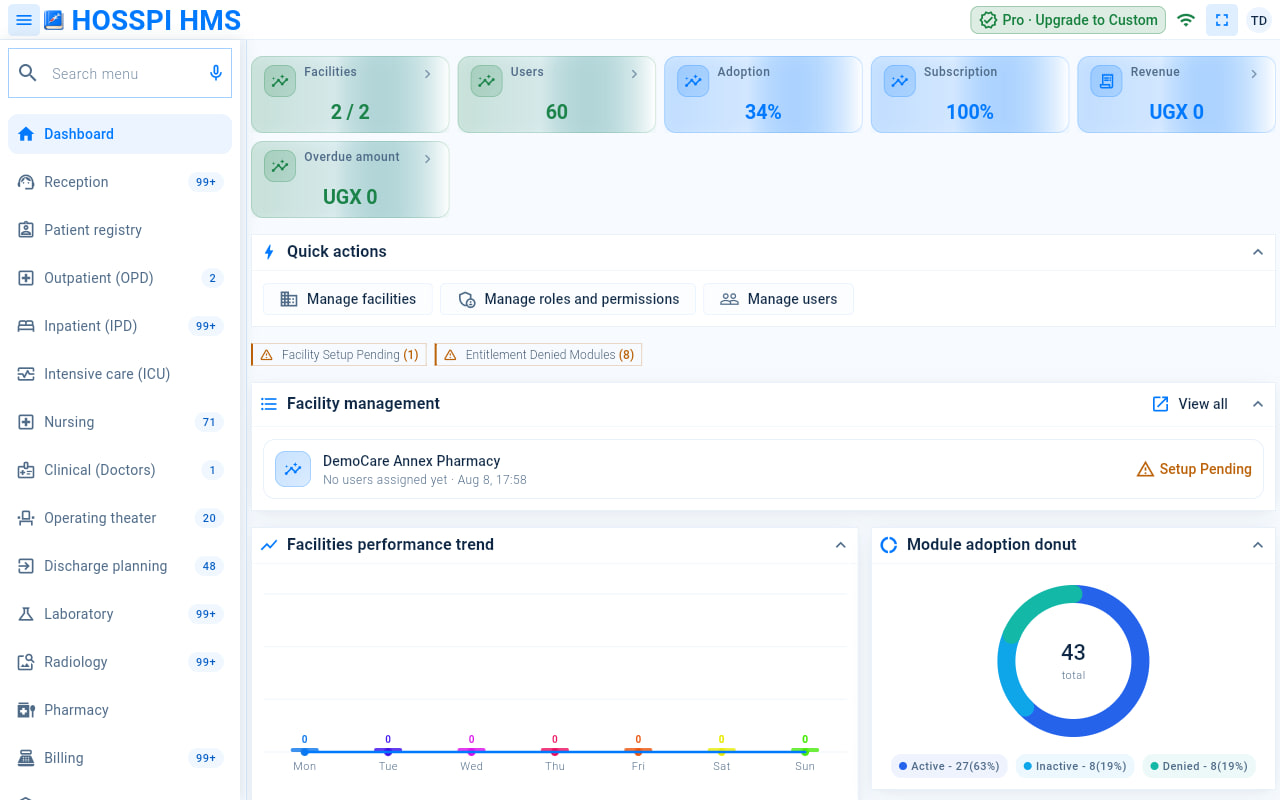
- Toggle sidebar hides or shows the menu to give the page more room.
- Search menu finds any menu item by name. See Find a screen with Search menu.
- The menu lists the areas your role can open, grouped by type of work. A number beside an item shows how many records are waiting there; 99+ means more than 99.
- The subscription badge shows your facility’s package, for example Pro. Administrators select it to renew or change the package. See Renew or change your subscription.
- The connection indicator shows whether HOSSPI HMS is Online or Offline.
- Full screen hides the browser’s toolbars. Select it again to leave full screen.
- Account, shown as your initials, opens your account menu. See Your account menu.
- Summary cards show the figures that matter to your role. Select a card that has an arrow to open the records behind it.
- Quick actions are shortcuts to the tasks you carry out most often.
3.2Find a screen with Search menu
Everyone
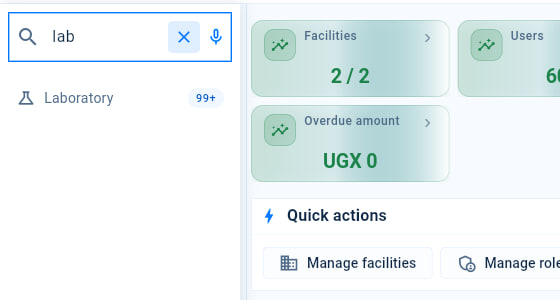
- Select Search menu at the top of the menu and type part of the screen’s name, for example lab.
- Select the matching item. If nothing matches, the menu shows No menu items found. Check the spelling, or ask your administrator whether your role includes that screen.
3.3Your account menu
Everyone
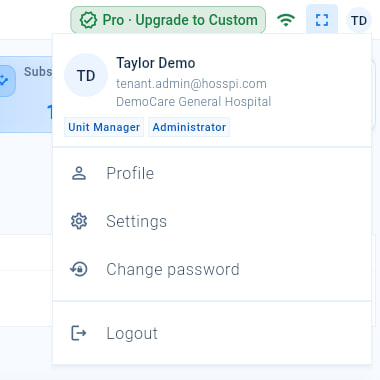
- Select your initials at the top right of the screen. The menu shows your name, email address, facility and roles.
- Profile opens your profile. See Your profile and settings.
- Settings opens your personal settings, such as the theme and accessibility options.
- Change password opens the form for choosing a new password.
- Logout signs you out of HOSSPI HMS.
3.4Working with lists
Everyone
Most screens show records as a list, such as patients, invoices, staff or departments. Every list has the same tools, so once you know one list you know them all.
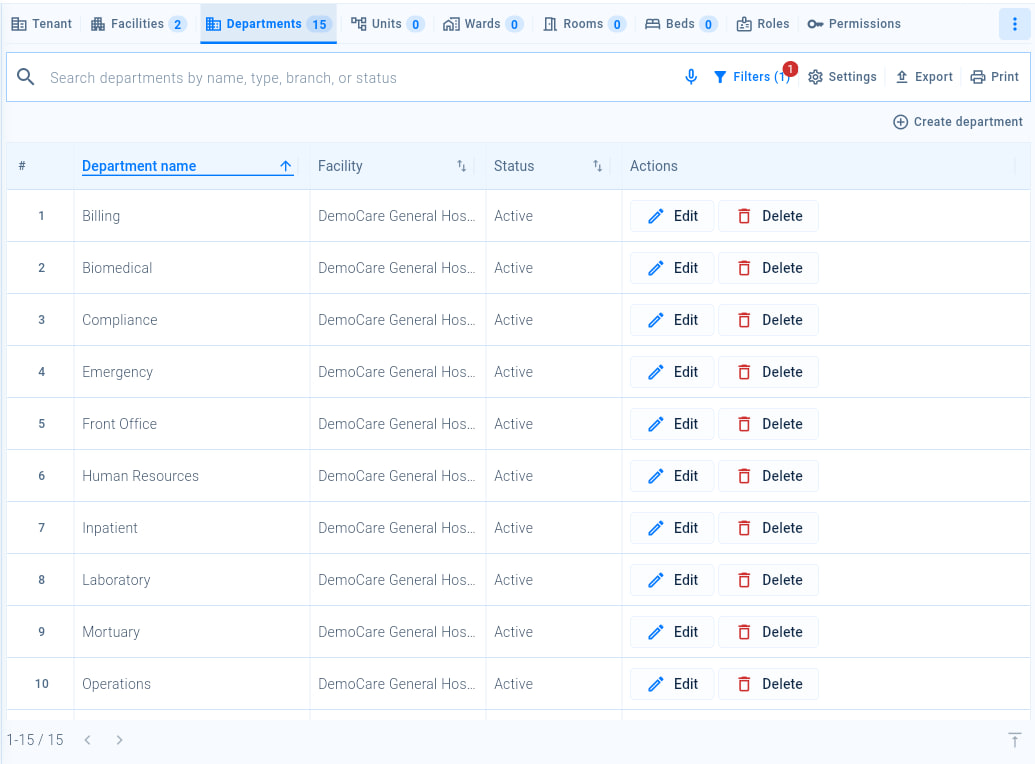
- Type in the search box to show only matching records. The hint in the box tells you what you can search by.
- Filters narrows the list, for example by date, facility or status. Choose the values, then select Apply filters; Clear filters removes them. A number beside Filters shows how many filters are in use.
- Settings chooses the columns the list shows. Tick the columns you want and select Apply columns, or select Reset columns to return to the standard set.
- Export saves the list as a file. Choose the columns and filters to include, then select Export.
- Print prepares the list for printing.
- The create button adds a new record to the list, here Create department.
- Select a column heading to sort by that column, and select it again to reverse the order. Drag the edge of a heading to widen or narrow the column.
- Row actions work on a single record, for example Edit and Delete. On some lists you select the row itself to open the record.
- The count shows which records are on screen and how many there are in total. Scroll down or use the page arrows to see more, and select Go to top to return to the start.
Chapter 4
Setting up your facility
Describe your organisation to HOSSPI HMS: its details, facilities, departments, wards, rooms and beds, the clinical services you offer, your default fees, and your subscription.
4.1Open Tenant setup
Administrators
HOSSPI HMS calls your organisation the tenant. A tenant can run several facilities, such as a hospital and a pharmacy, and each facility is organised into departments, units, wards, rooms and beds.
Select Tenant setup at the bottom of the menu. Facility administrators see Facility setup instead, which covers their own facility.
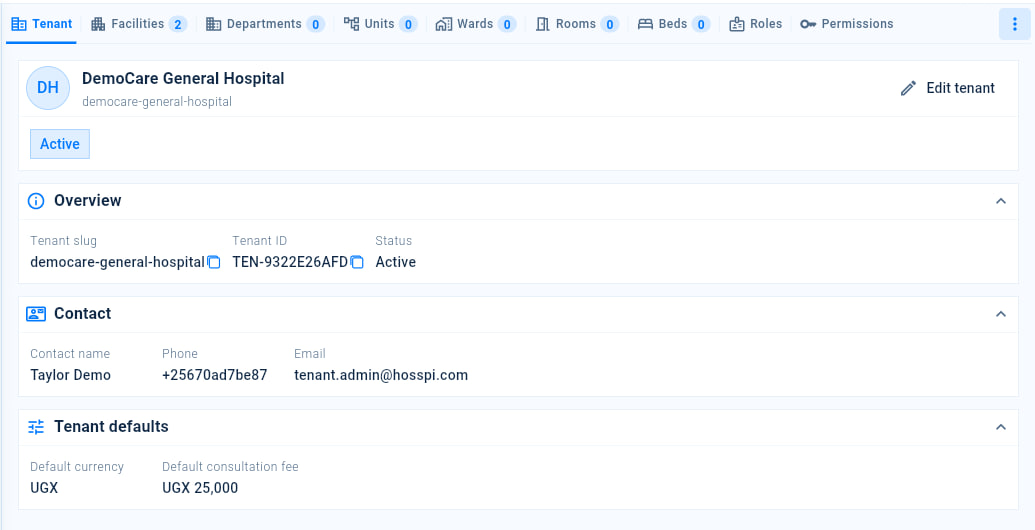
- The tabs cover each part of your organisation, such as Tenant, Facilities, Departments, Units, Wards, Rooms, Beds and Clinical Services. The number on a tab shows how many records it holds.
- More tabs lists the tabs that do not fit on the screen, such as Users, Roles and Permissions.
- Edit tenant changes your organisation’s details. See Update your organisation’s details.
- Tenant defaults shows the currency and consultation fee used when a facility does not set its own.
4.2Update your organisation’s details
Tenant administrators
On the Tenant tab, select Edit tenant.
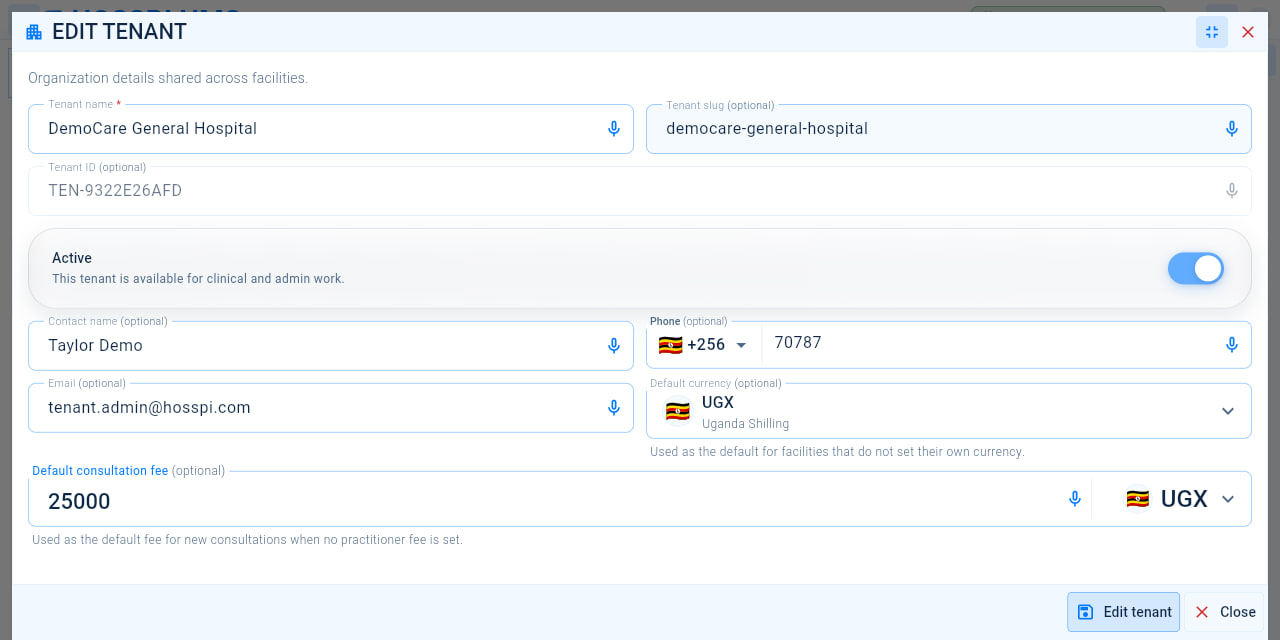
- Check the Tenant name, the name of your organisation as it appears throughout HOSSPI HMS.
- Keep Active switched on. Staff can only work in an active organisation.
- Enter the Contact name, Phone and Email of the person to contact about the organisation.
- Choose the Default currency for prices and amounts at facilities that do not set their own.
- Enter the Default consultation fee, charged for new consultations when no practitioner fee is set.
- Select Edit tenant to save your changes.
4.3Add or edit a facility
Tenant administrators
Select the Facilities tab, then Create facility. To change a facility that already exists, select Edit on its row instead.
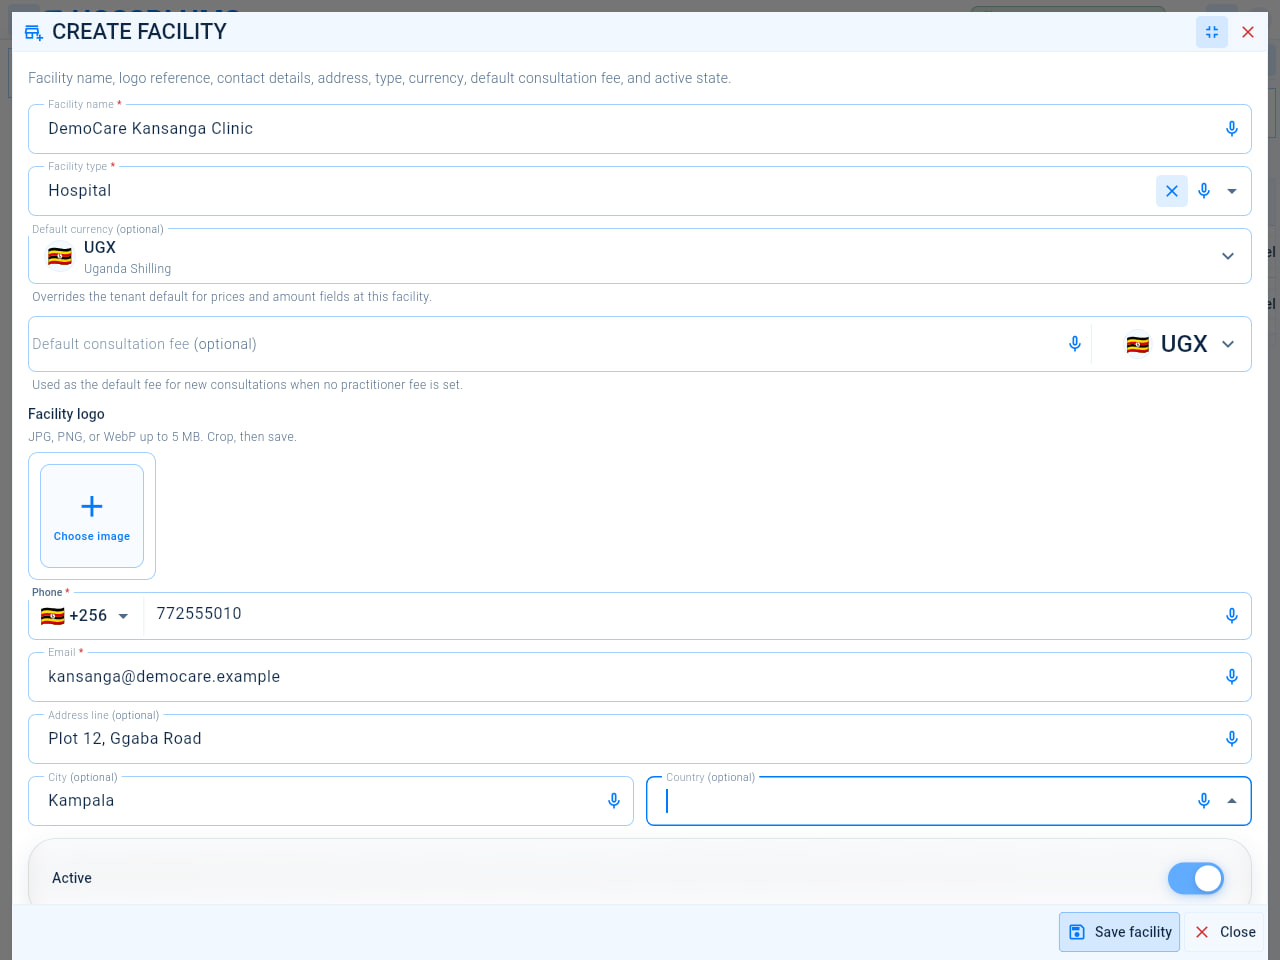
- Enter the Facility name.
- Choose the Facility type.
- Choose a Default currency if this facility prices services in a different currency from the tenant default.
- Enter a Default consultation fee if this facility charges a different fee from the tenant default.
- Select Choose image to add the facility’s logo: a JPG, PNG or WebP image of up to 5 MB. Crop it, then save.
- Enter the facility’s Phone number.
- Enter the facility’s Email address.
- Add the Address line, City and Country if you wish.
- Select Save facility.
4.4Add departments and units
Administrators
Departments group your services, for example Outpatient, Laboratory or Pharmacy. Units are the teams inside a department. Select the Departments tab, then Create department.
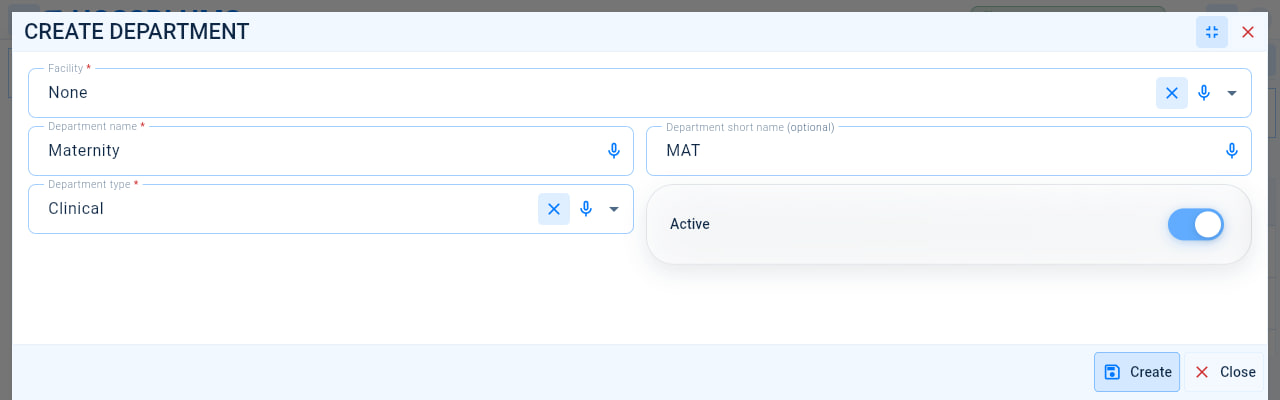
- Enter the Department name.
- Enter a Department short name if you want an abbreviation for places where space is limited.
- Choose the Department type.
- Keep Active switched on so the department can be used.
- Select Create.
To add a unit, select the Units tab, then Create unit. Complete the form, enter the Unit name, keep Active switched on and select Create.
4.5Add wards, rooms and beds
Administrators
Wards, rooms and beds describe where patients stay. Admission and ward screens allocate patients to these beds, so set them up before you admit patients. Select the Wards tab, then Create ward.
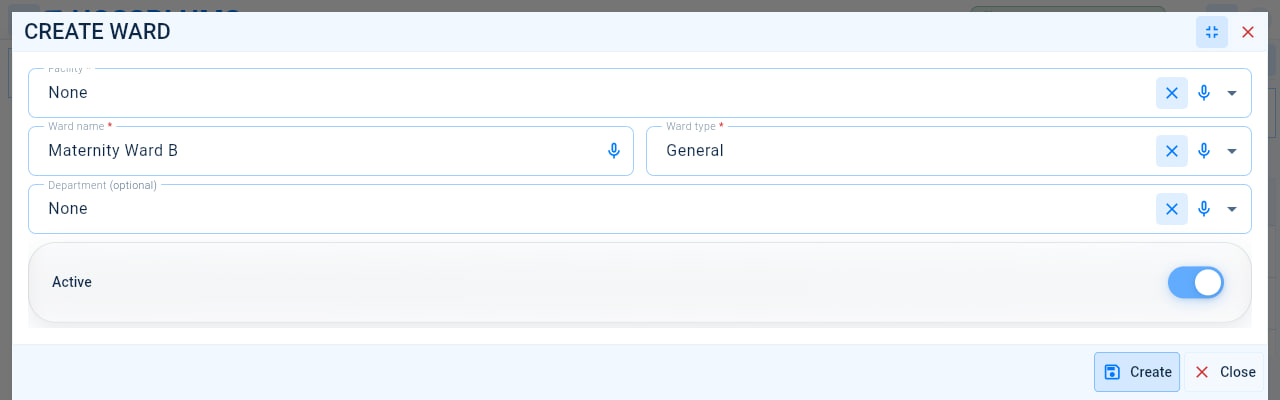
- Choose the Facility the ward belongs to.
- Enter the Ward name.
- Choose the Ward type, for example General, ICU, Maternity, Pediatric or Surgical.
- Choose the Department that runs the ward, if you wish.
- Keep Active switched on.
- Select Create.
To add a room, select the Rooms tab, then Create room. Choose the Facility and enter the Room name. Choose the Ward the room is on, or leave it unassigned for an outpatient or department consulting room. Add the Floor if you wish, then select Create.
To add a bed, select the Beds tab, then Create bed.
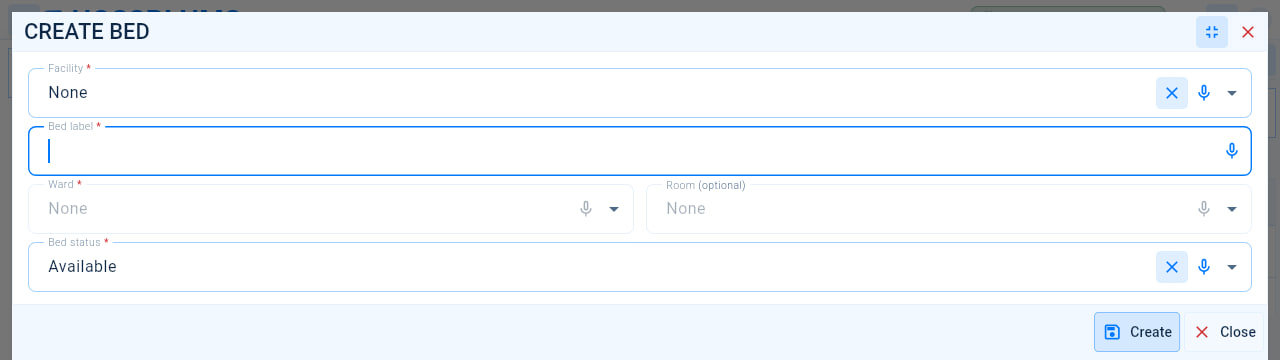
- Choose the Facility.
- Enter the Bed label shown on the ward, for example B12.
- Choose the Ward the bed is on.
- Choose the Room, if the bed is in one.
- Choose the Bed status. New beds are usually Available.
- Select Create.
| Bed status | Meaning |
|---|---|
| Available | Ready for a patient. |
| Occupied | A patient is using the bed. |
| Reserved | Held for a patient who is expected. |
| Cleaning | Being cleaned before the next patient. |
| Maintenance | Out of use while it is repaired. |
| Blocked | Not to be used. |
4.6Choose the clinical services you offer
Administrators
The Clinical Services tab holds the catalogues that clinicians choose from when they order investigations or record a diagnosis. HOSSPI HMS comes with ready-made catalogues; you decide which items your facility offers. Open More tabs if Clinical Services is not visible.
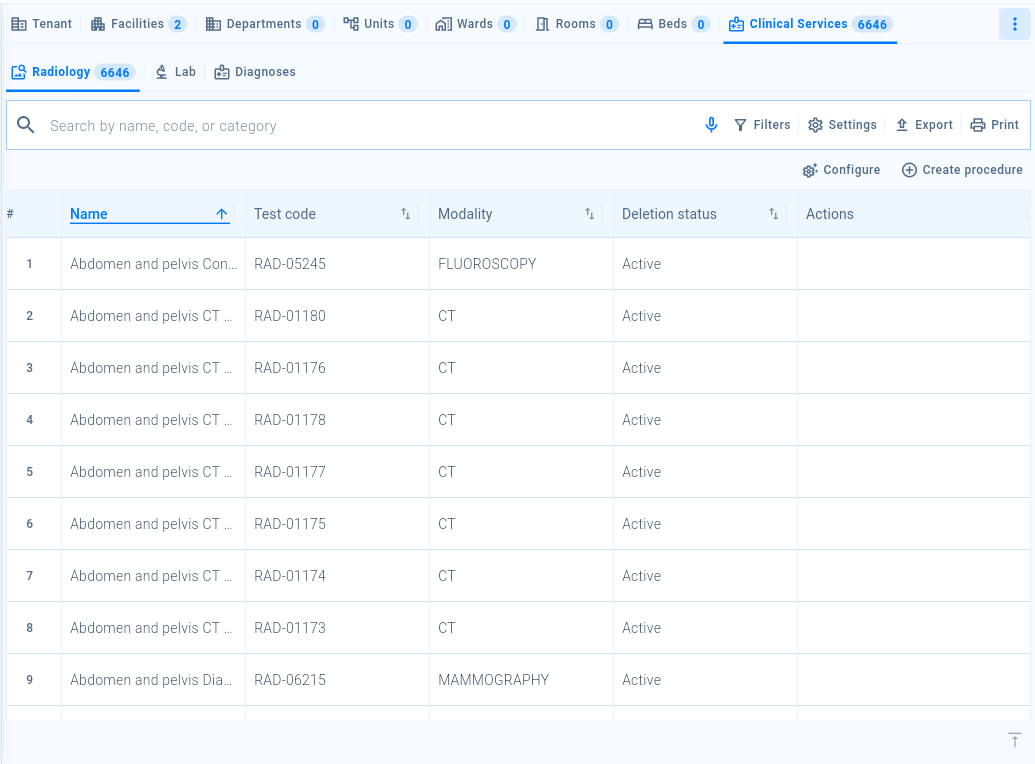
- Choose a catalogue: Radiology, Lab or Diagnoses.
- Search the catalogue by name, code or category.
- Configure lists the catalogue so you can choose the items this facility offers. Tick the items and select Next, enter a Unit price for each item you chose, then select Next again to finish.
- Create procedure adds an item that is not in the catalogue. Enter its Name, an optional Test code and the Modality, then select Save. On the other catalogues this button is named after the kind of item it adds.
4.7Set default consultation fees and currency
Administrators
Open Settings and select the Configuration tab.
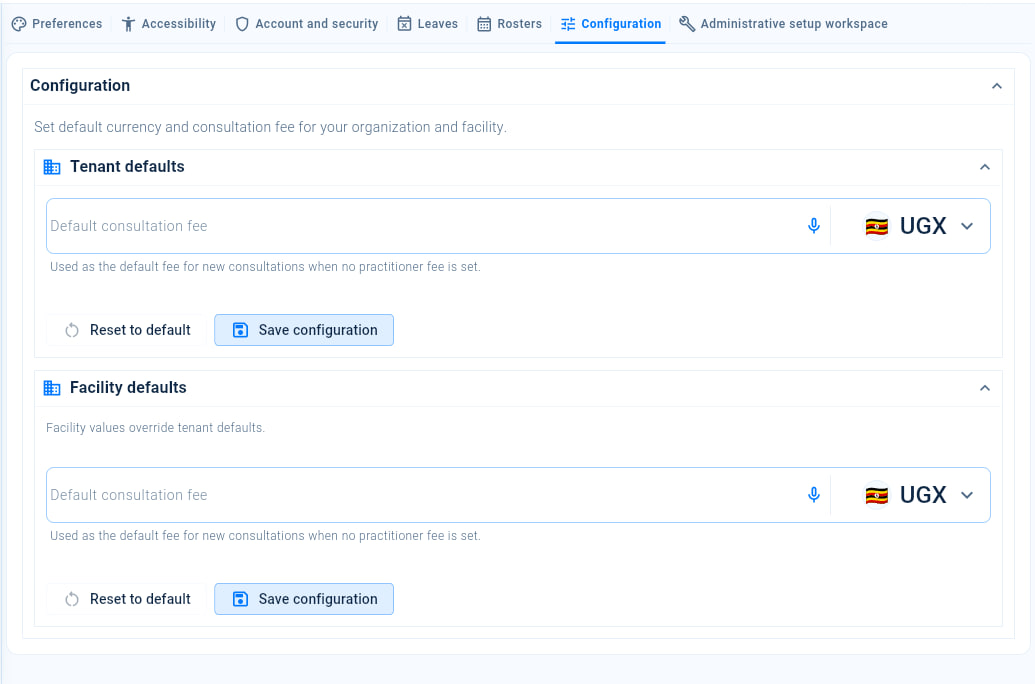
- Under Tenant defaults, enter the Default consultation fee for the whole organisation.
- Choose the currency beside the fee.
- Select Save configuration.
- Under Facility defaults, set a different fee or currency for the current facility if it charges differently, then select its Save configuration. Facility values override the tenant defaults.
- Reset to default clears the saved values in that section, after you confirm. Once a facility’s values are cleared, the tenant defaults apply to it again.
4.8Renew or change your subscription
Administrators
Your subscription package decides which areas of HOSSPI HMS your facility can use, and how many users and facilities it can have. Select the package badge at the top of the screen, for example Pro, to open the subscription window.
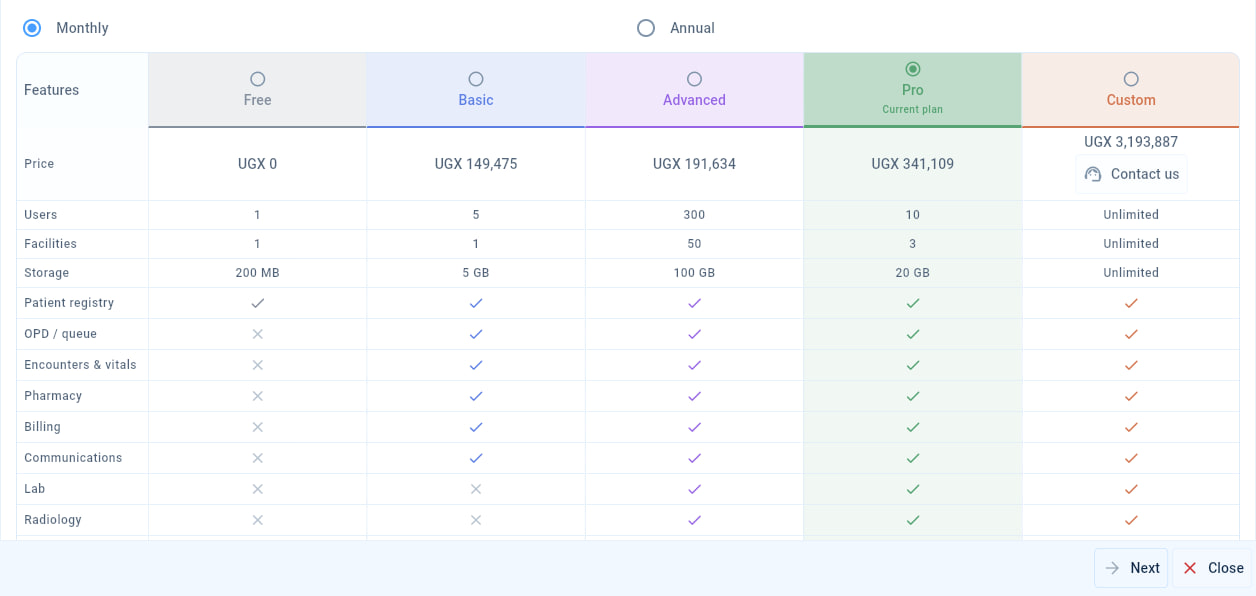
- Choose Monthly or Annual billing.
- Compare the Free, Basic, Advanced, Pro and Custom packages by price, users, facilities, storage and the areas each one includes, then select the package you want. Your present package is marked Current plan.
- For Custom, select Contact us to agree pricing and contents with the HOSSPI team.
- Select Next and follow the steps: choose how you will pay, make the payment using the details shown, then send the payment reference and, if you have it, proof of payment.
The HOSSPI team checks the payment and activates the package. Until then, the window shows Activation request in progress and package changes are locked. Select Cancel request if you need to choose a different package. If a request is rejected, the window gives the reason, and you can select Contact admins.
Chapter 5
Users, roles and permissions
Give every member of staff their own account, control what they can open and do through roles, and keep access up to date as people join, change jobs and leave.
5.1How access works
Administrators
Every member of staff signs in with their own account. What each person can open and do is decided by three things together:
- Your subscription package sets which areas of HOSSPI HMS your organisation can use at all.
- Roles bundle the permissions a job needs, such as Receptionist, Nurse or Accountant. HOSSPI HMS comes with ready-made roles, and you can create your own.
- Direct permissions give one extra permission to one person, for exceptions.
Everything a person’s roles and direct permissions allow, within your package, makes up their effective permissions.
5.2Open access administration
Administrators
On your Dashboard, select Manage users or Manage roles and permissions under Quick actions. The same lists are also on the Users and Roles tabs of Tenant setup.
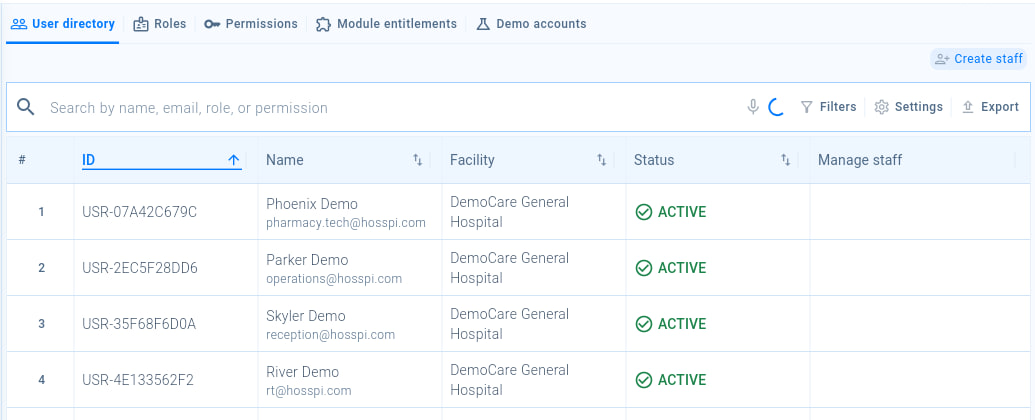
- The tabs: User directory lists staff accounts, Roles lists roles, Permissions describes every permission, and Module entitlements shows the areas your package includes.
- Create staff adds a staff account. See Create a staff account.
- Search by name, email address, role or permission.
- Select a staff member’s row to open their record.
5.3Create a staff account
Administrators
On the User directory tab, select Create staff.
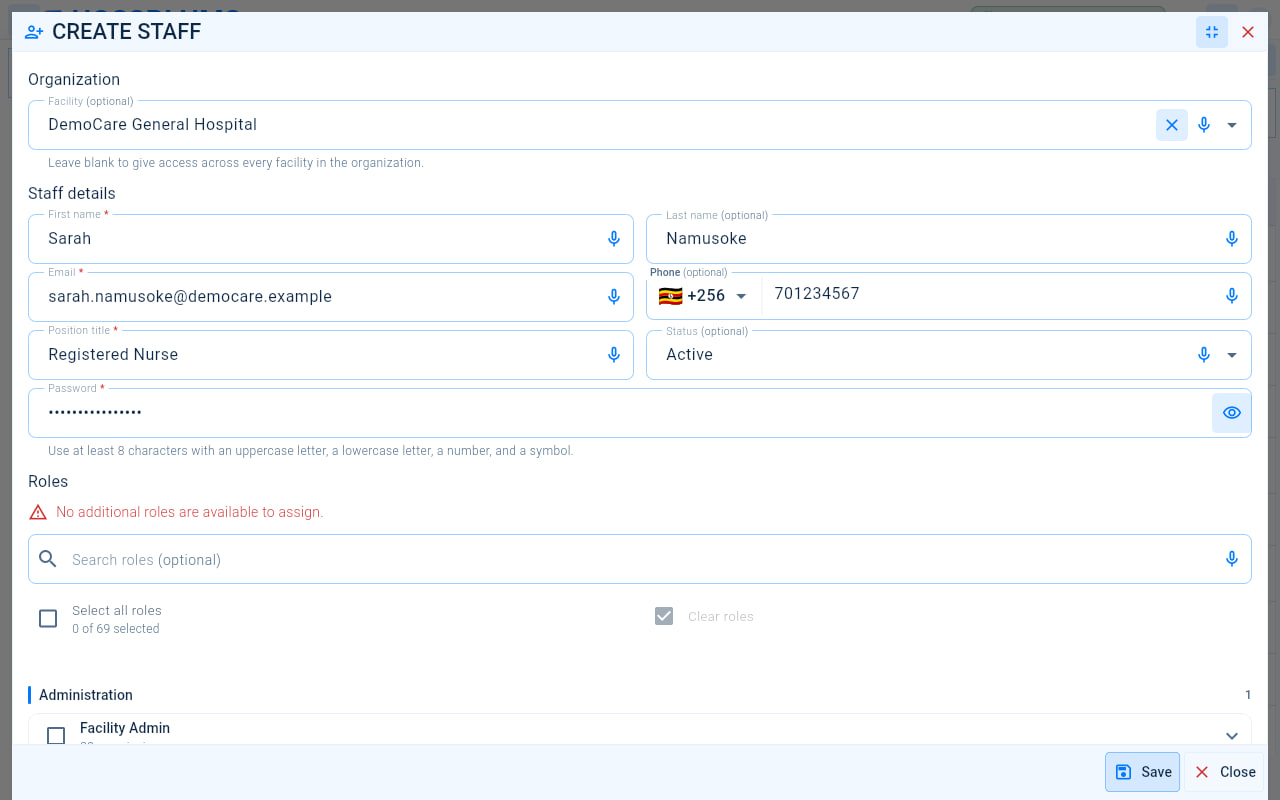
- Choose the Facility the person works at. Leave it blank to give them access across every facility in the organisation.
- Enter their First name and, if you wish, their Last name.
- Enter their Email address. They sign in with it.
- Enter their Phone number if you wish. They can sign in with it too.
- Enter their Position title, for example Registered Nurse.
- Leave Status as Active so they can sign in.
- Set a starting Password of at least 8 characters, with an upper-case letter, a lower-case letter, a number and a symbol.
- When you have chosen the person’s roles, as described below, select Save.
Scroll down to Roles in the same form.
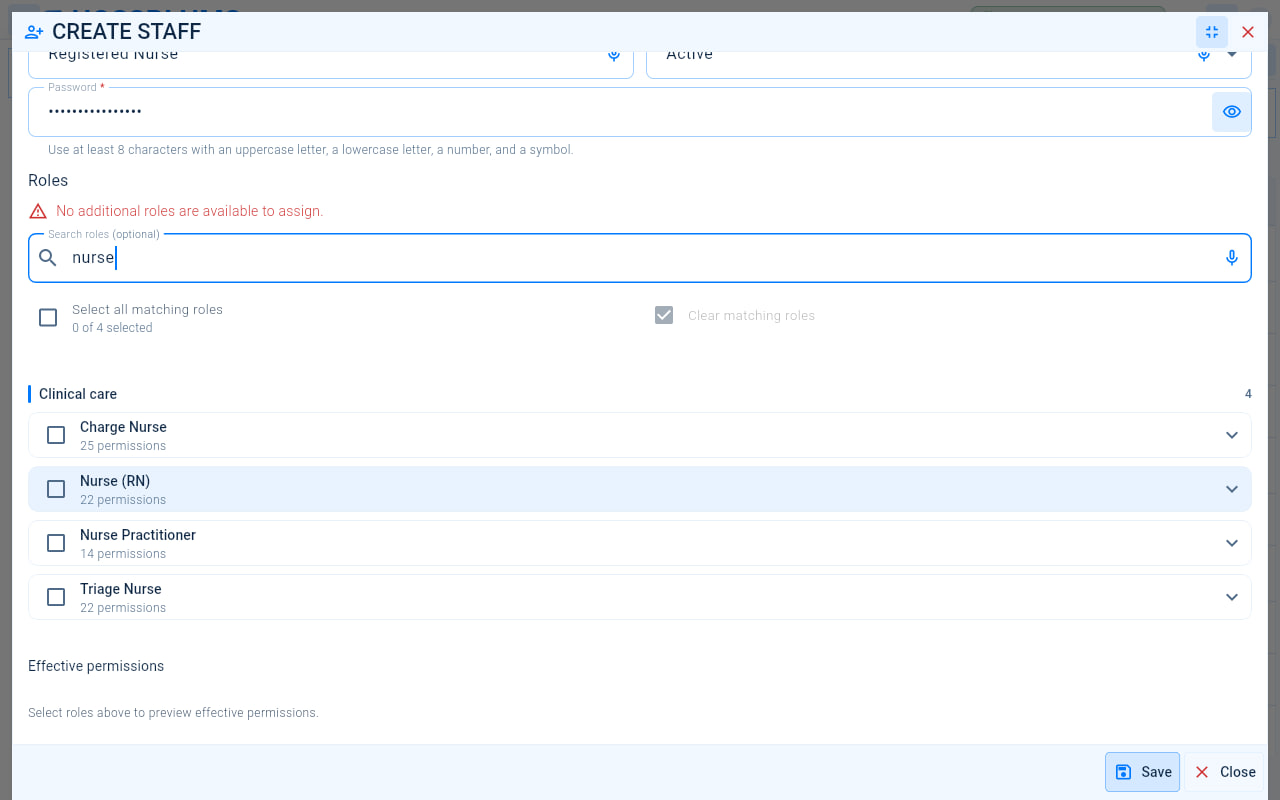
- Type part of a role’s name in Search roles, for example nurse. Roles are grouped by area, such as Administration and Clinical care.
- Tick each role the person needs. The figure under each role is the number of permissions it grants, and Effective permissions below previews everything the chosen roles allow together.
- Select Save.
5.4Review and change a staff account
Administrators
Select a staff member in the User directory to open their record.
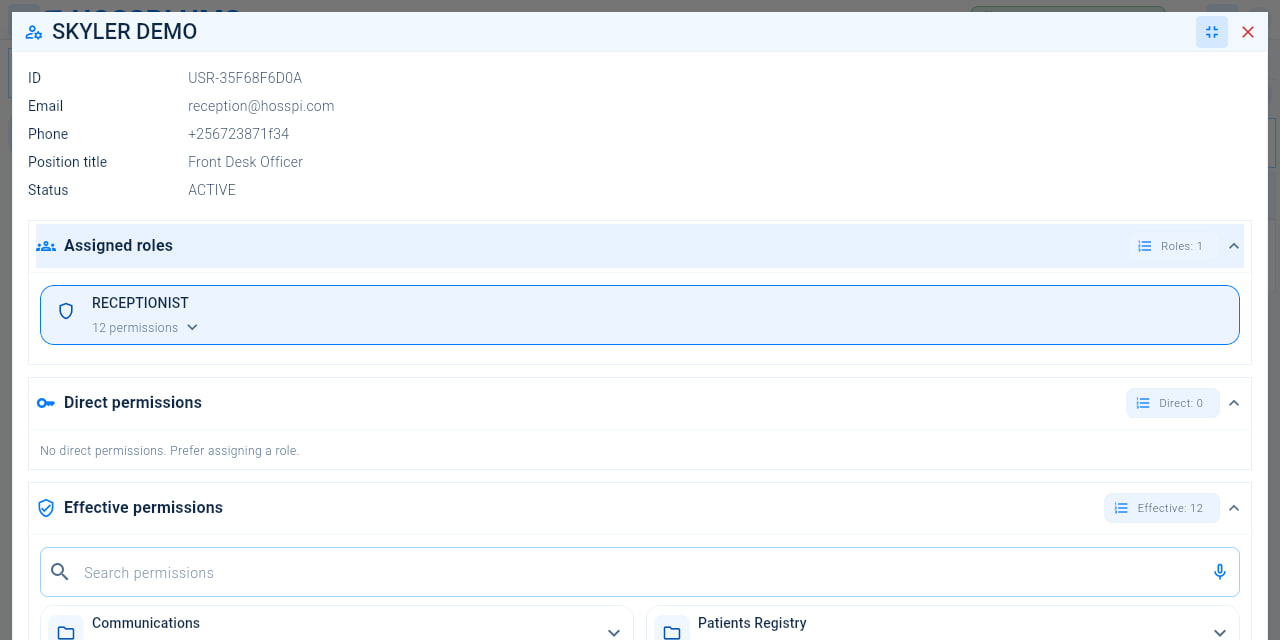
- The account details: ID, email address, phone, position title and status.
- Assigned roles lists the person’s roles and how many permissions each one grants. Select Add role to assign another role, or remove a role to take away its permissions.
- Direct permissions lists permissions given to this person alone. Select Add permission only for a one-off exception.
- Effective permissions shows everything the person can do, grouped by area. Search it to check whether they have a particular permission.
Depending on the account, these actions are also available:
| Action | What it does |
|---|---|
| Edit staff | Change the person’s name, contact details, position title or status. |
| Deactivate staff | Stop the person signing in, for example when they leave. Activate staff gives access back. |
| Send password reset email | Email the person a single-use link to choose a new password. Their current password keeps working until they use the link, and all their signed-in sessions end when they do. |
| Delete staff | Remove an account created by mistake. Deactivate staff who leave instead. |
| Open HR profile | Open the person’s staff profile in Human resources. |
5.5Create a custom role
Administrators
Create a role when none of the ready-made roles fits a job. Select the Roles tab.
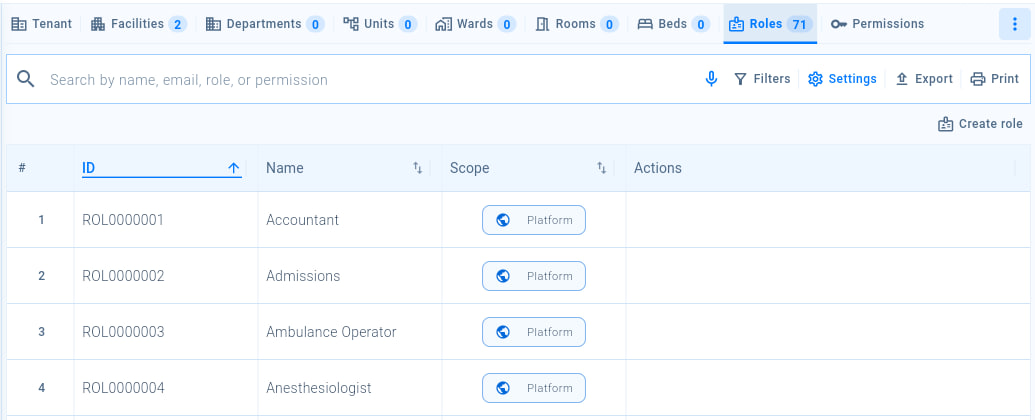
- Select Create role to start a new role.
- Select a role to see the permissions it grants and the staff who have it. Select Edit permissions to change what it grants.
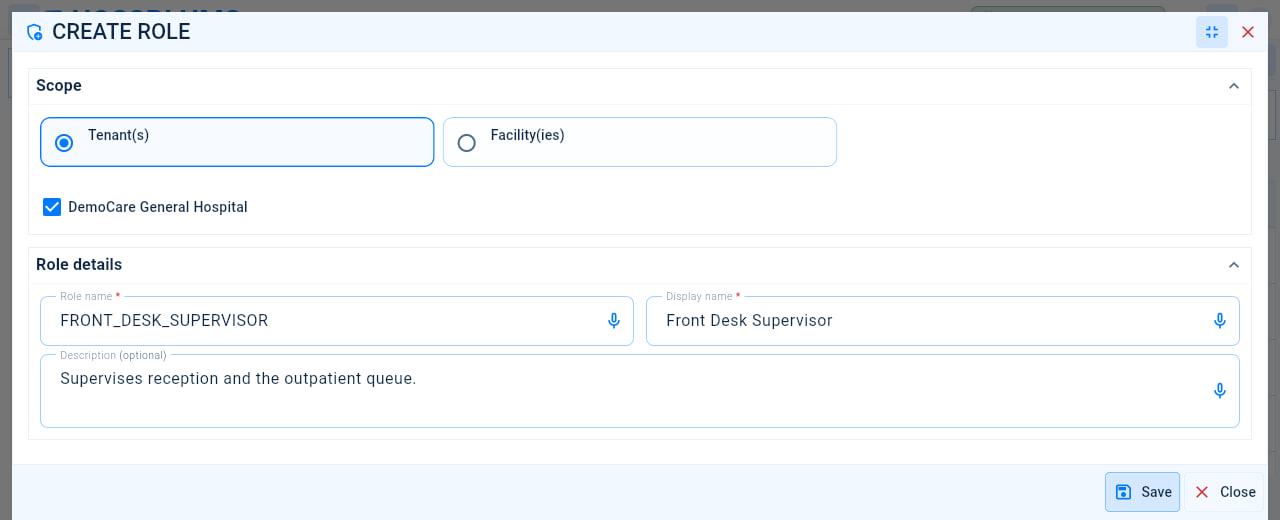
- Under Scope, choose Tenant(s) for a role used across the organisation, or Facility(ies) for a role used at particular facilities.
- Tick the organisation or facilities the role applies to.
- Enter a Role name: a short, unique name such as FRONT_DESK_SUPERVISOR.
- Enter the Display name that staff see.
- Describe what the role is for in Description.
- Select Save. A new role grants no permissions yet: select it in the list, then select Edit permissions to choose what it allows.
5.6Look up permissions and module entitlements
Administrators
The Permissions tab lists every permission with its name, description and code, for example Patient — Read, which allows read access to patient records. Search it when you need to know exactly what a permission allows.
The Module entitlements tab shows the areas of HOSSPI HMS that your subscription package includes. If staff need an area your package does not include, see Renew or change your subscription.
Chapter 6
Your profile and settings
Settings that belong to you: the theme, accessibility options, your profile and password, leave requests and your roster.
6.1Open Settings
Everyone
Select Settings in the menu, or select your initials at the top right and then Settings. The tabs you see depend on your role.
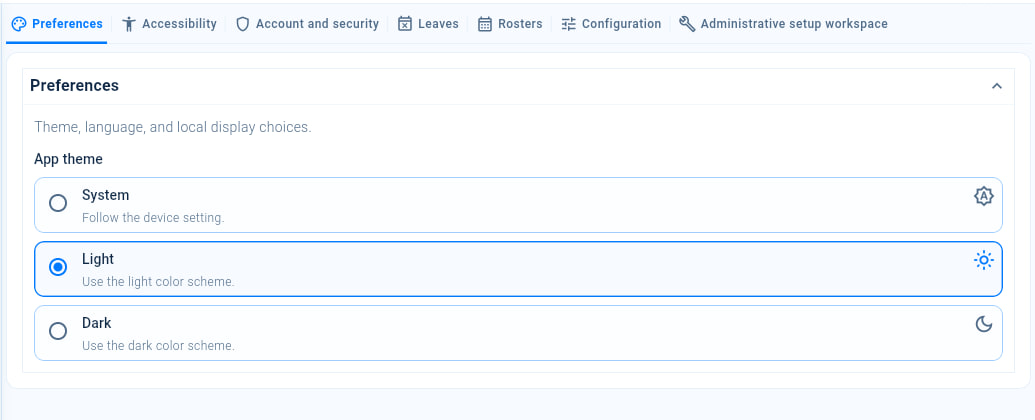
- The tabs group your settings, for example Preferences, Accessibility, Account and security, Leaves and Rosters. Select a tab to open it.
- Under App theme, choose System to follow your device’s setting, Light or Dark.
6.2Make the screen easier to read
Everyone
Select the Accessibility tab.
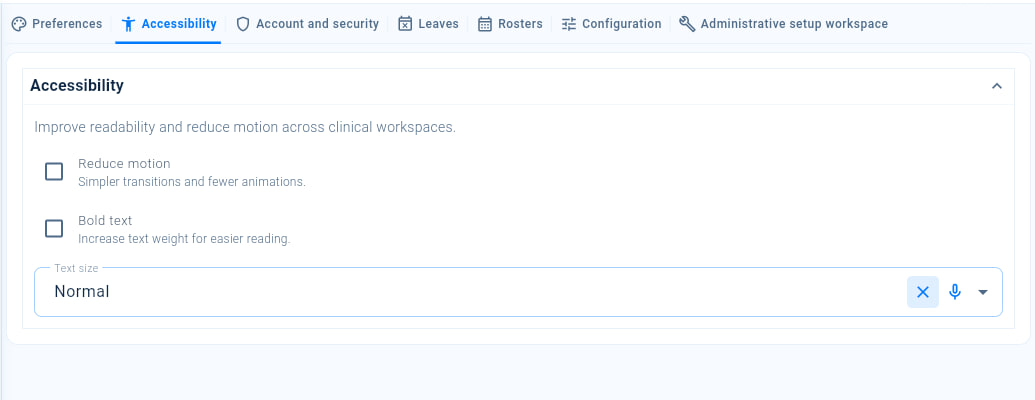
- Switch on Reduce motion for simpler transitions and fewer animations.
- Switch on Bold text to make text heavier and easier to read.
- Choose a Text size to make text larger or smaller throughout HOSSPI HMS.
6.3View and update your profile
Everyone
Select your initials and then Profile, or select the Account and security tab in Settings.
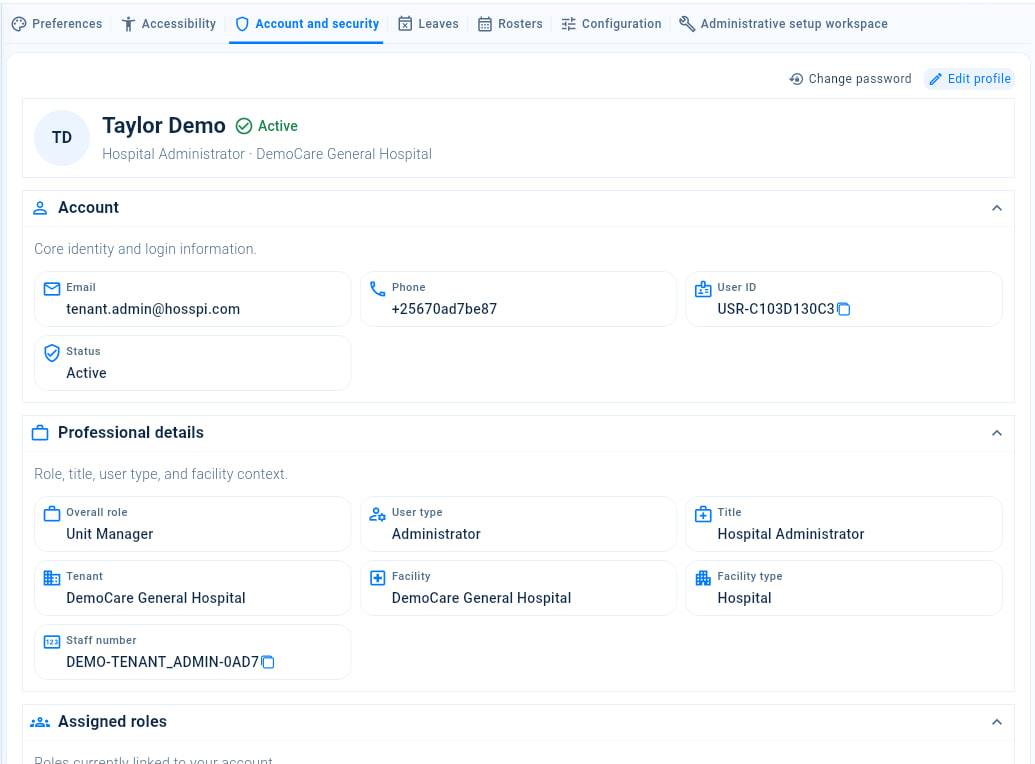
- Change password lets you choose a new password. See Change your password.
- Edit profile updates your First name, Middle name, Last name and Gender. Select Save when you have finished.
- Account shows your email address, phone number, user ID and account status.
- Professional details shows your role, user type, title, organisation, facility and staff number.
- Assigned roles lists the roles on your account, which decide what you can open and do.
6.4Change your password
Everyone
Select your initials and then Change password, or select Change password on the Account and security tab.
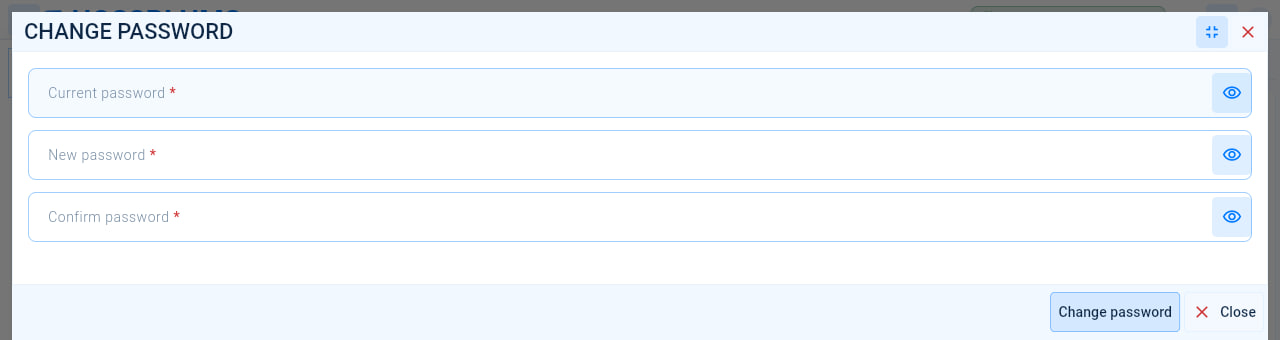
- Enter your Current password.
- Enter a New password of at least 8 characters. Mixing upper- and lower-case letters, numbers and symbols makes it harder to guess.
- Enter the new password again in Confirm password.
- Select Change password.
If you are asked to sign in again, use your new password. Forgotten your current password? Sign out and follow Reset a forgotten password.
6.5Request leave
Staff
Select the Leaves tab in Settings, then Request leave.
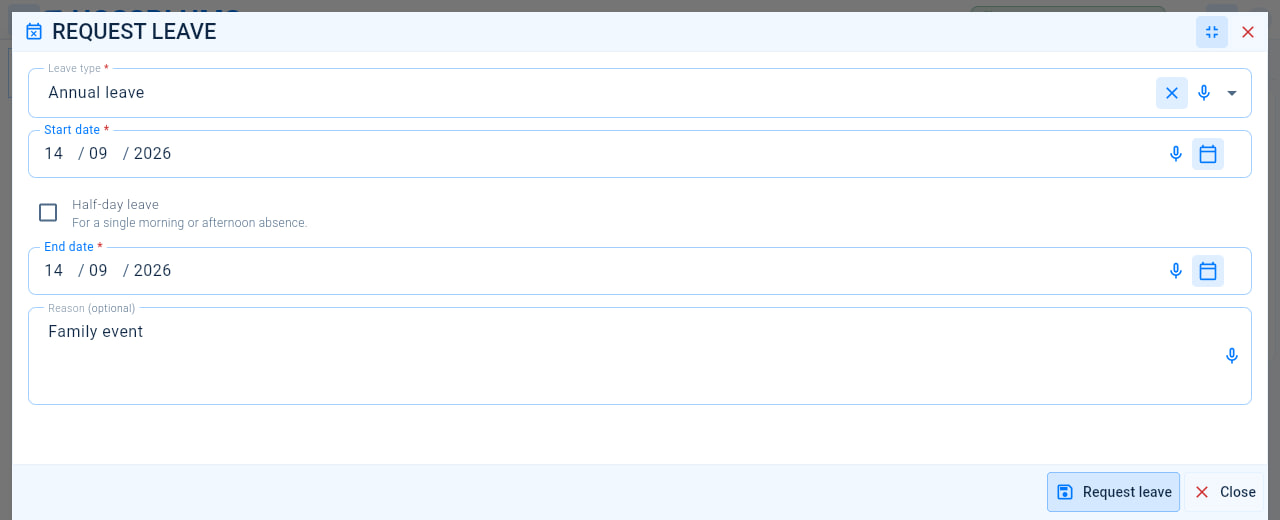
- Choose the Leave type.
- Enter the Start date.
- Tick Half-day leave if you will be away for a single morning or afternoon.
- Enter the End date.
- Add a Reason if you wish.
- Select Request leave.
Your request joins the list on the Leaves tab with its status. Use All, Pending, Approved, Rejected and Cancelled to choose which requests you see.
6.6View your roster
Staff
Select the Rosters tab in Settings to see the shifts assigned to you. Choose the period to show: Today, Tomorrow, This week, This month, Last month, Next month or Next 3 months, or select Custom range and pick your own dates.
Chapter 7
Patient registry
Every patient has one record in HOSSPI HMS. Find patients, register new ones, and keep their details, allergies and contacts up to date.
7.1Find a patient
Reception and clinical staff
Select Patient registry in the menu. Always search for a patient before registering them, so that nobody ends up with two records.
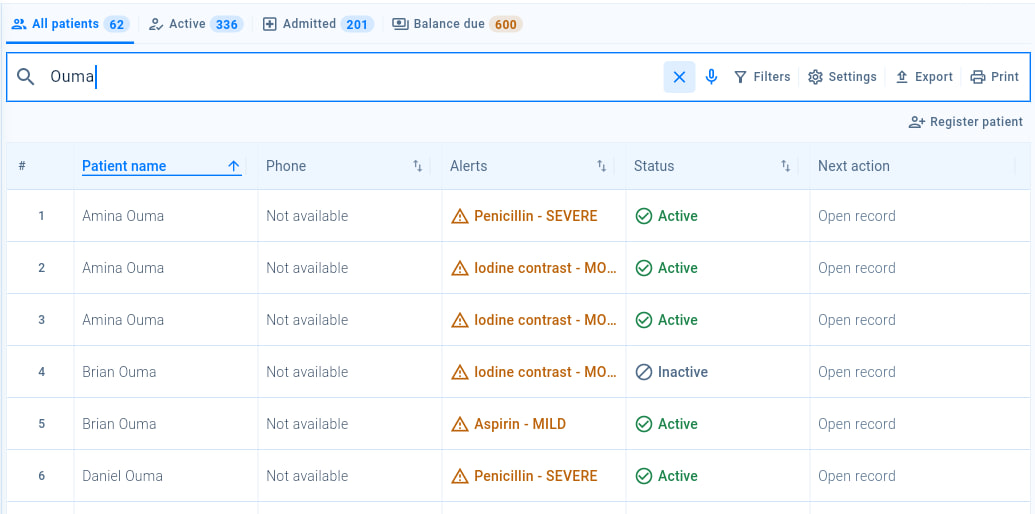
- Choose a tab: All patients, Active, Admitted, or Balance due for patients who still owe money. The number on each tab shows how many patients it holds.
- Search by name, phone number, email address, identifier or contact.
- Filters, Settings, Export and Print work as they do on every list. See Working with lists.
- Register patient adds someone who is not in HOSSPI HMS yet. See Register a new patient.
- Select a patient to open their record. The Alerts column warns of allergies, such as Aspirin - MILD.
7.2Register a new patient
Reception staff
Select Register patient. You can also register a patient while booking an appointment or starting an outpatient visit.
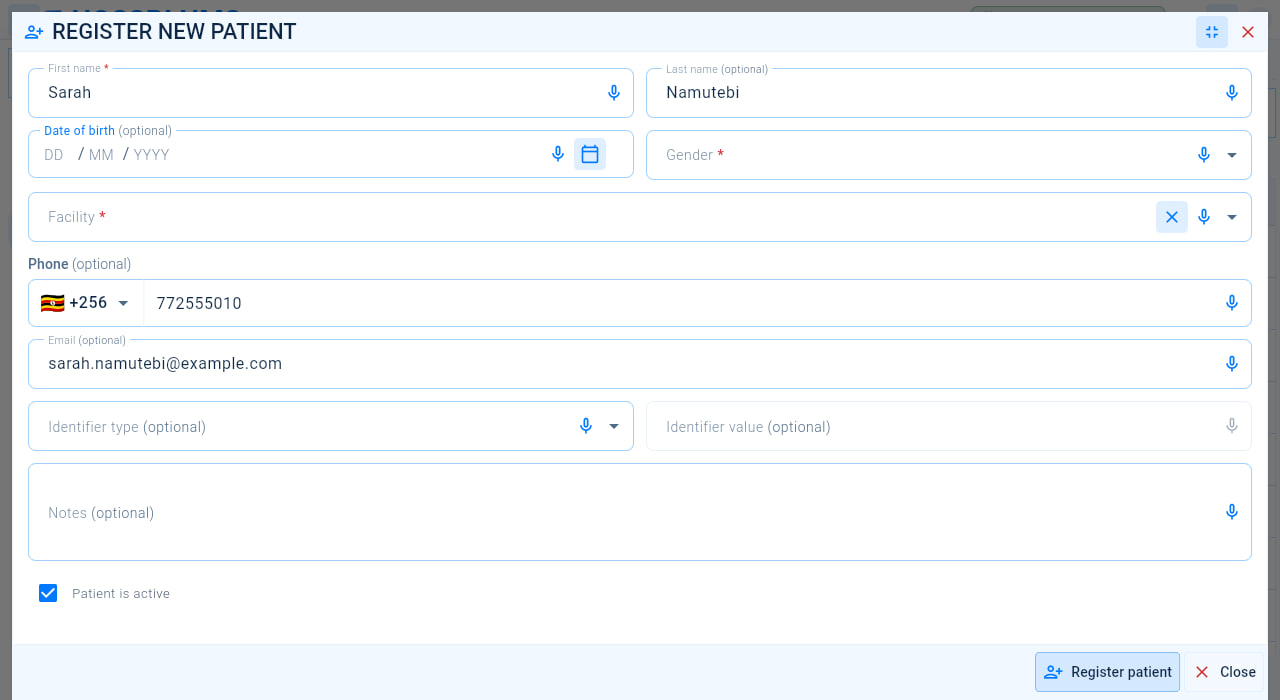
- Enter the patient’s First name and, if known, their Last name.
- Enter the Date of birth, or select the calendar to pick it. HOSSPI HMS works out the patient’s age from it.
- Choose the patient’s Gender.
- Choose the Facility registering the patient.
- Choose the country code and enter the patient’s Phone number.
- Enter the patient’s Email address, if they have one.
- To record an identity document or another number, choose the Identifier type, then enter the Identifier value.
- Add any Notes that staff should know.
- Keep Patient is active ticked.
- Select Register patient.
7.3Work with a patient record
Reception and clinical staff
Select a patient in the registry to open Patient details.
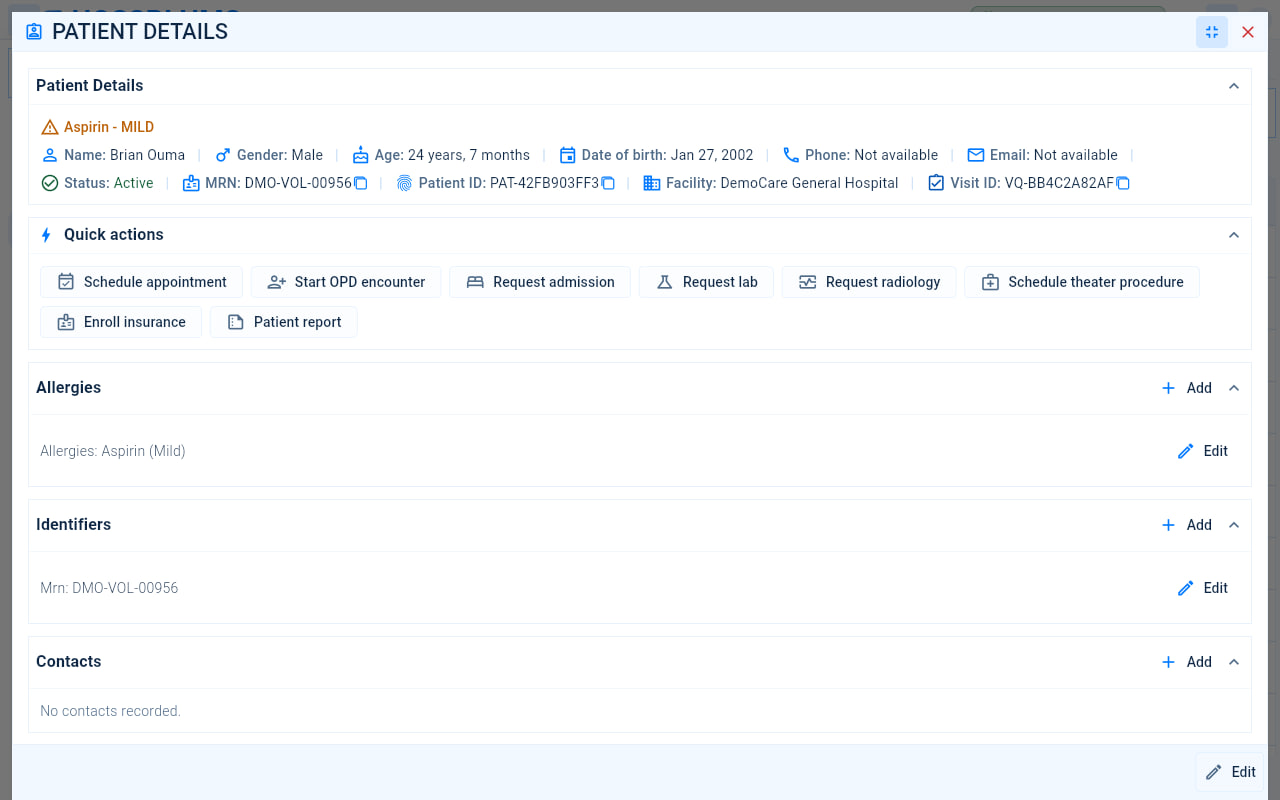
- Patient Details sums up the patient: allergy alerts first, then their name, gender, age, date of birth, contact details, status, and identifiers such as the MRN and Patient ID. Select the copy icon beside an identifier to copy it.
- Quick actions start the patient’s next step: Schedule appointment, Start OPD encounter, Request admission, Request lab, Request radiology, Schedule theater procedure, Enroll insurance and Patient report.
- Select Add in a section, such as Allergies, to record something new.
- Select Edit beside an entry to correct it.
- Select Edit at the bottom of the window to change the patient’s registration details.
Scroll down for the other sections: Identifiers, Contacts, Guardians, Medical history, Consents, and the Timeline, which lists the patient’s visits, appointments, referrals and other events, newest first.
7.4Print a patient report
Reception and clinical staff
Open the patient’s record and select Patient report under Quick actions.
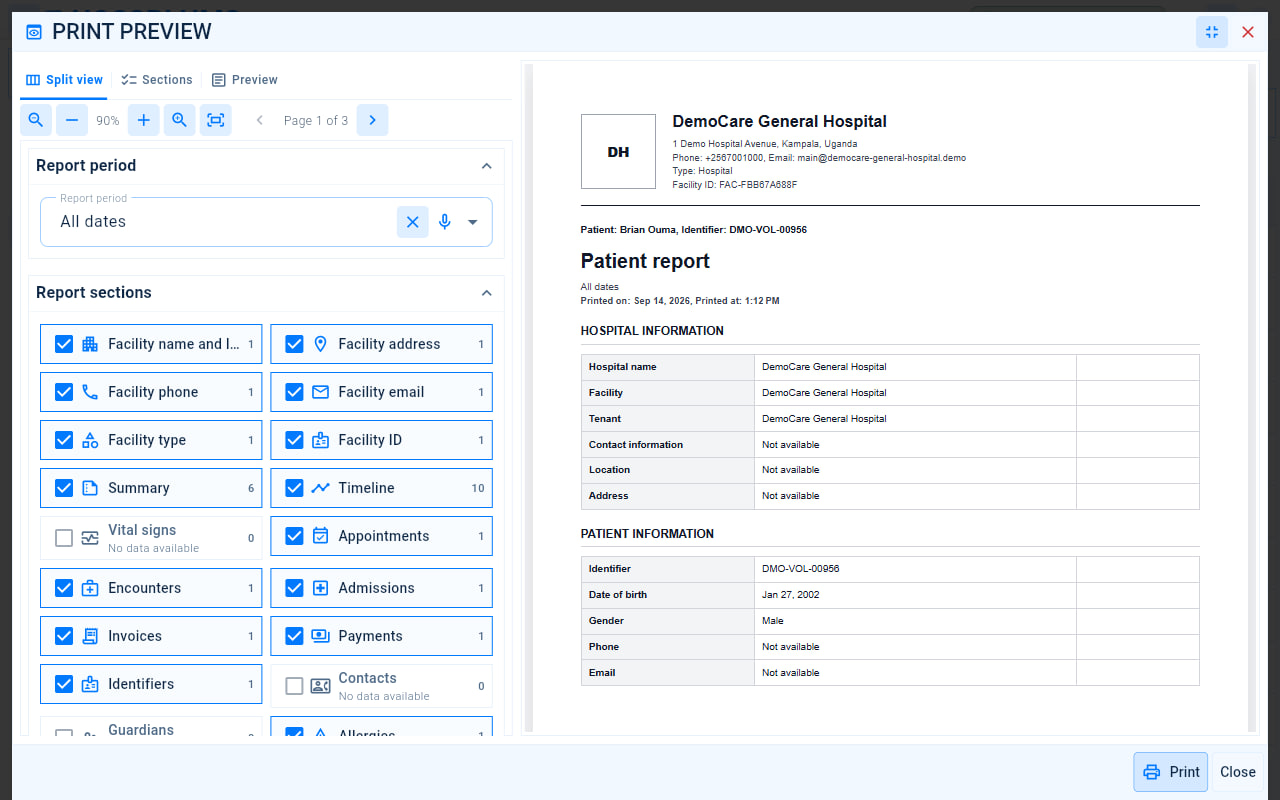
- Choose how to view the window: Split view, Sections or Preview.
- Choose the Report period, or keep All dates.
- Tick the Report sections to include, such as Summary, Timeline, Encounters, Invoices and Allergies. The number on each section shows how many entries it holds; sections with no data are left out.
- Check the report in the preview. The zoom and page buttons at the top help you read it closely.
- Select Print.
Chapter 8
Reception and appointments
Welcome patients and visitors at the front desk: book appointments, register new patients and keep the desk queue moving.
8.1The reception desk
Reception staff
Select Reception in the menu.
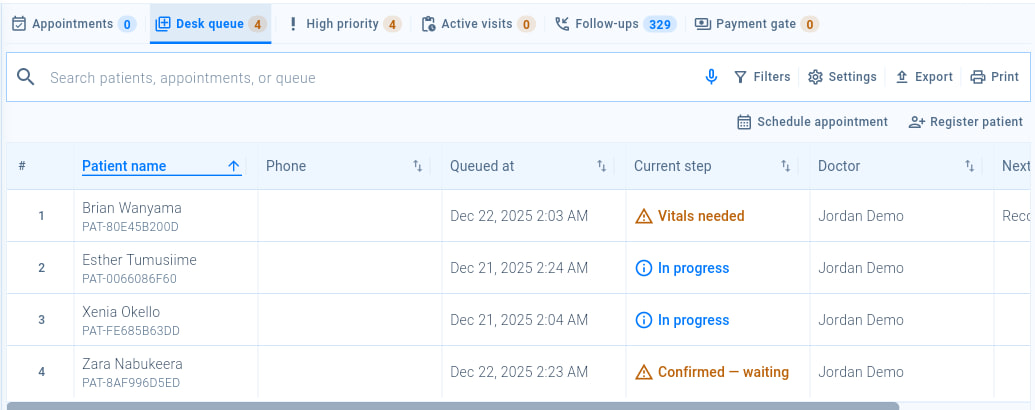
- The tabs sort the desk’s work, as described in the table below.
- Search for a patient, appointment or queue entry.
- Schedule appointment books a patient or a visitor. See Book an appointment.
- Register patient adds a patient who is not in HOSSPI HMS yet. See Register a new patient.
- Each row shows the patient, when they joined the queue, their Current step, such as Vitals needed, and their doctor. Select a row to open the patient, then use Change status to update their place in the queue or Change doctor to give them to another doctor.
| Tab | What it lists |
|---|---|
| Appointments | Appointments booked for patients and visitors. |
| Desk queue | Patients waiting at the desk, and the step each one has reached. |
| High priority | Queue entries marked as high priority, so they can be seen first. |
| Active visits | Patients whose visit is in progress. |
| Follow-ups | Follow-up visits planned by clinicians, with their date and time. |
| Payment gate | Patients with outpatient charges still to pay. Review them here, then send the patient to the cashier: payments are taken in Billing. |
8.2Book an appointment
Reception staff
Select Schedule appointment. The window has three tabs: Existing patient, New patient and Visitor / staff meeting.
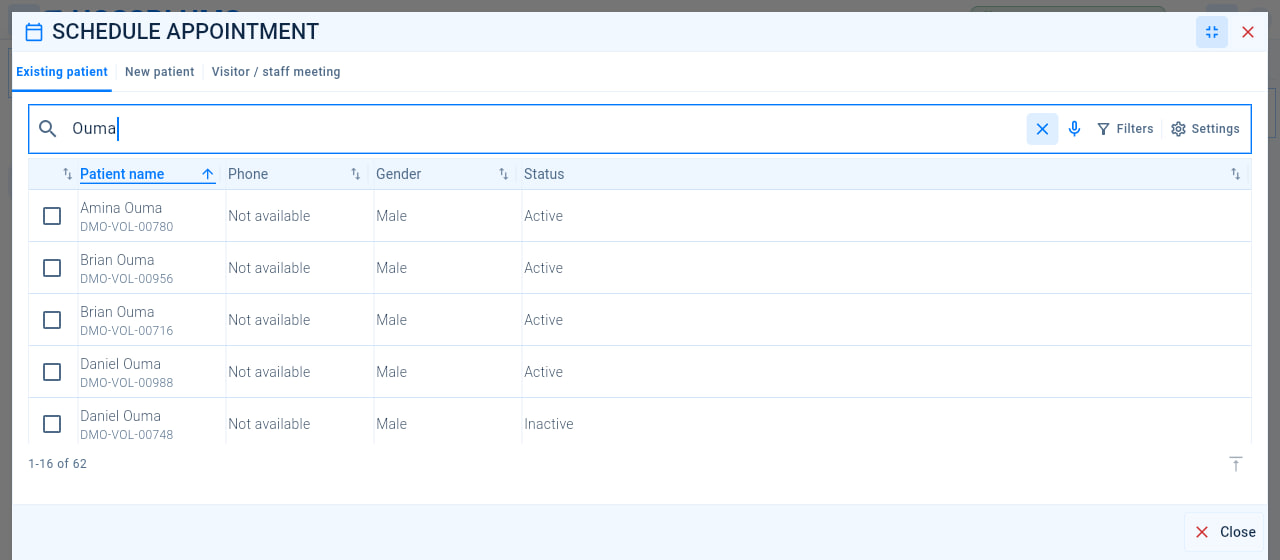
- Choose Existing patient for someone who is already registered.
- Search by name, phone number, email address, identifier or contact.
- Tick the patient, then complete the appointment details.
The appointment details are the Facility, the Contact phone used for reminders, the Appointment date and Start time, the End time or Duration minutes, the Provider if you want to assign one, and the Reason. Select Schedule appointment to book.
For someone who is not registered yet, choose New patient and complete the same details as in Register a new patient before you book. You can also book from a patient’s record with Schedule appointment under Quick actions.
8.3Book a visitor or staff meeting
Reception staff
Use the Visitor / staff meeting tab for people who are not patients, such as suppliers, inspectors or visiting staff.
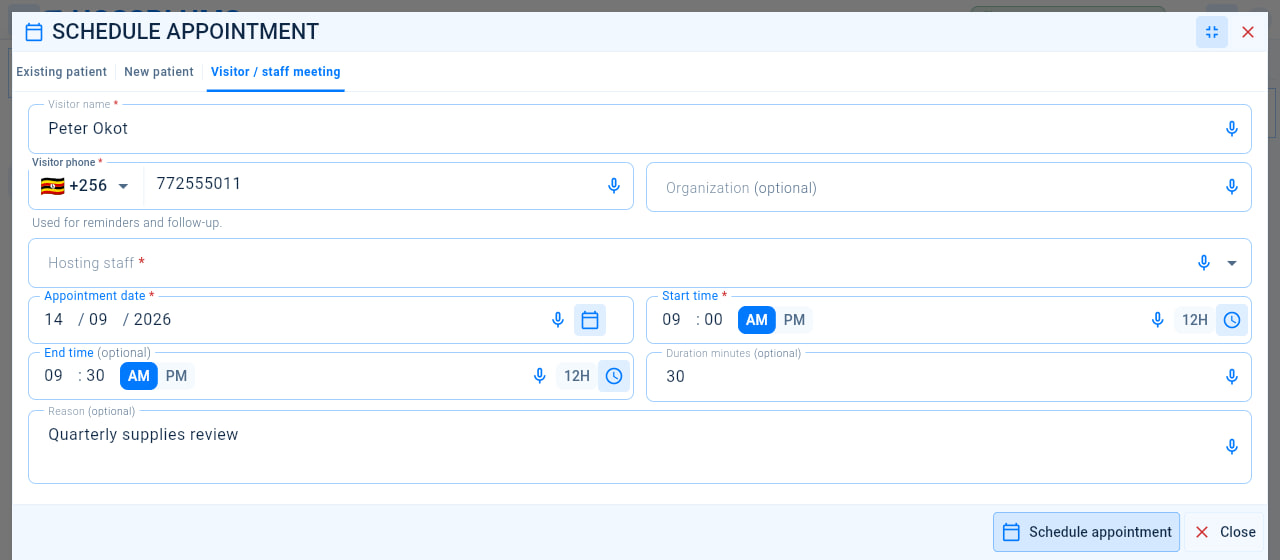
- Enter the Visitor name.
- Enter the Visitor phone number. It is used for reminders and follow-up.
- Enter the visitor’s Organization, if they have one.
- Choose the Hosting staff member they are coming to see.
- Set the Appointment date.
- Set the Start time, choosing AM or PM.
- Check the End time and Duration minutes. Change either one if the meeting will be longer.
- Add the Reason for the visit, if you wish.
- Select Schedule appointment.
Chapter 9
Outpatient care (OPD)
Take outpatients from arrival to the doctor: start the visit, record triage and vital signs, and hand the patient over for consultation.
9.1The OPD worklist
Nurses and outpatient staff
Select Outpatient (OPD) in the menu.
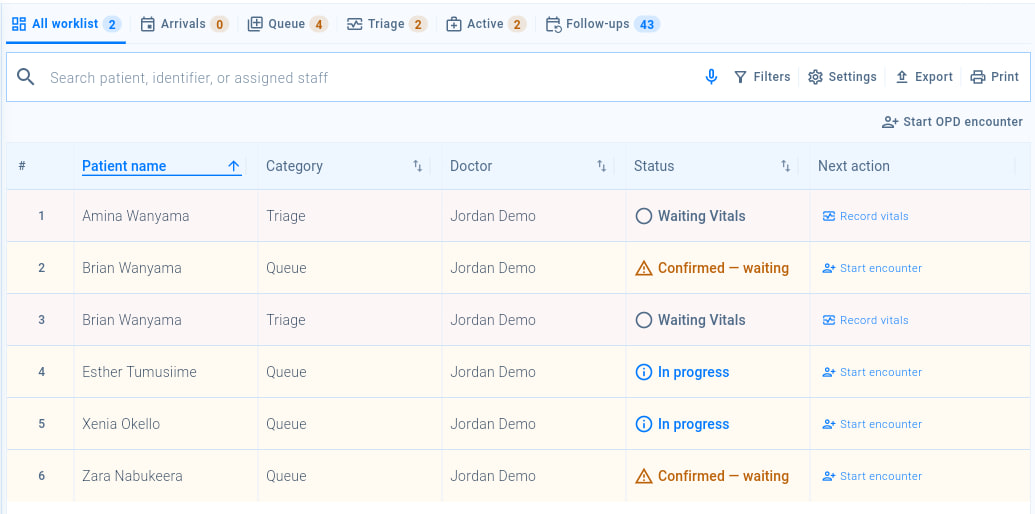
- The tabs follow patients through the department, as described in the table below.
- Search by patient, identifier or assigned staff.
- Start OPD encounter begins a visit. See Start an OPD encounter.
- For a patient who is Waiting Vitals, select Record vitals. See Record triage and vital signs.
- For a patient who is Confirmed — waiting, select Start encounter when the doctor is ready to see them.
| Tab | What it lists |
|---|---|
| All worklist | Every outpatient who still needs something done. |
| Arrivals | Scheduled and checked-in patients. |
| Queue | Patients waiting, with their doctor and how long they have waited. |
| Triage | Patients waiting for triage and vital signs. |
| Active | Patients in consultation. |
| Follow-ups | Planned follow-up visits. |
9.2Start an OPD encounter
Reception staff and nurses
An encounter is a single visit. Everything done for the patient during the visit, from vital signs to prescriptions and charges, is recorded against it. Select Start OPD encounter.
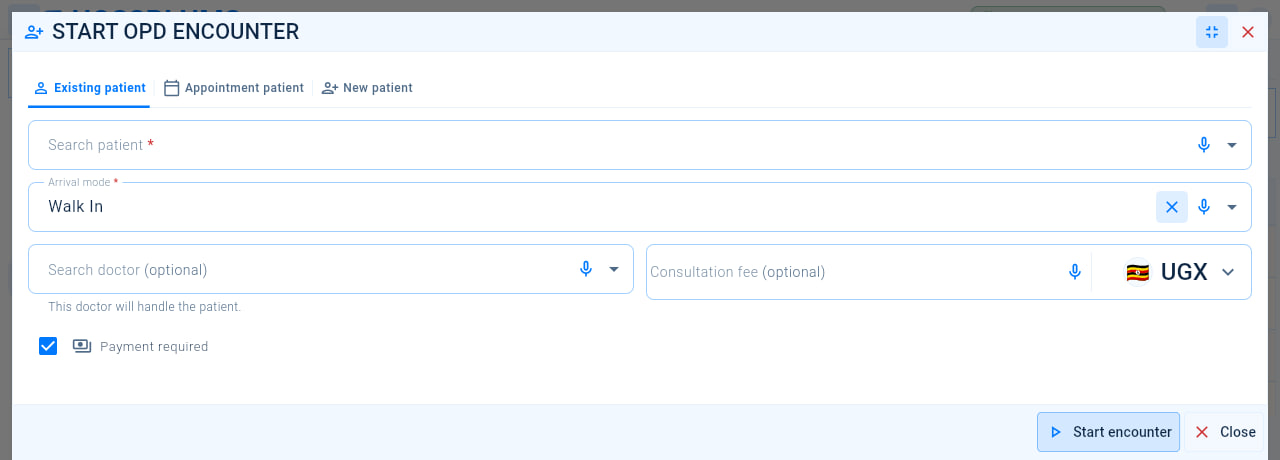
- Choose Existing patient, Appointment patient for someone who has booked, or New patient to register someone first.
- Search for the patient and select them.
- Choose the Arrival mode: Walk-in, Appointment, Emergency or Follow-up.
- Choose the doctor who will see the patient, if you know who it is.
- Enter a Consultation fee only if this visit is charged differently; otherwise the usual fee applies. Check the currency beside it.
- Keep Payment required ticked if the patient must pay before they are seen. Until they pay, they appear under Payment gate at reception.
- Select Start encounter.
9.3Record triage and vital signs
Nurses
On the Triage tab, select Record vitals on the patient’s row. Check the patient’s name, age and gender at the top of the window before you record anything.
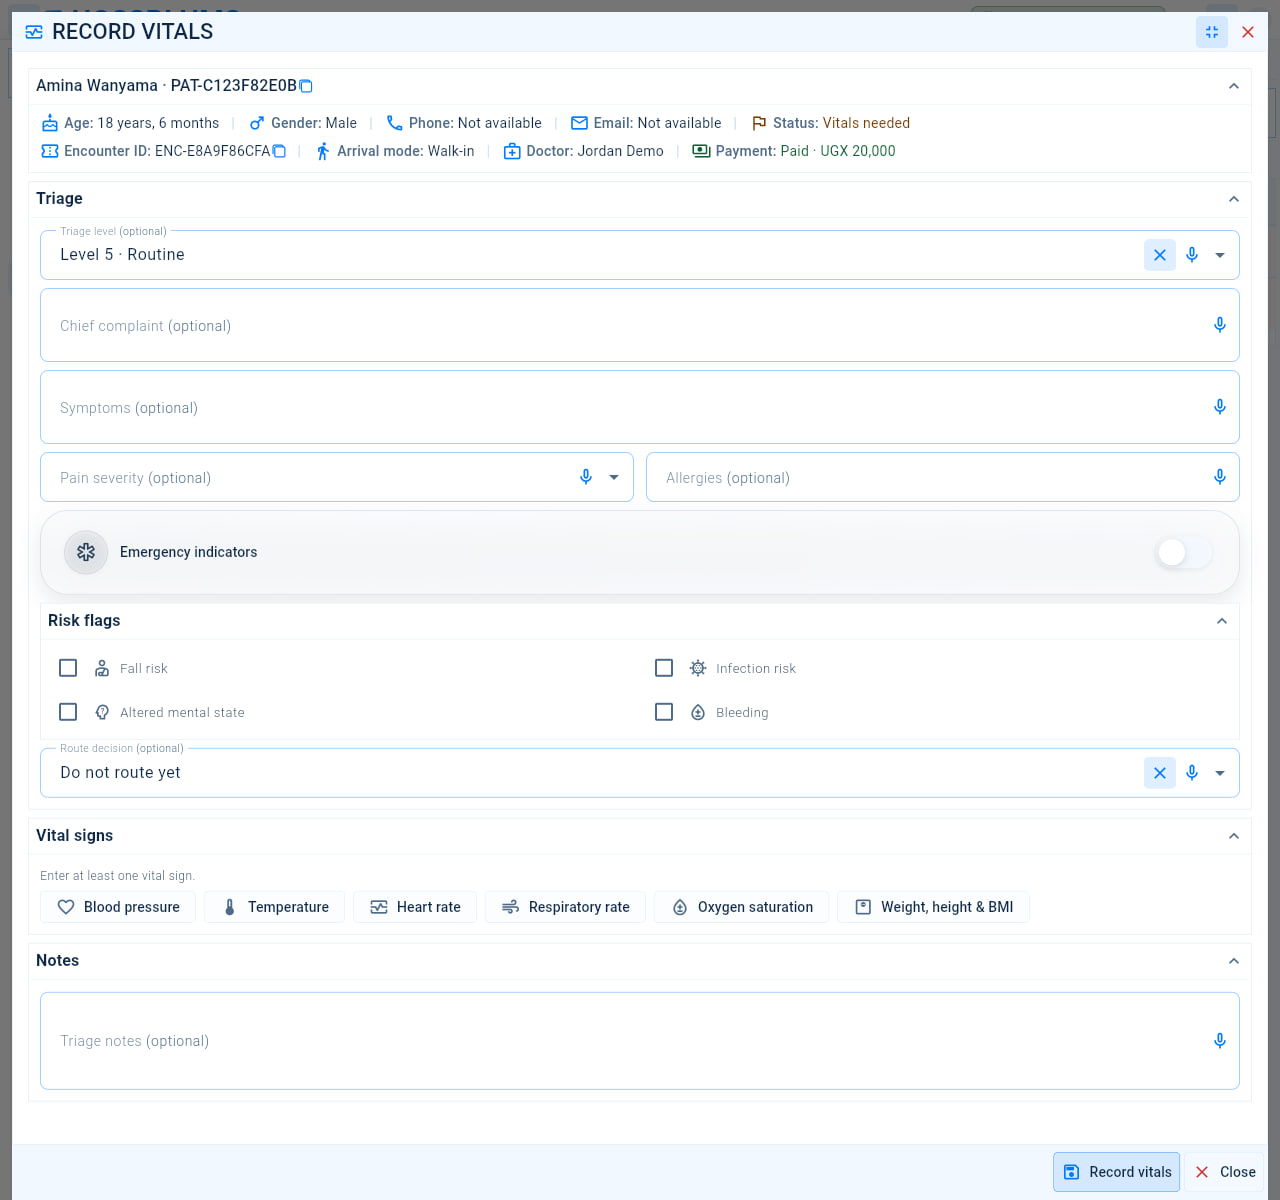
- Choose the Triage level, from Level 1 · Immediate for the most urgent patients to Level 5 · Routine.
- Enter the Chief complaint, in the patient’s words, and any Symptoms.
- Choose the Pain severity, from No pain to Worst imaginable, and note any Allergies.
- Switch on Emergency indicators if the patient shows signs of an emergency.
- Tick any Risk flags that apply: Fall risk, Infection risk, Altered mental state or Bleeding.
- Choose a Route decision to send the patient straight to the laboratory, radiology or pharmacy, or keep Do not route yet.
- Under Vital signs, select each measurement you took, such as Blood pressure, Temperature or Weight, height & BMI, and enter the reading. Record at least one vital sign.
- Add Triage notes, if you wish.
- Select Record vitals.
The patient then waits for their doctor. To give the patient to a different doctor, select their row on the worklist, then Change doctor under Quick actions.
Chapter 10
Consultations
Doctors review each encounter, write clinical notes, record diagnoses, order investigations and treatment, and decide what happens next.
10.1The clinical worklist
Doctors and clinical officers
Select Clinical (Doctors) in the menu.
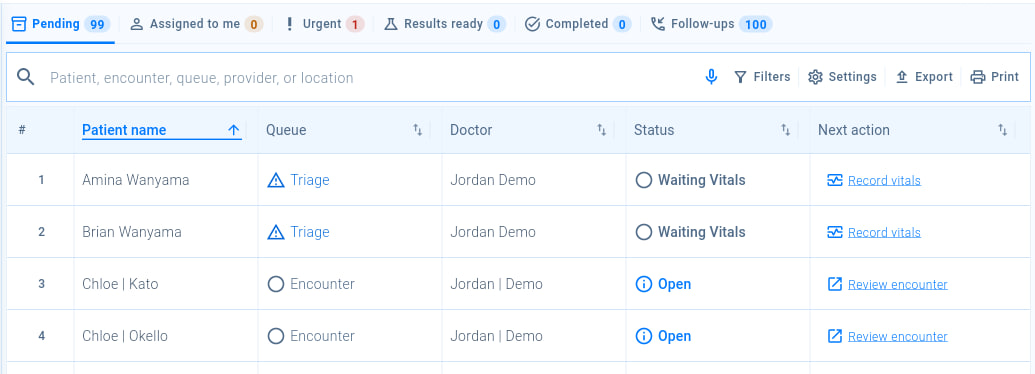
- Choose a tab: Pending, Assigned to me, Urgent, Results ready for patients whose investigation results are back, Completed or Follow-ups.
- Search by patient, encounter, queue, provider or location.
- If a patient still needs vital signs, Record vitals opens the same form that nurses use.
- Select Review encounter to open the patient’s encounter.
10.2Review an encounter
Doctors and clinical officers
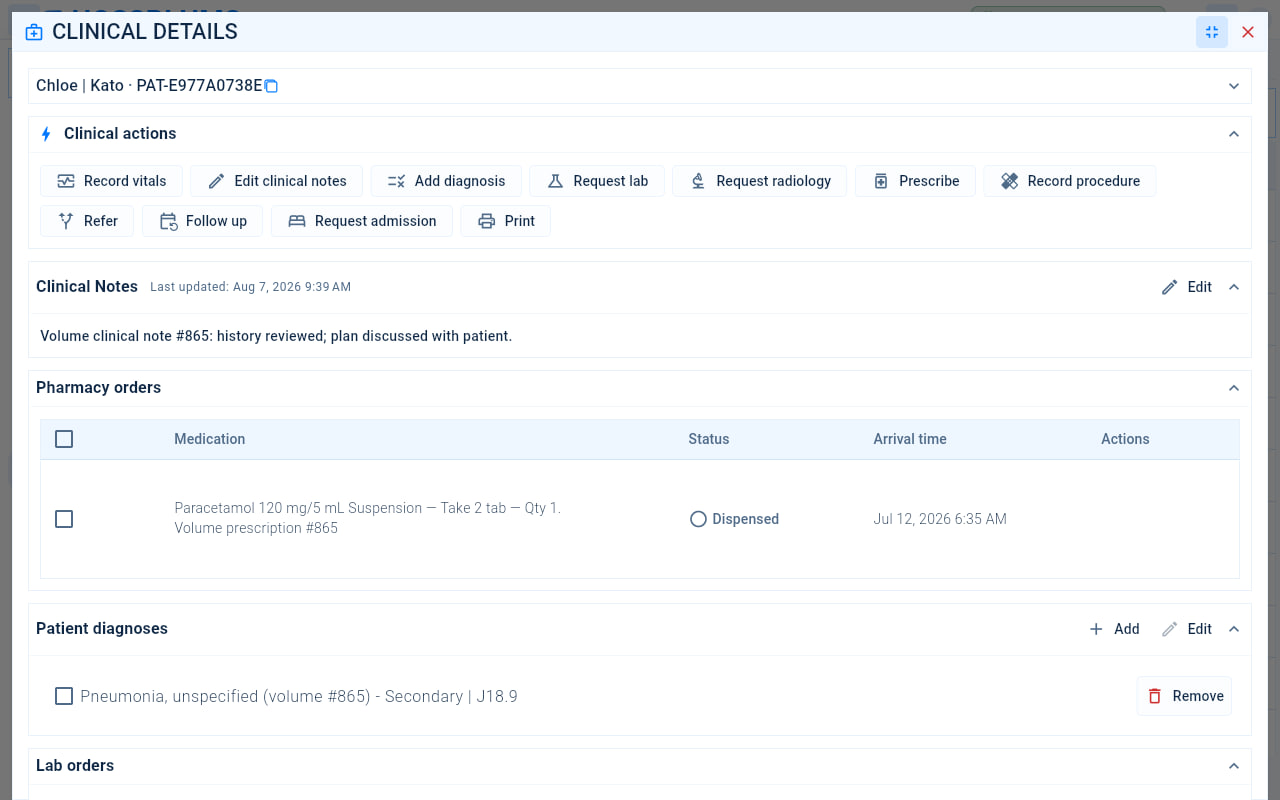
- The patient’s name and ID. Select the bar to show their full details, including allergy alerts.
- Clinical actions are what you can do for this patient. The sections that follow explain each one.
- Select Edit beside Clinical Notes to write or update your notes for the visit.
- Every order appears in its own section, such as Pharmacy orders, Lab orders and Radiology orders, together with its status.
- Select Add beside Patient diagnoses to record a diagnosis.
Scroll down for Procedures, Referrals, Follow-ups, Admissions and Care plans. Lab results appear under Lab orders as soon as the laboratory releases them, with a flag such as High or Low beside any result outside the normal range.
10.3Write clinical notes
Doctors and clinical officers
Select Edit clinical notes under Clinical actions, or Edit beside Clinical Notes.
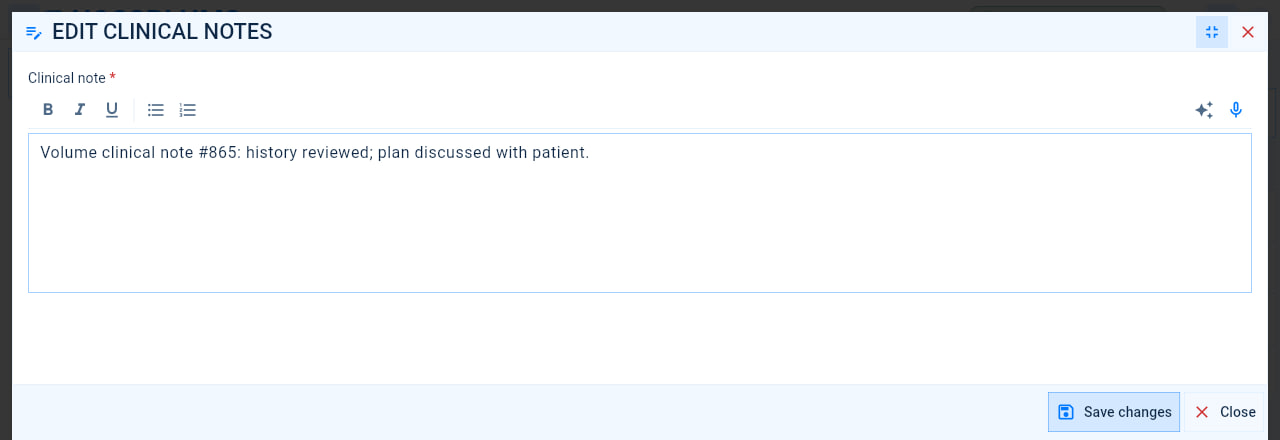
- Format the note with the toolbar: bold, italic, underline, and bulleted or numbered lists.
- Format note with AI rewrites your note in clear, professional medical language. It does not add facts, but always read the result before you save it. It needs an internet connection.
- Select the microphone to dictate the note instead of typing it.
- Write the note, for example the history, examination findings and your plan.
- Select Save changes.
10.4Record a diagnosis
Doctors and clinical officers
Select Add diagnosis.
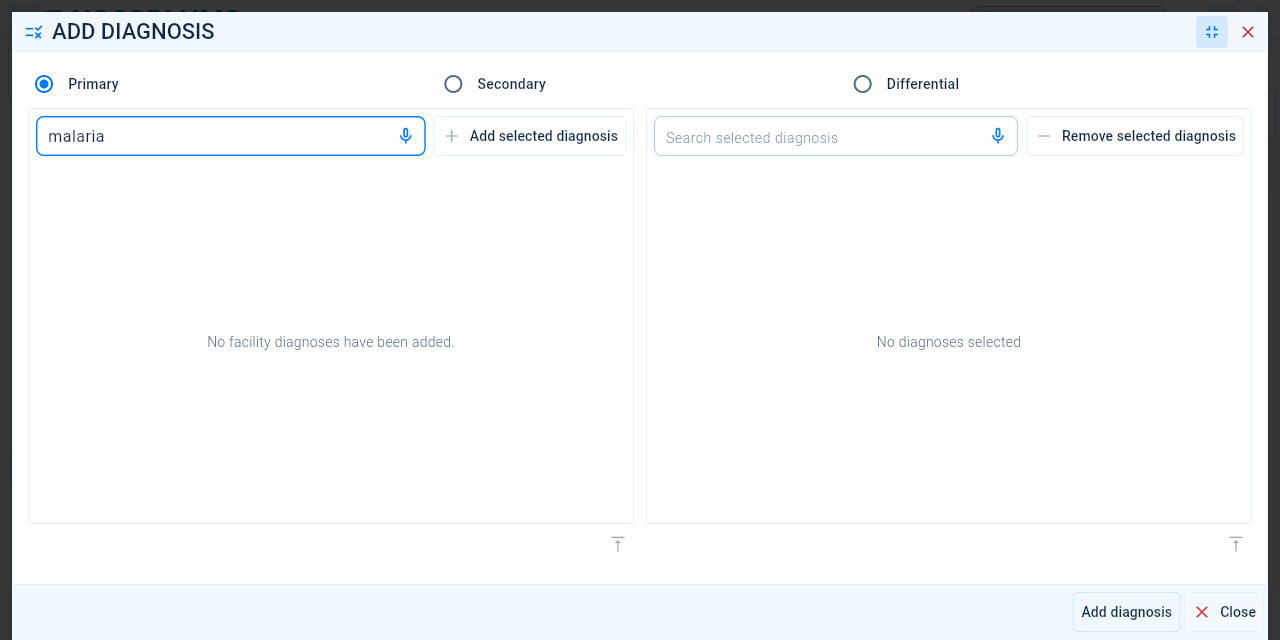
- Choose the diagnosis type: Primary, Secondary or Differential.
- Search your facility’s diagnoses by name or code.
- Tick each diagnosis that applies.
- Select Add selected diagnosis to move the ticked diagnoses to the list on the right.
- Check the selected diagnoses, searching them if the list is long. To take one off the list, tick it and select Remove selected diagnosis.
- Select Add diagnosis.
10.5Order laboratory tests
Doctors and clinical officers
Select Request lab. The window shows the patient and encounter IDs. Select Add Lab Orders to choose the tests.
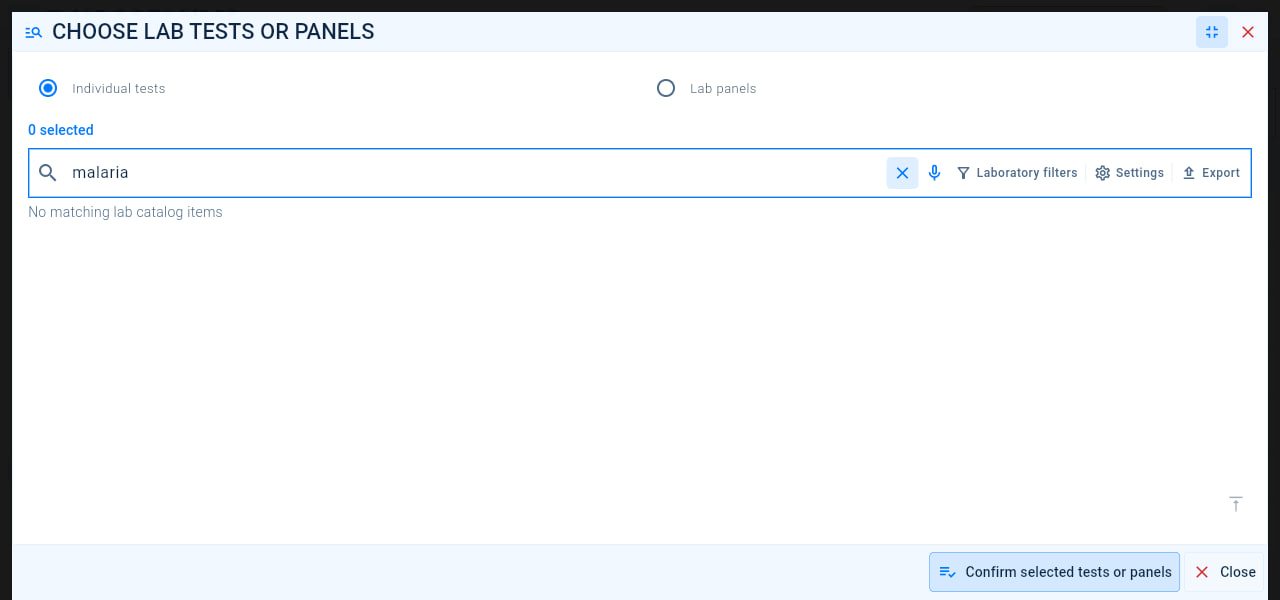
- Choose Individual tests, or Lab panels to order a group of tests together.
- Search the laboratory catalogue by name, code, category or specimen. The count above the search shows how many items you have selected.
- Tick each test or panel you need.
- Select Confirm selected tests or panels.
Back in the request window, select Review billing to check the charges, then select Request lab. The order appears on the laboratory worklist straight away. See The laboratory worklist.
10.6Order imaging
Doctors and clinical officers
Select Request radiology, then Add study.
- Under Request details, choose the Modality, the Laterality (the side of the body) and the Priority.
- Add a Clinical note for the radiologist.
- Search the radiology catalogue, tick the studies you need, and select Confirm selected studies.
- Select Review billing to check the charges, then select Request radiology.
10.7Prescribe medicines
Doctors and clinical officers
Select Prescribe, then Add medicine.
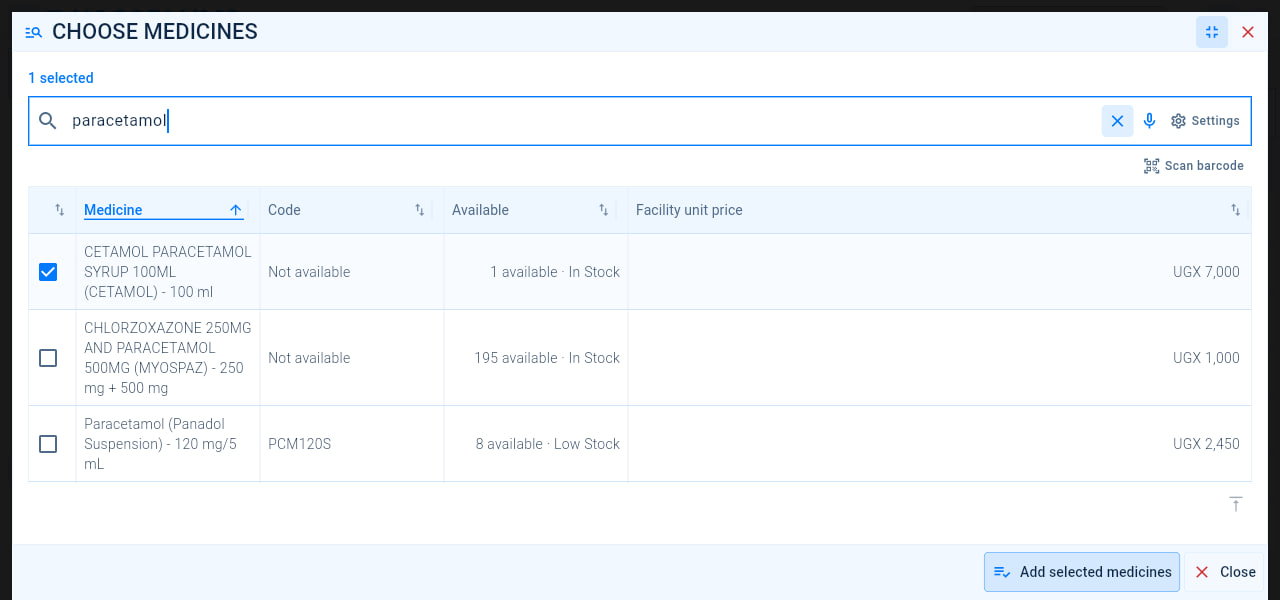
- Search the medicines available at your facility by name or code.
- Or select Scan barcode to find a medicine by scanning its barcode.
- Tick each medicine to prescribe. The list shows how many are Available, whether stock is low, and the Facility unit price.
- Select Add selected medicines.
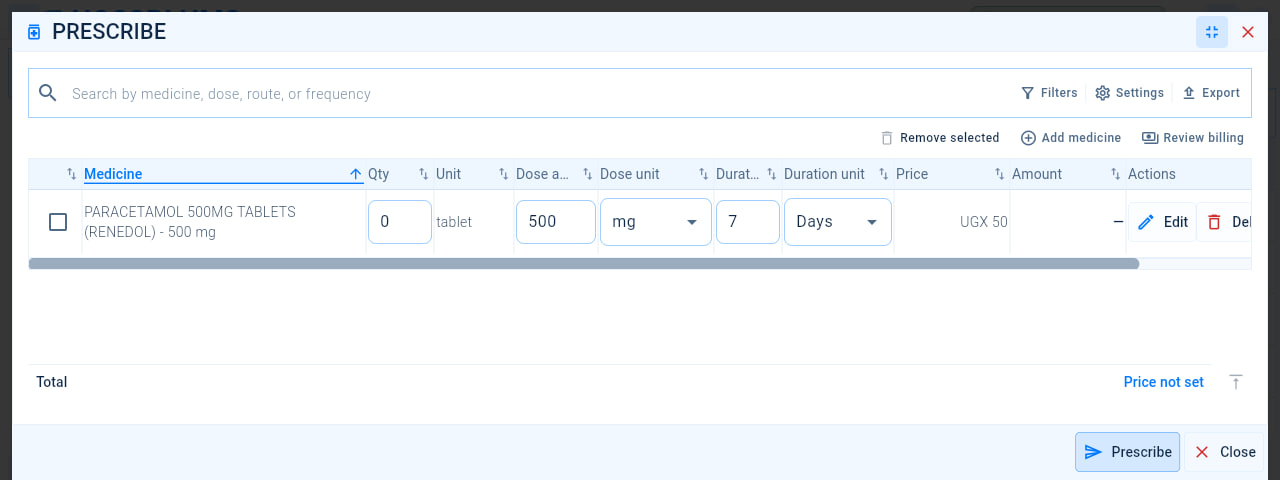
- Select Add medicine again to add more medicines.
- Enter the Quantity to supply.
- Enter the Dose amount and choose the Dose unit.
- Enter the Duration and choose the Duration unit.
- Select Edit to set the Medication route, Frequency and Instructions, then Done. Select Delete to remove a medicine. HOSSPI HMS warns you when the quantity does not match the dose, frequency and duration.
- Select Review billing to check the charges.
- Select Prescribe. The prescription appears on the pharmacy worklist.
10.8Procedures, referrals, follow-ups and admission
Doctors and clinical officers
The remaining Clinical actions each open a short form:
| Action | What to do |
|---|---|
| Record procedure | Select Add items to choose the procedures you carried out, Review billing to check the charges, then Record procedure. |
| Refer | Enter the External facility and the Reason for the referral, add any Notes, then select Save referral. |
| Follow up | Choose the Follow-up date and Follow-up time, add any Notes, then select Save follow-up. The visit appears under Follow-ups at reception and on the worklists. |
| Request admission | Enter the Admission reason and any Notes, then select Request admission. The request waits in the ward team’s Admission Queue. See The admissions worklist. |
| Print a summary of the encounter. |
Chapter 11
Laboratory
Receive test orders, enter and check results, and make them available to the doctors who asked for them.
11.1The laboratory worklist
Laboratory staff
Select Laboratory in the menu.
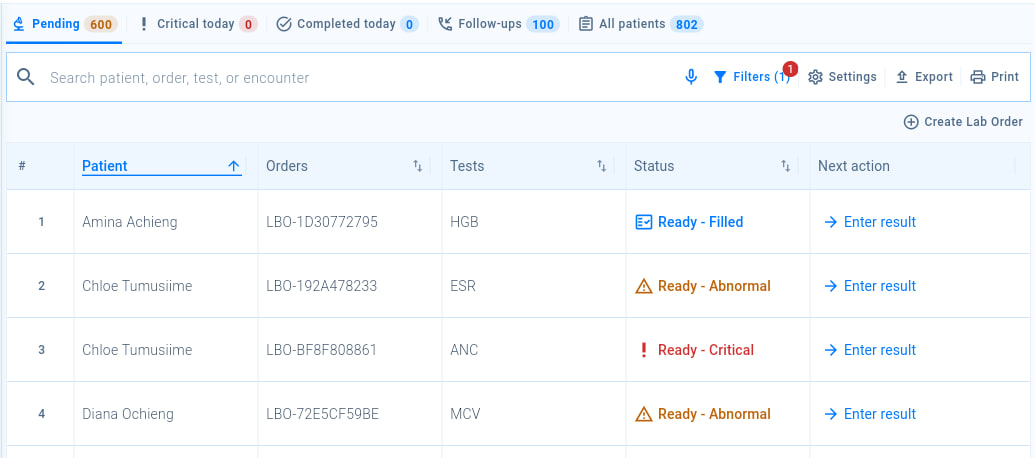
- Choose a tab: Pending, Critical today, Completed today, Follow-ups or All patients.
- Search by patient, order, test or encounter.
- Create Lab Order records tests for a patient who arrives without an order from a doctor. See Create a lab order.
- Select Enter result to record the results of an order. See Enter lab results.
| Status | Meaning |
|---|---|
| Ready - Filled | Results have been entered. |
| Ready - Abnormal | At least one result is outside the normal range. |
| Ready - Critical | At least one result is at a critical level. Select Escalate critical result to alert the clinical team. |
| Completed | The order is complete and ready for the doctor to review. |
11.2Create a lab order
Laboratory staff
Select Create Lab Order. Select or register the Patient. Choosing an existing lab order is optional: if you do not choose an encounter, HOSSPI HMS creates or reuses an open laboratory encounter for the patient. Select Next, then choose the tests to run.
11.3Enter lab results
Laboratory staff
Select Enter result on the order.
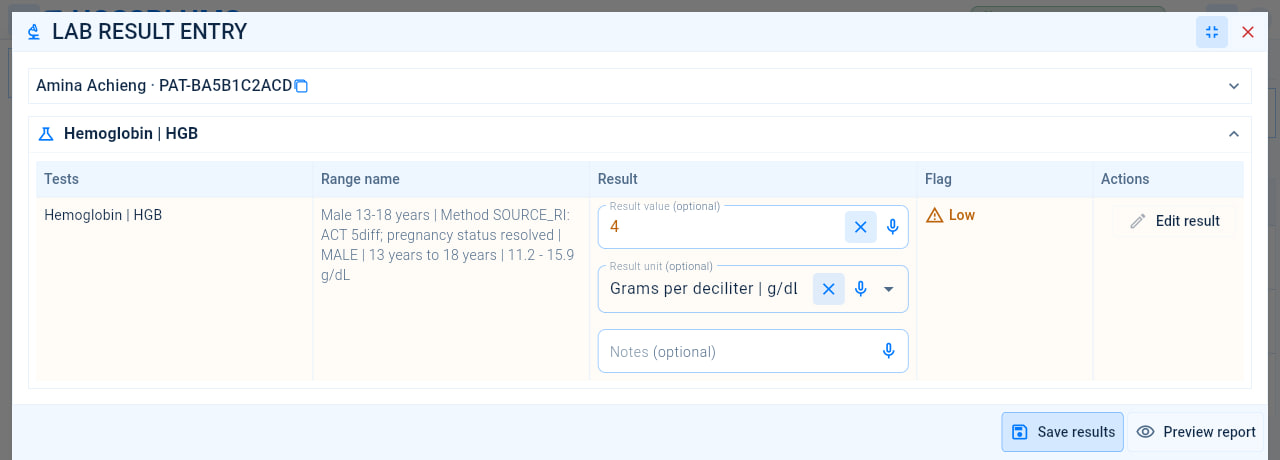
- Each test in the order has its own section. Check that it is the right test for the right patient; select the bar at the top to see the patient’s details.
- Range name shows the reference range that applies to this patient, for example by sex and age.
- Enter the Result value and choose the Result unit.
- Add Notes about the sample or the result, if needed.
- HOSSPI HMS compares the result with the reference range and shows a Flag, such as Low or High.
- Select Edit result to change a result that has already been entered.
- Select Save results.
- Select Preview report to see the lab report as it will be printed.
Chapter 12
Radiology
Take imaging requests, then write, check and release the radiology report.
12.1The radiology worklist
Radiology staff
Select Radiology in the menu.
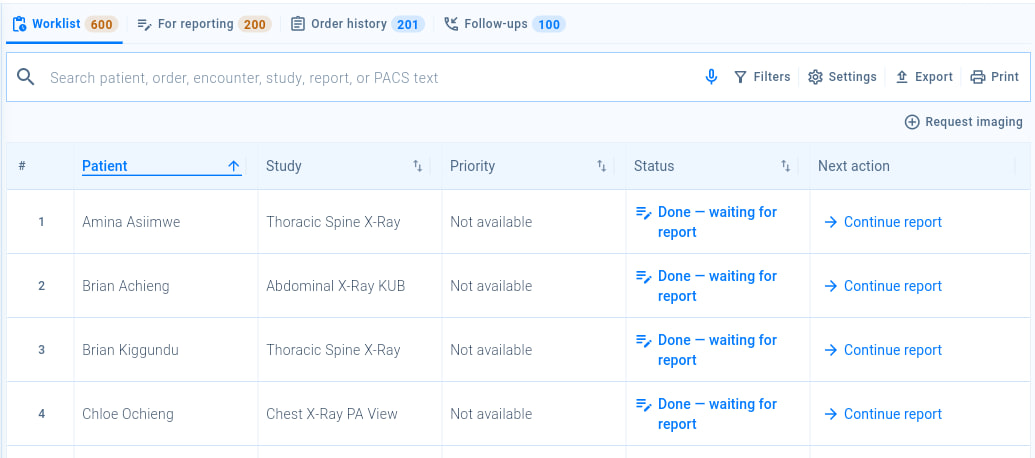
- Choose a tab: Worklist, For reporting, Order history or Follow-ups.
- Search by patient, order, encounter, study, report or PACS text.
- Request imaging records a study for a patient who arrives without a request from a doctor. Search the catalogue, choose the Patient and, if there is one, the Encounter, add Clinical notes, then select Request imaging.
- For a study that is Done — waiting for report, select Continue report. See Report a study.
12.2Report a study
Radiologists
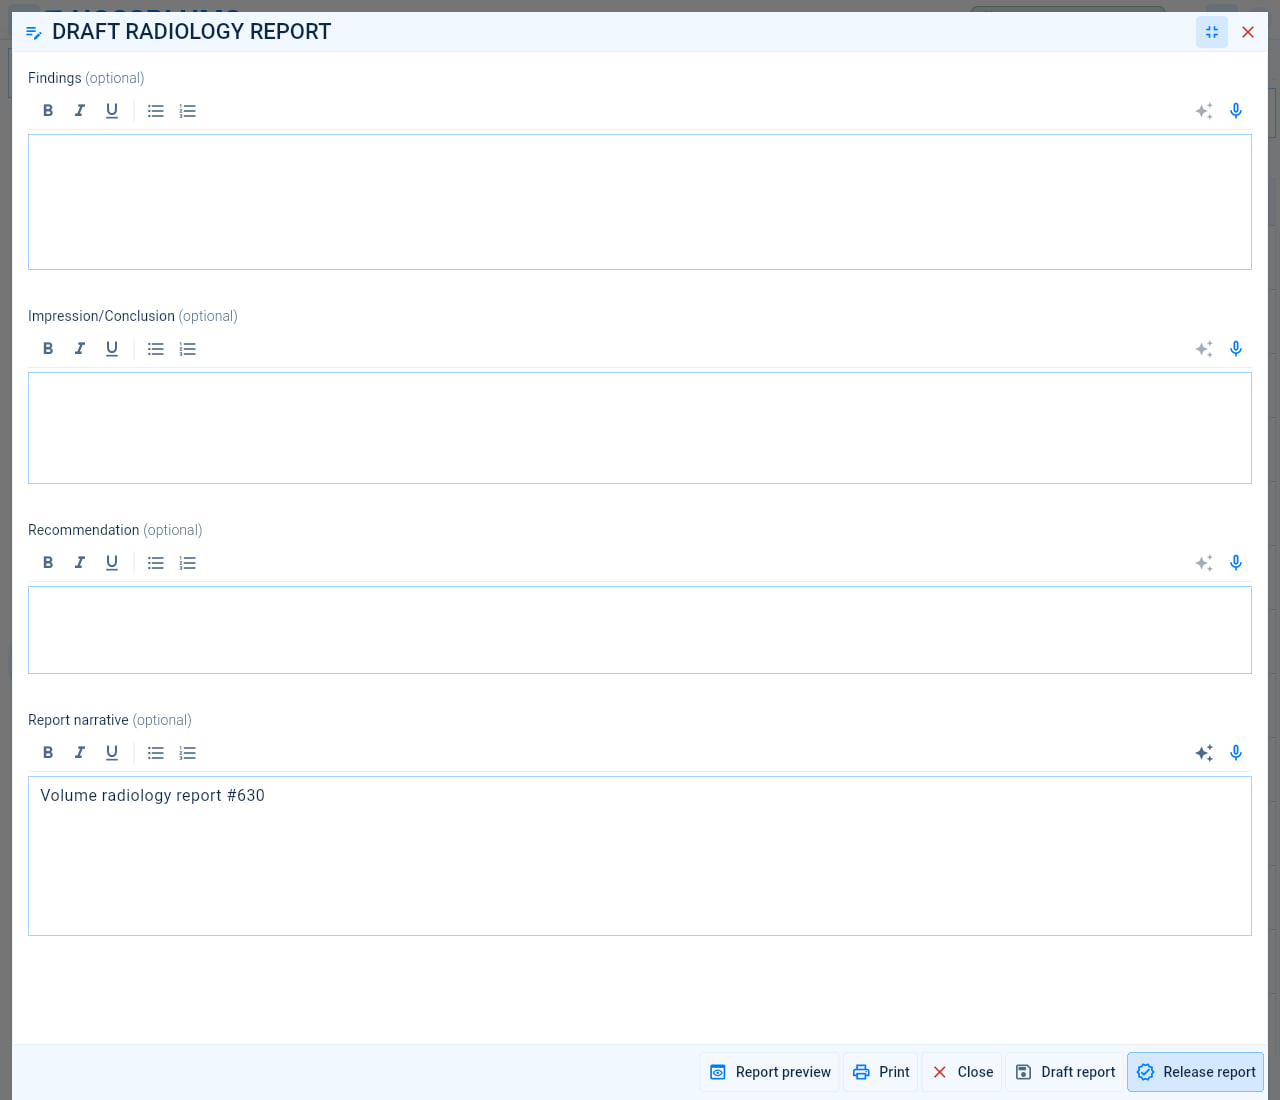
- Describe what you see in Findings.
- Give your Impression/Conclusion.
- Add a Recommendation, such as further imaging or a review.
- Write the full Report narrative, if your facility uses one.
- Format note with AI rewrites a section in clear, professional language without adding facts. Read the result before you continue. You can also dictate each section with the microphone.
- Select Report preview to see the report as it will be printed.
- Select Print to print it.
- Select Draft report to save your work and finish later.
- Select Release report when the report is final. Released studies move to Order history with the status Reported.
Chapter 13
Pharmacy
Dispense prescriptions from the consulting rooms and wards, and sell medicines to walk-in customers.
13.1The pharmacy worklist
Pharmacy staff
Select Pharmacy in the menu.
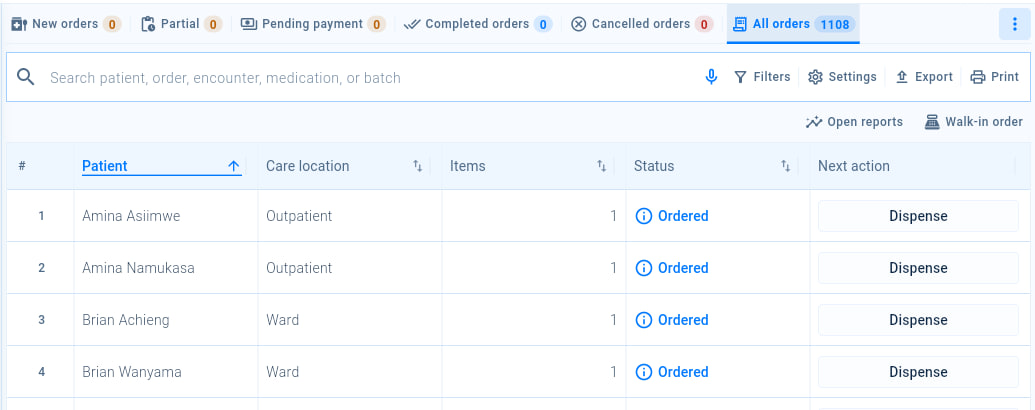
- Choose a tab: New orders, Partial, Pending payment, Completed orders, Cancelled orders or All orders. More tabs holds the rest, such as the catalogue and stock.
- Search by patient, order, encounter, medication or batch.
- Open reports shows the pharmacy’s reports.
- Walk-in order sells medicines to a customer without a prescription. See Sell to a walk-in customer.
- Select Dispense to supply the medicines in an order. The Dispense column shows how many items have been supplied, for example 0 / 4, and Care location shows whether the order is from outpatients or a ward.
13.2Dispense a prescription
Pharmacy staff
Select Dispense on the order. Check the patient’s allergy alerts before you hand anything over.
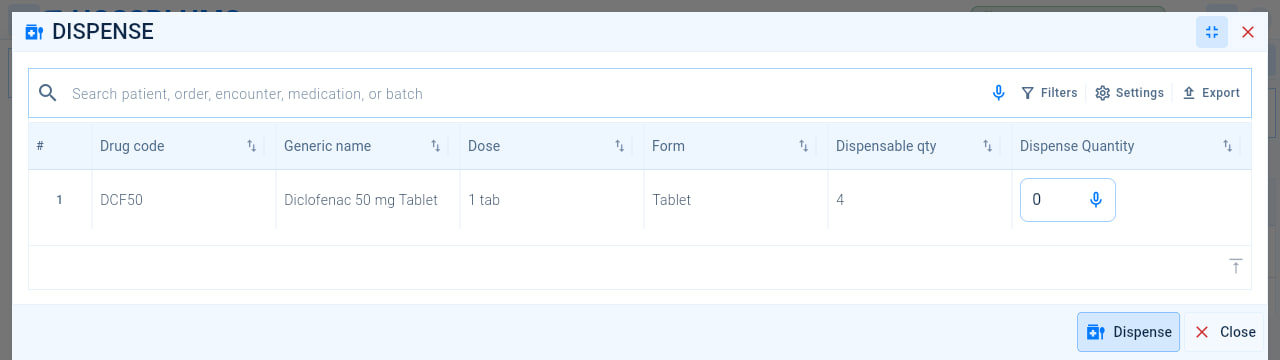
- If the order is long, search its medicines by name or batch.
- Check each medicine: its Drug code, Generic name, Dose and Form.
- Dispensable qty is how much of the medicine is still to be supplied.
- Enter the Dispense Quantity you are handing over.
- Select Dispense.
An order that is only partly supplied appears under Partial, so you can finish it later. Orders that must be paid for first wait under Pending payment.
13.3Sell to a walk-in customer
Pharmacy staff
Select Walk-in order.
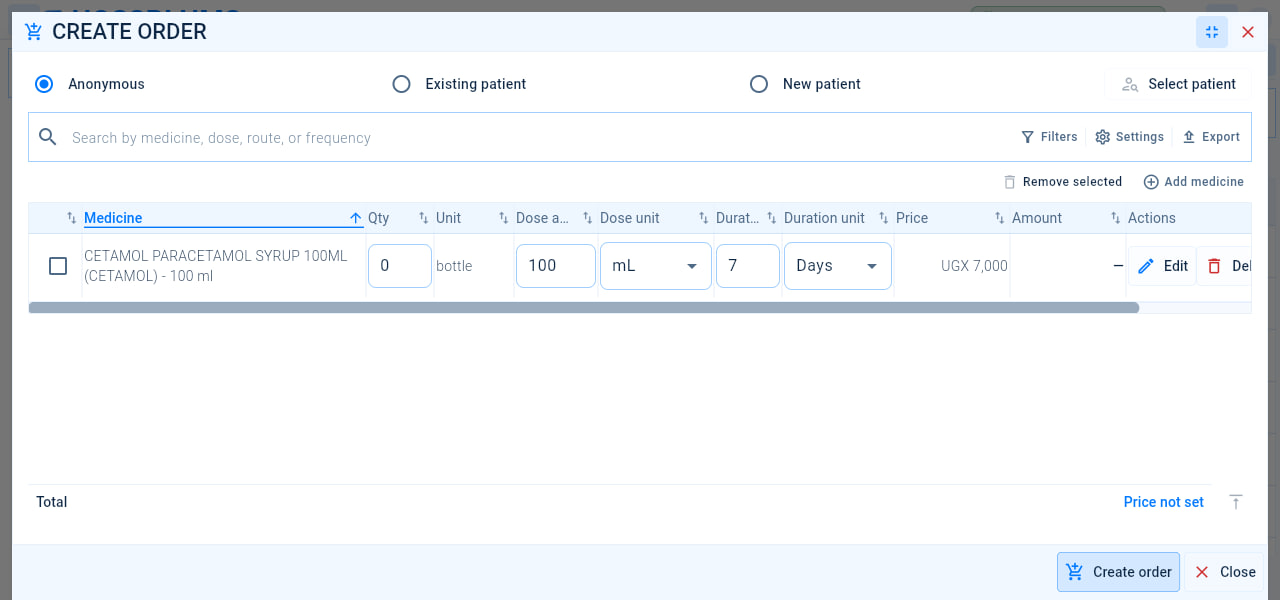
- Choose who is buying: Anonymous, Existing patient or New patient.
- For an existing patient, select Select patient and find them.
- Select Add medicine, tick the medicines as described in Prescribe medicines, then select Add selected medicines.
- Enter the Qty of each medicine and check its dose and duration. Select Delete to remove a medicine.
- Select Create order.
Chapter 14
Admissions and wards
Admit patients, allocate beds and follow each admission from the ward round to discharge.
14.1The admissions worklist
Ward staff and admissions officers
Select Inpatient (IPD) in the menu.
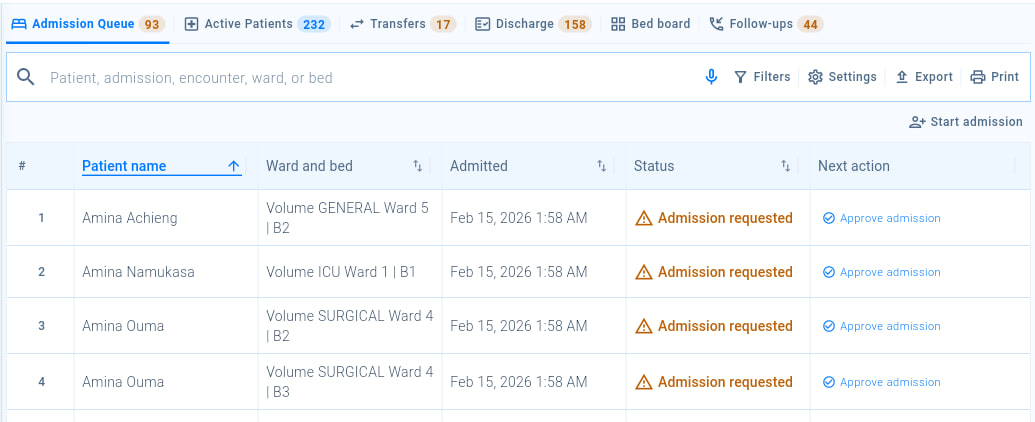
- Choose a tab: Admission Queue, Active Patients, Transfers, Discharge, Bed board or Follow-ups.
- Search by patient, admission, encounter, ward or bed.
- Start admission admits a patient directly. See Admit a patient.
- Admission requests from doctors wait in the Admission Queue. Select Approve admission to accept one.
The Bed board tab shows the beds on each ward and whether they are free. Select Manage beds there to change them; see Add wards, rooms and beds.
14.2Admit a patient
Ward staff and admissions officers
Select Start admission.
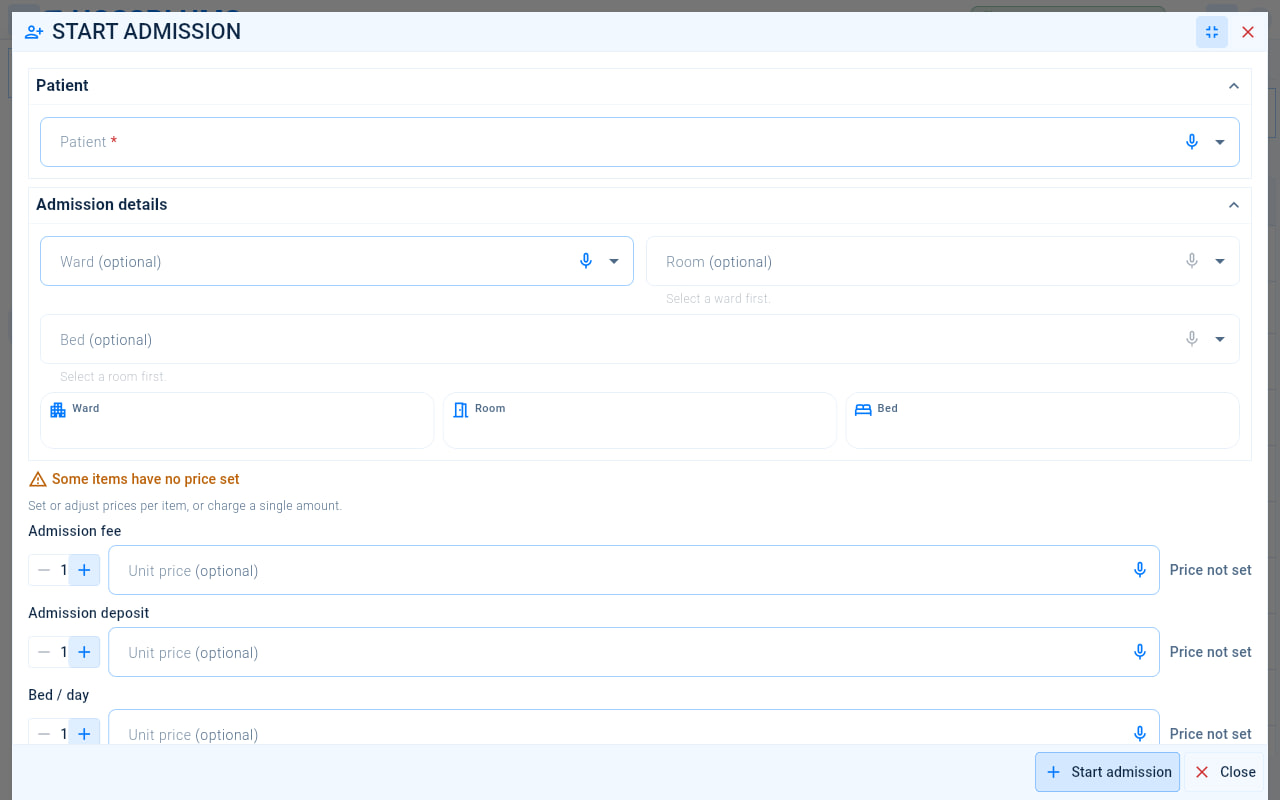
- Search for and select the Patient.
- Choose the Ward.
- Choose the Room, then the Bed. Each list becomes available once you have chosen the one before it.
- Check the admission charges, such as the Admission fee, Admission deposit and Bed / day. Where a price is not set, enter a Unit price, and change the quantity if needed.
- Select Start admission.
14.3Work with an admission
Doctors, nurses and ward staff
On the Active Patients tab, select a patient to open their admission.
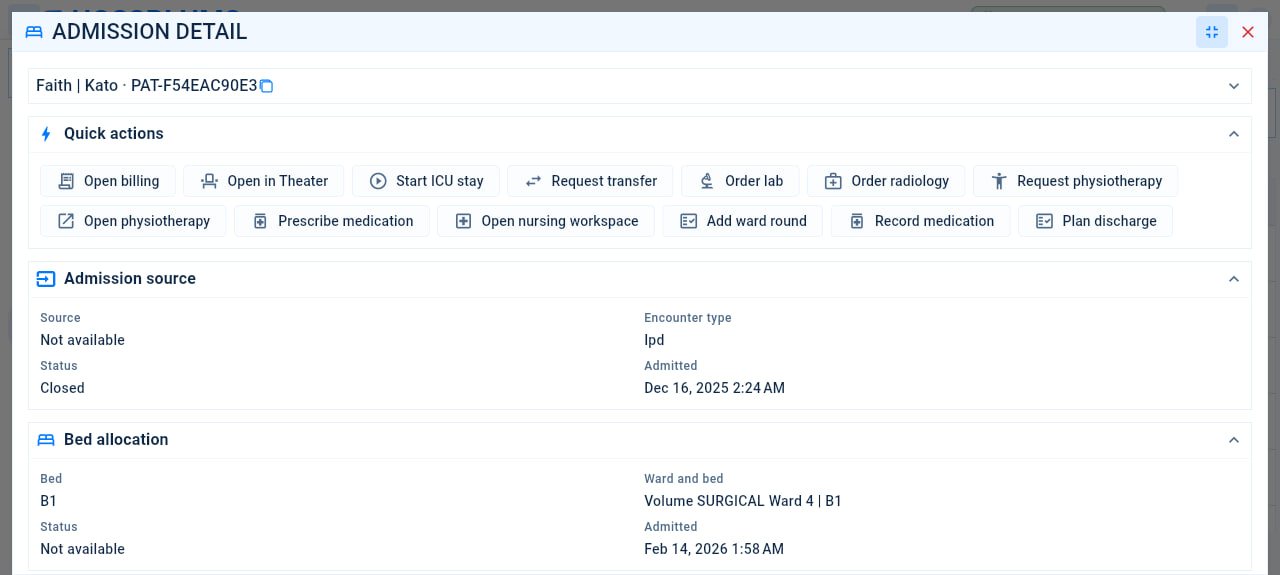
- The patient’s name and ID. Select the bar to see their details.
- Quick actions cover the stay, for example Open billing, Start ICU stay, Request transfer, Order lab, Order radiology, Prescribe medication, Open nursing workspace, Add ward round, Record medication and Plan discharge.
- Admission source shows the encounter the patient was admitted from, and when.
- Bed allocation shows the ward and bed, and when they were allocated.
- Insurance authorization shows the amount the insurer approved, how much has been used and how much remains. Select Request authorization to ask for more.
Further down are Transfers, Ward rounds, Nursing notes, Medication, Discharge and the Timeline of the stay.
Chapter 15
Nursing
See the patients and tasks on your ward, record observations and notes, and complete the nursing checks on admission and discharge.
15.1The nursing worklist
Nurses
Select Nursing in the menu.
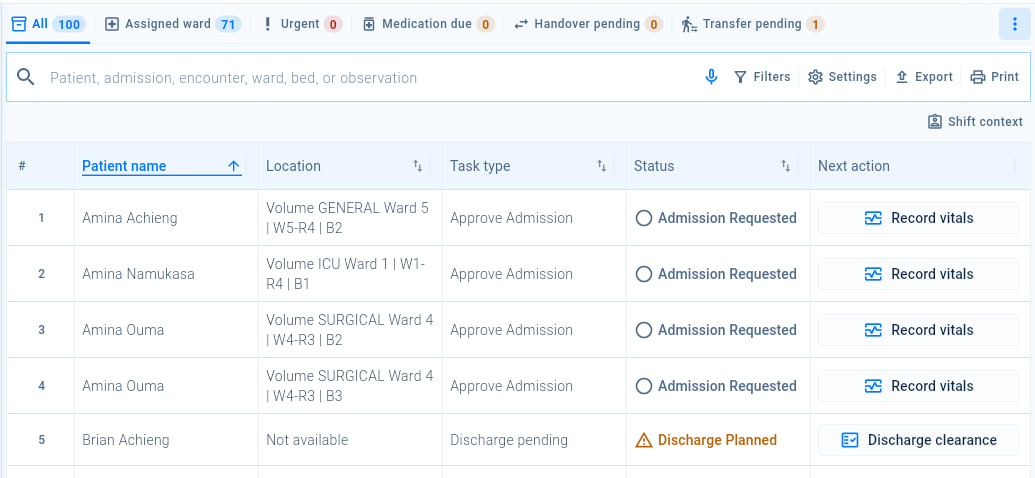
- Choose a tab: All, Assigned ward, Urgent, Medication due, Handover pending or Transfer pending.
- Search by patient, admission, encounter, ward, bed or observation.
- Shift context shows the roster assignments and pending handovers for your shift.
- Each row shows the patient’s next nursing task. Record vitals opens the vital signs form described in Record triage and vital signs.
- Discharge clearance opens the nursing checks before a patient goes home. See Complete nursing discharge clearance. Acknowledge transfer confirms a patient transferred to your ward.
15.2Care for a ward patient
Nurses
Select a patient on the worklist.
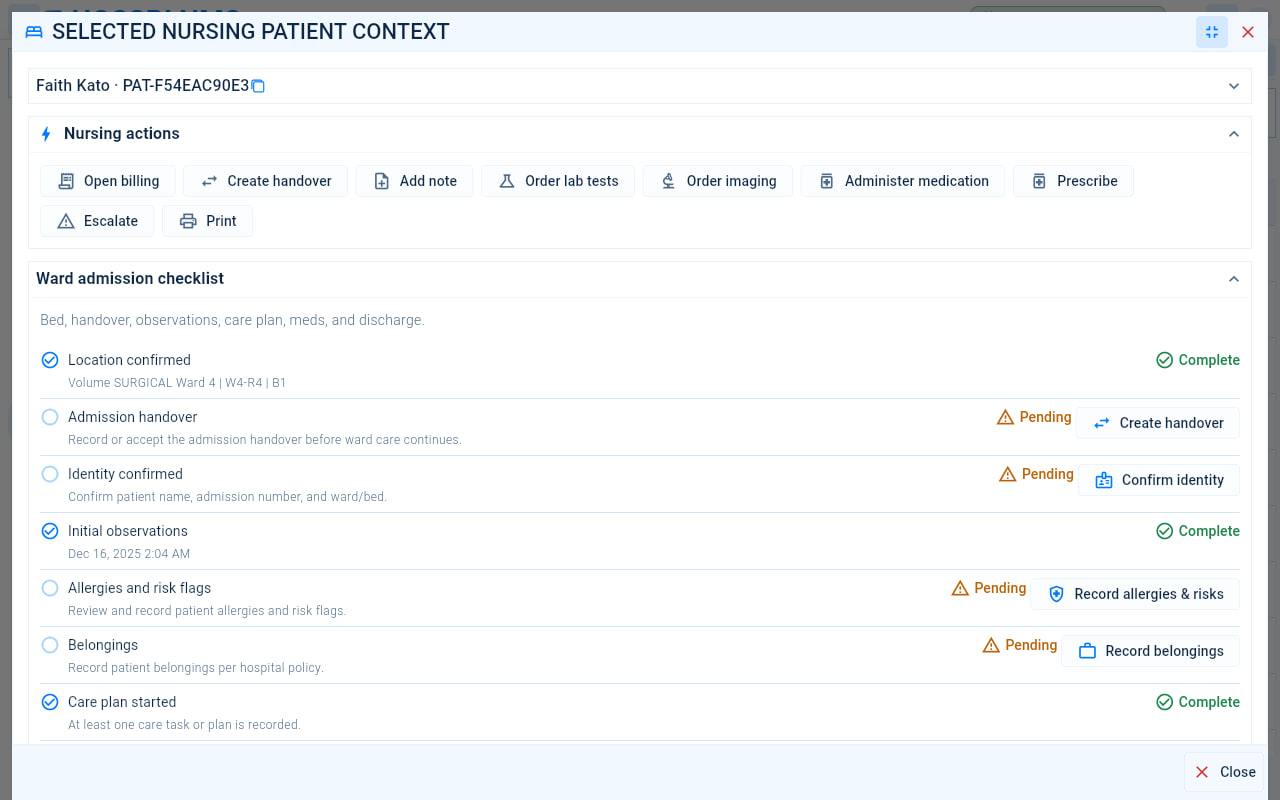
- The patient’s name and ID. Select the bar to see their details.
- Nursing actions: Open billing, Create handover, Add note, Order lab tests, Order imaging, Administer medication, Prescribe, Escalate and Print.
- The Ward admission checklist lists what must be done when a patient arrives on the ward: the bed, handover, observations, care plan, medicines and discharge.
- Each item shows Complete or Pending. Complete a pending item with its button, such as Create handover, Confirm identity, Record allergies & risks, Record belongings or Notify doctor.
Scroll down for Billing clearance, Observations (select Edit vitals to record new ones), Medications and Nursing notes.
15.3Complete nursing discharge clearance
Nurses
Select Discharge clearance on the patient’s row.
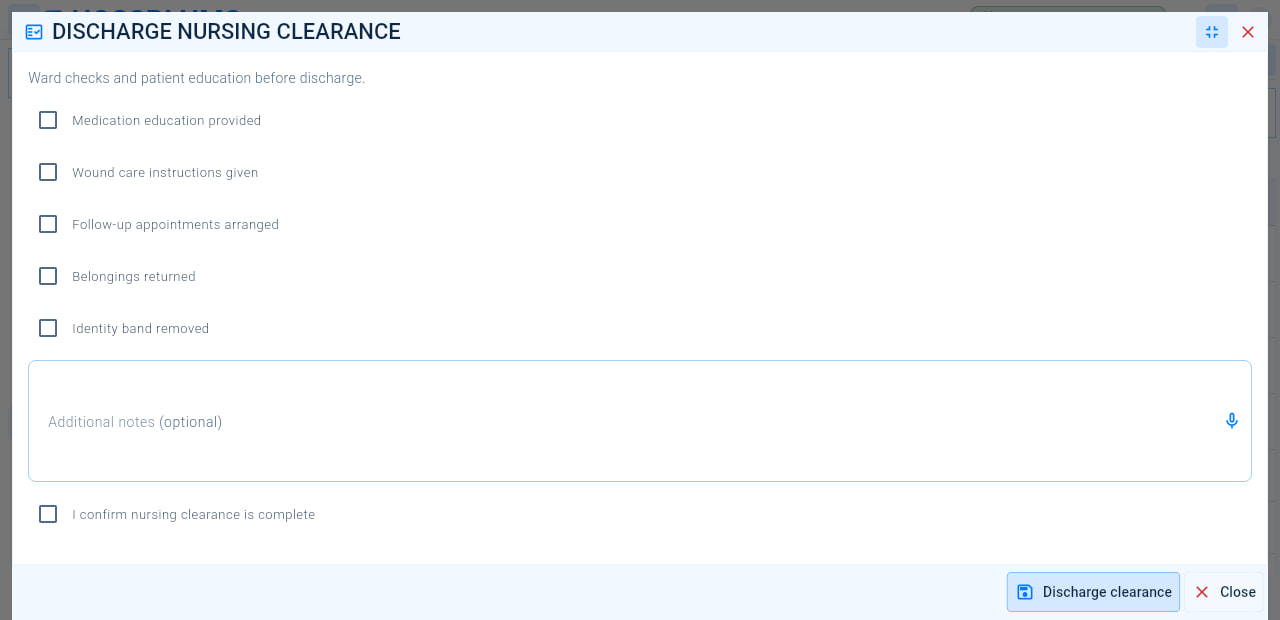
- Tick each check as you complete it: Medication education provided, Wound care instructions given, Follow-up appointments arranged, Belongings returned and Identity band removed.
- Add Additional notes, if needed.
- Tick I confirm nursing clearance is complete.
- Select Discharge clearance.
Chapter 16
Intensive care (ICU)
Follow critically ill patients closely: alerts, intensive observations, ICU rounds, transfers and the end of the ICU stay.
16.1The ICU worklist
ICU staff
Select Intensive care (ICU) in the menu. A patient joins the ICU worklist when Start ICU stay is selected on their admission.
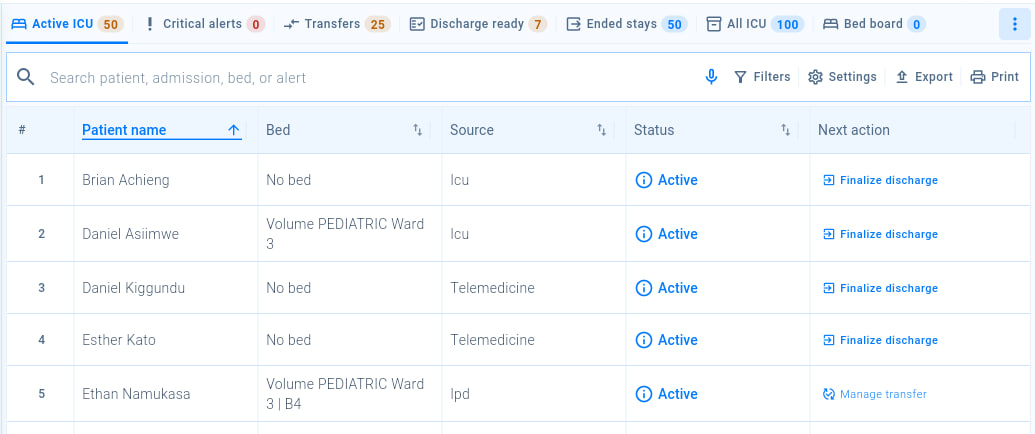
- Choose a tab: Active ICU, Critical alerts, Transfers, Discharge ready, Ended stays, All ICU or Bed board.
- Search by patient, admission, bed or alert.
- Each row shows the next action, such as Finalize discharge, or Manage transfer to approve or cancel a transfer.
16.2Manage an ICU stay
ICU staff
Select a patient on the worklist.
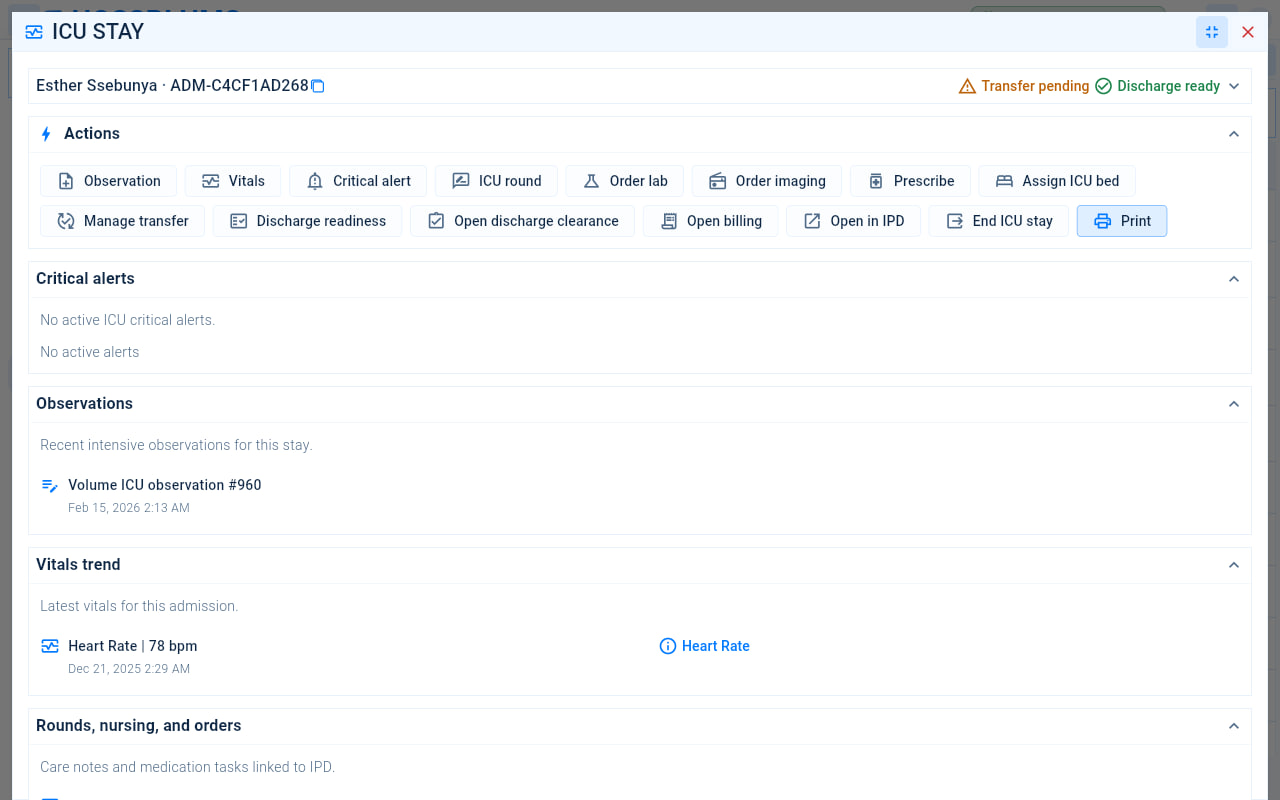
- The patient and admission. Badges such as Transfer pending or Discharge ready show where the stay stands.
- Actions: Observation, Vitals, Critical alert, ICU round, Order lab, Order imaging, Prescribe, Assign ICU bed, Manage transfer, Discharge readiness, Open discharge clearance, Open billing, Open in IPD, End ICU stay and Print.
- Critical alerts lists the patient’s active alerts. Select Critical alert to raise one.
- Observations shows the recent intensive observations.
- Vitals trend shows the latest vital signs for the admission.
Further down, Rounds, nursing, and orders and Transfer and readiness show care notes, medication tasks, bed movements and the planned discharge.
Chapter 17
Operating theatre
Schedule theatre cases, prepare the team and the patient, and record anaesthesia, the operation and recovery.
17.1The theatre worklist
Theatre staff and surgeons
Select Operating theater in the menu.
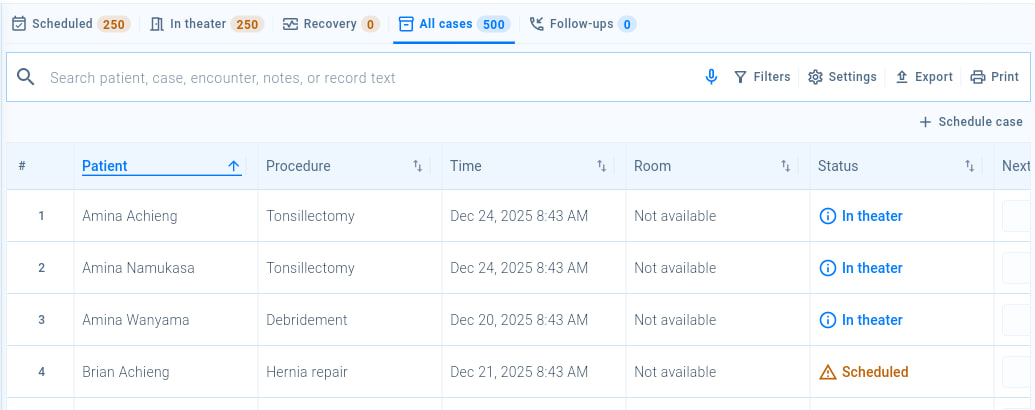
- Choose a tab: Scheduled, In theater, Recovery, All cases or Follow-ups.
- Search by patient, case, encounter, notes or record text.
- Schedule case books an operation. See Schedule a theatre case.
- Each case shows the patient, procedure, time, room and status. Select a case to open it.
17.2Schedule a theatre case
Theatre staff and surgeons
Select Schedule case. You can also start from a patient record with Schedule theater procedure.
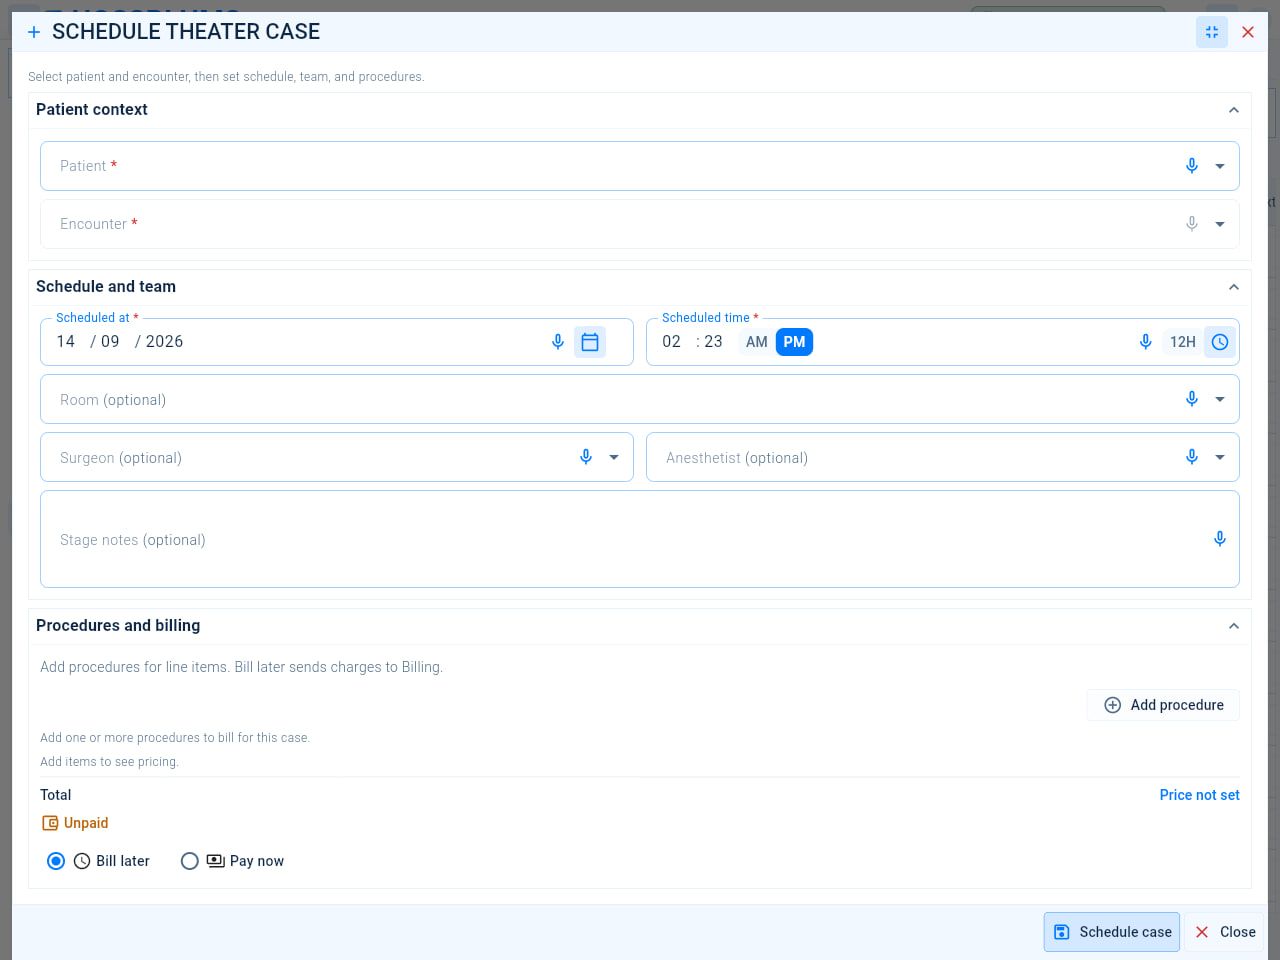
- Select the Patient and the Encounter the operation belongs to.
- Set the date in Scheduled at and the Scheduled time.
- Choose the theatre Room.
- Choose the Surgeon and the Anesthetist.
- Add Stage notes, if needed.
- Select Add procedure for each procedure to be performed. The charges are totalled below: choose Bill later to send them to Billing, or Pay now.
- Select Schedule case.
17.3Manage a theatre case
Theatre staff and surgeons
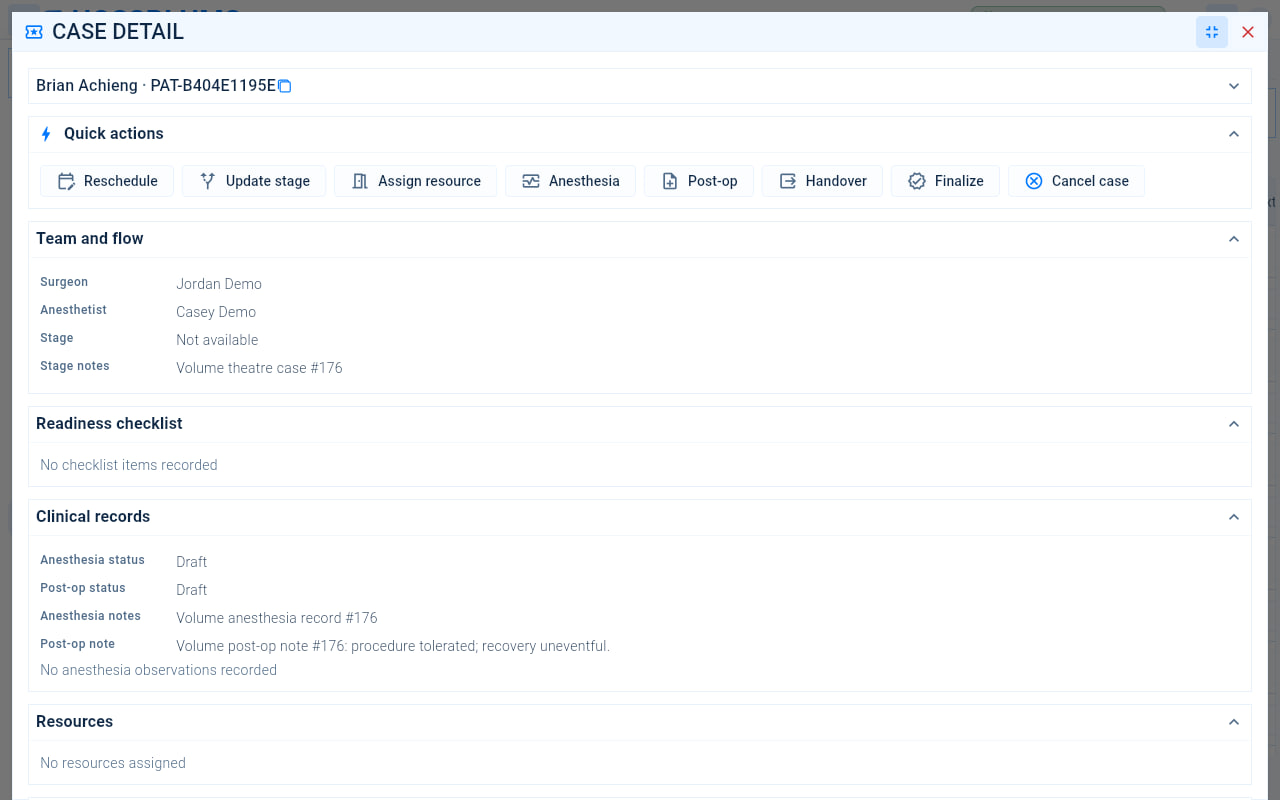
- The patient and the case.
- Quick actions follow the operation: Reschedule, Update stage, Assign resource, Anesthesia, Post-op, Handover, Finalize and Cancel case.
- Team and flow shows the Surgeon, the Anesthetist, the current Stage and the Stage notes.
- Readiness checklist records the checks before the operation.
- Clinical records shows the status and notes of the anaesthesia record and the post-operative note, and any anaesthesia observations.
Further down, Resources lists what has been assigned to the case, and the Timeline records each step.
Chapter 18
Discharge planning
Plan each patient’s discharge, make sure every department has cleared them, and close the admission.
18.1The discharge worklist
Doctors, nurses and ward managers
Select Discharge planning in the menu.
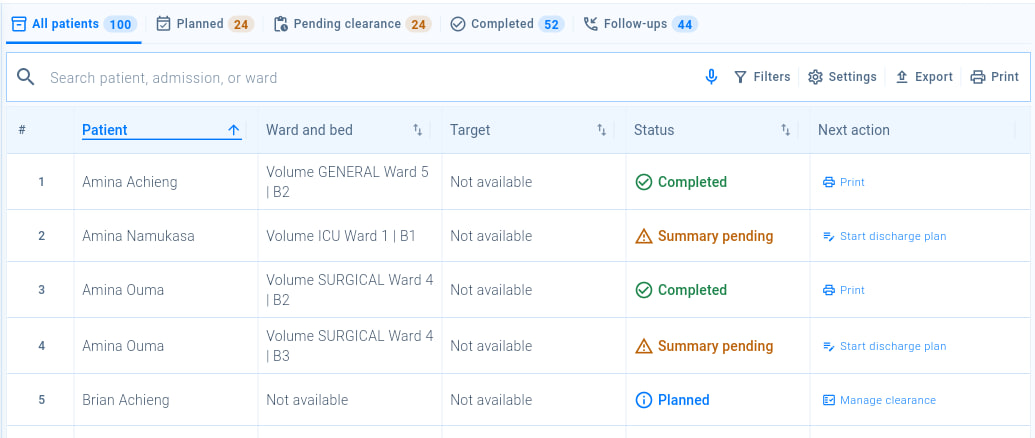
- Choose a tab: All patients, Planned, Pending clearance, Completed or Follow-ups.
- Search by patient, admission or ward.
- For a patient whose status is Summary pending, select Start discharge plan. See Start a discharge plan.
- For a patient whose discharge is Planned, select Manage clearance. See Finalize a discharge.
Select a patient on the worklist to open billing or the pharmacy for them, request take-home medicines with Request medicines, or print their discharge papers.
18.2Start a discharge plan
Doctors
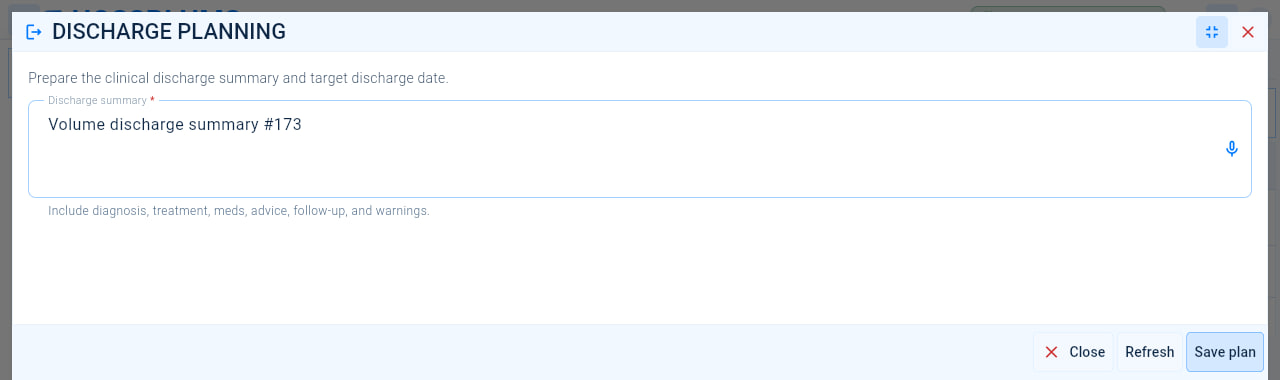
- Write the Discharge summary: the diagnosis, treatment, medicines, advice, follow-up and warning signs to look out for.
- Select Refresh to load the latest information about the admission.
- Select Save plan.
18.3Finalize a discharge
Doctors and ward managers
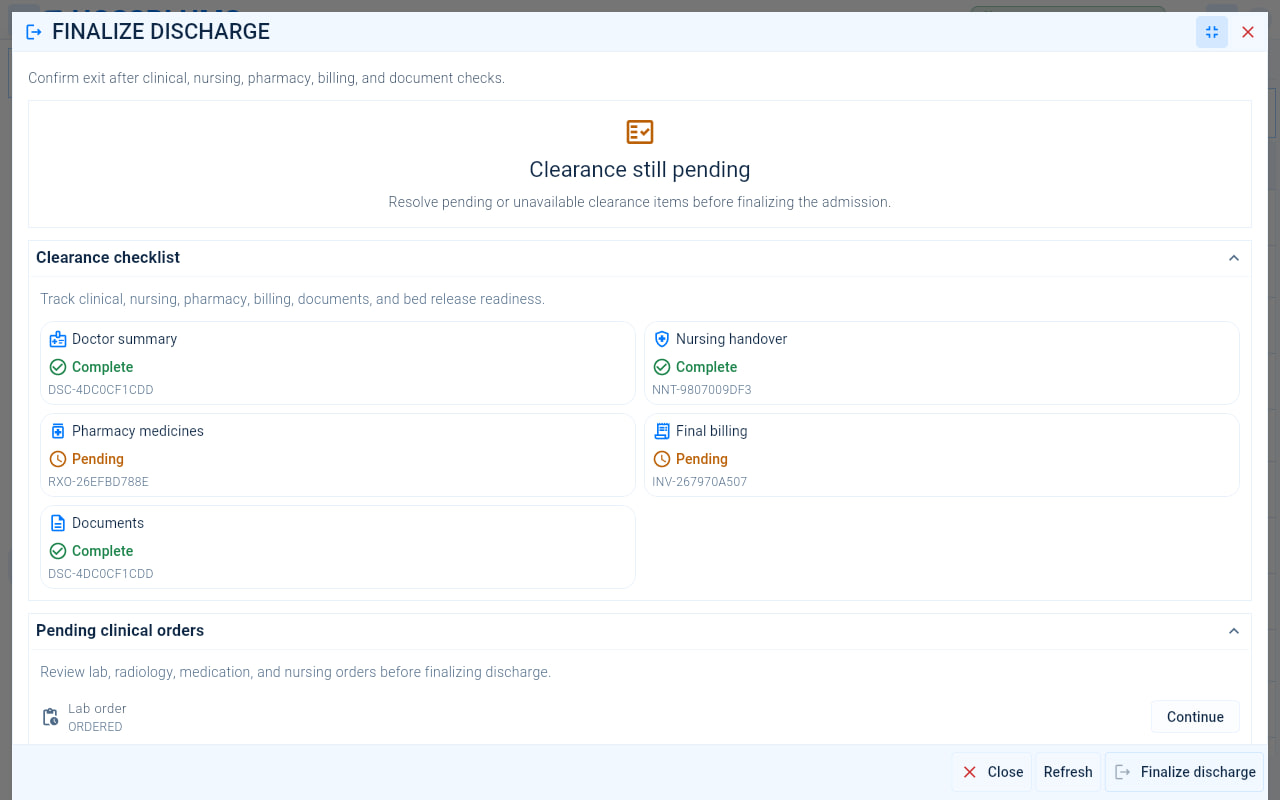
- The status at the top shows whether anything still stops the discharge, for example Clearance still pending.
- The Clearance checklist tracks each department: Doctor summary, Nursing handover, Pharmacy medicines, Final billing, Documents and, for insured patients, Insurance clearance. Each one shows Complete or Pending.
- Pending clinical orders lists laboratory, radiology, medication and nursing orders that are still open.
- Select Continue on an order to deal with it.
- Select Refresh once other departments have completed their part.
- When every item is complete, select Finalize discharge.
Chapter 19
Billing
Charge for services, issue invoices, take payments and refunds, and keep the price book up to date.
19.1The billing worklist
Billing officers and cashiers
Select Billing in the menu. Charges for consultations, orders, admissions and procedures reach Billing from the departments, so you only add charges by hand for anything else.
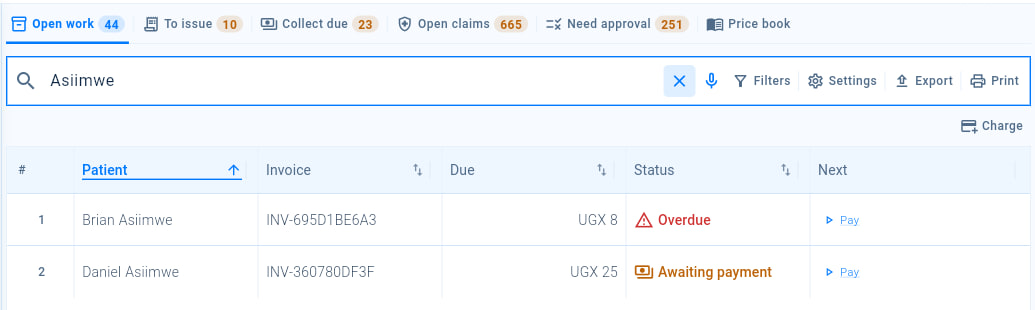
- Choose a tab: Open work for everything that needs action, To issue for draft invoices, Collect due for balances to collect, Open claims, Need approval for refunds, voids and adjustments, or Price book.
- Search by patient, invoice or encounter.
- Charge adds a charge by hand. See Charge a patient.
- Each invoice shows its next step, such as Pay to take a payment, Issue to issue a draft invoice, or Refund.
19.2Charge a patient
Billing officers and cashiers
Select Charge.
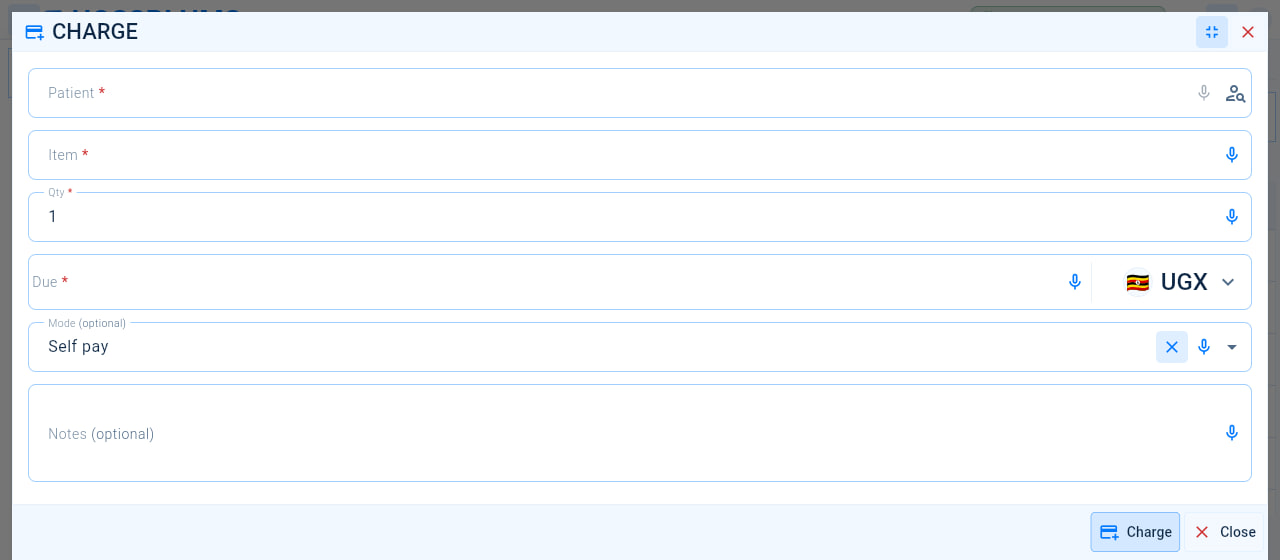
- Select the Patient.
- Choose the Item or service.
- Enter the quantity in Qty.
- Check the amount Due and its currency.
- Choose the payment Mode, such as self-pay or insurance.
- Add Notes, if needed.
- Select Charge.
19.3Take a payment
Cashiers
On the Collect due tab, select Pay on the invoice.
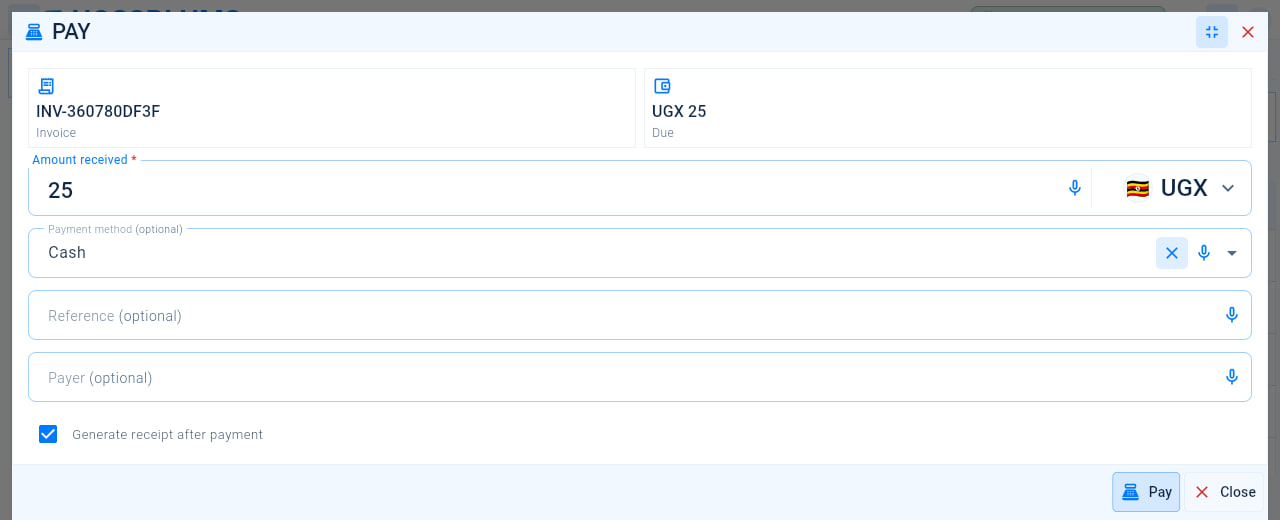
- Check the Invoice number and the amount Due.
- Enter the Amount received and check the currency.
- Choose the Payment method.
- Enter the payment Reference, such as a mobile money transaction ID.
- Enter the Payer if someone other than the patient is paying.
- Keep Generate receipt after payment ticked to produce a receipt.
- Select Pay.
19.4Work with an invoice
Billing officers and cashiers
Select an invoice on the worklist to open it.
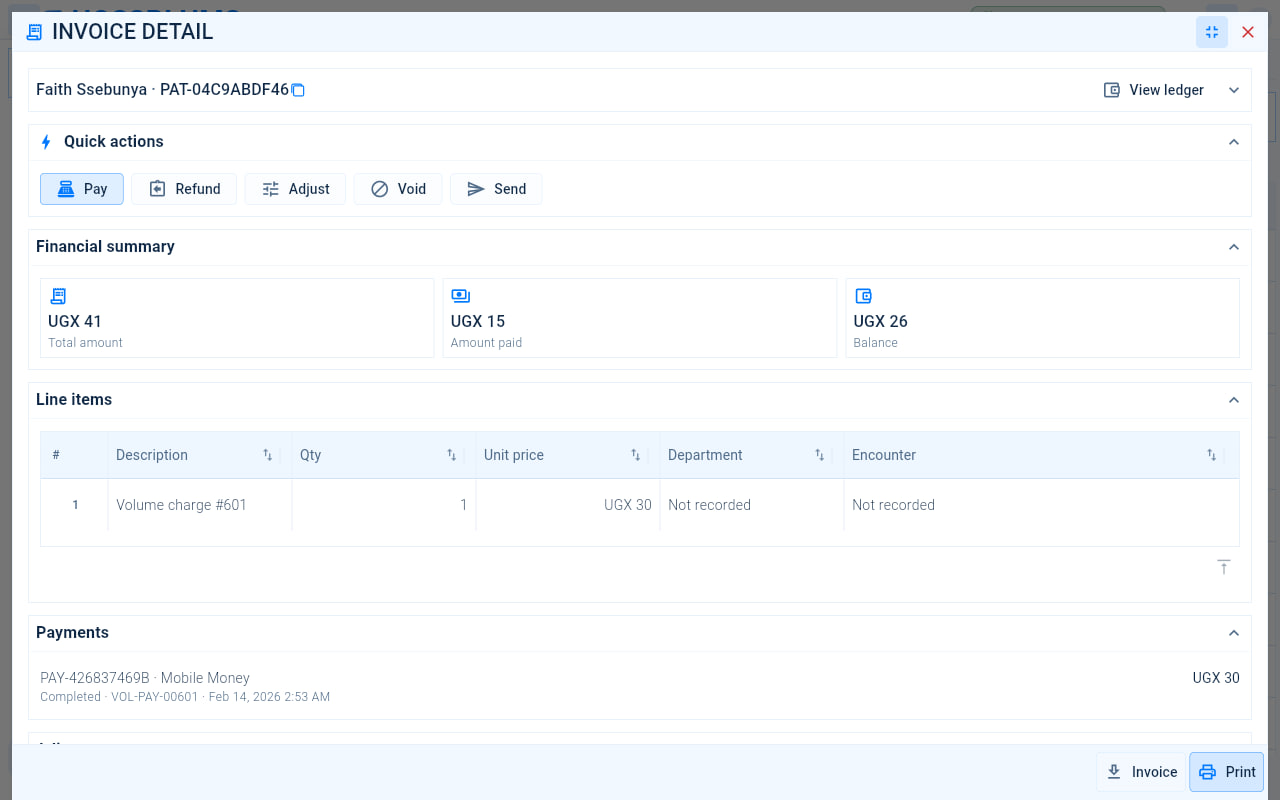
- View ledger shows all of the patient’s invoices and payments.
- Quick actions: Pay, Refund, Adjust, Void and Send. Refunds, voids and adjustments wait under Need approval until they are approved.
- Financial summary shows the Total amount, Amount paid and Balance.
- Line items lists what was charged, with the quantity, unit price, department and encounter.
- Payments lists each payment with its reference and method.
- Select Invoice to download the invoice as a PDF, or Print to print it with its line items and payments.
19.5Keep prices up to date
Billing managers
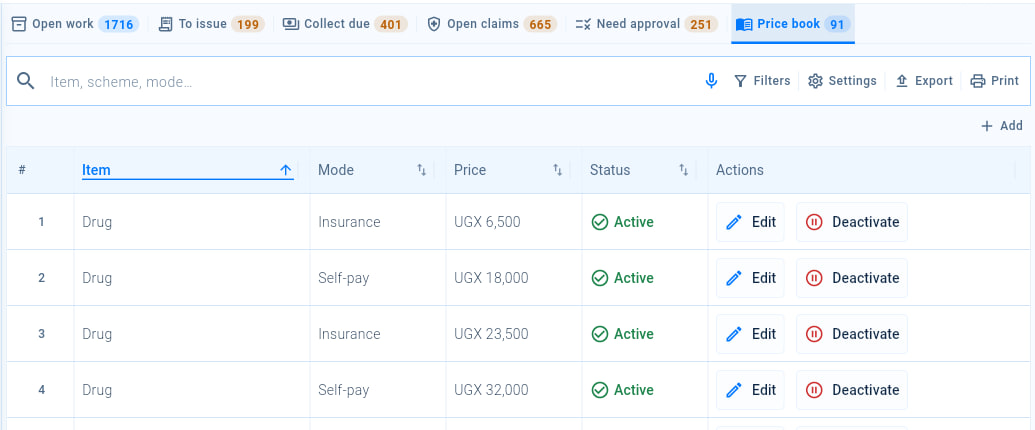
- Open the Price book tab. It holds the prices used when services and items are charged.
- Search by item, scheme or mode.
- Select Add to set a price for an item or service.
- Select Edit to change a price.
- Select Deactivate to stop using a price.
19.6Close your shift
Cashiers
At the end of your shift, open the Collect due tab and select Close shift. Enter the Expected amount and the Actual amount you collected, add Notes to explain any difference, tick Submit for approval if a supervisor must check the shift, and select Close shift.
Chapter 20
Insurance claims
Set up insurers and schemes, enrol patients, request pre-authorizations and follow claims until they are paid.
20.1Set up insurance
Claims officers and billing managers
Select Insurance claims in the menu, then Insurance Setup. If the tab is not visible, open More tabs.
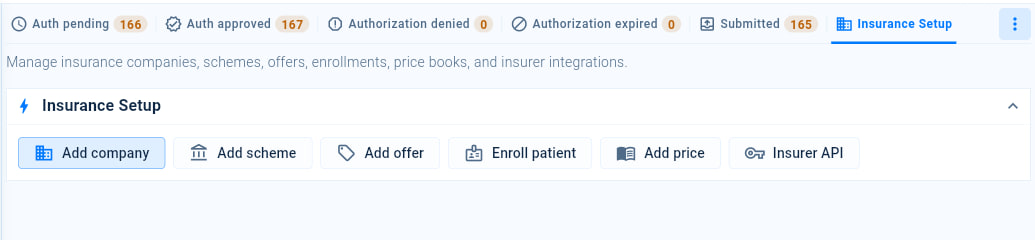
- Add company adds an insurance company.
- Add scheme adds a scheme offered by a company.
- Add offer records an offer made under a scheme.
- Enroll patient registers a patient as a member of a scheme.
- Add price sets the price an insurer pays for an item or service.
- Insurer API connects HOSSPI HMS to an insurer’s own system, where the insurer supports it.
You can also enrol a patient from their record: select Enroll insurance under Quick actions, choose the Insurance company and Insurance scheme, enter the patient’s Member ID and select Save enrollment.
20.2The claims worklist
Claims officers
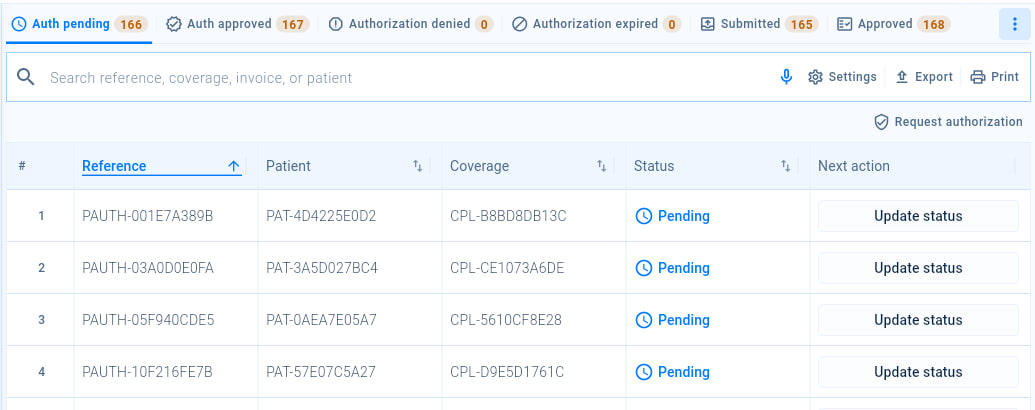
- Choose a tab: Auth pending, Auth approved, Authorization denied, Authorization expired, Submitted or Approved. More tabs holds the rest.
- Search by reference, coverage, invoice or patient.
- Request authorization asks an insurer to approve care before it is given. Choose the Insurance company and Insurance scheme, then select Request authorization.
- Each claim shows its next step, such as Record response, Update status or Close as paid.
20.3Record an insurer’s response
Claims officers
When the insurer replies, select Record response on the claim.
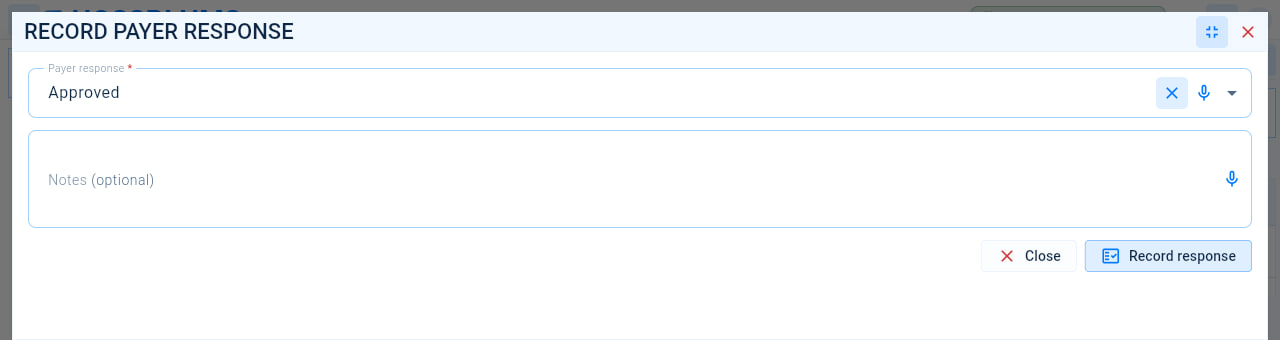
- Choose the Payer response.
- Add Notes, such as the insurer’s reference or reason.
- Select Record response.
When the insurer pays an approved claim, select Close as paid.
Chapter 21
Accounts
Keep the facility’s books: post journal entries, review ledgers and outgoing invoices, and set up the accounting calendar and controls.
21.1The accounting books
Accountants
Select Accounts in the menu, then Books.
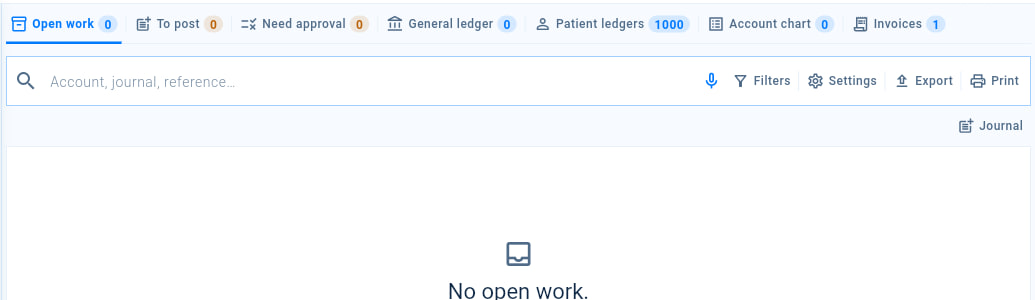
- The tabs cover the books, as described in the table below.
- Search by account, journal or reference.
- Journal starts a new journal entry. See Post a journal entry.
| Tab | What it holds |
|---|---|
| Open work | Every accounting item that still needs action. |
| To post | Draft journal entries ready to post to the books. Post all posts them together. |
| Need approval | Journal posts, voids and reversals waiting for approval. |
| General ledger | The facility’s account balances and activity by general ledger account. |
| Patient ledgers | What each patient has been invoiced, has paid and still owes. Pay takes you to Billing to receive a payment. |
| Account chart | The chart of accounts, with each account’s code, type and status. Add creates an account. |
| Invoices | Invoices for money leaving the facility, such as supplier bills. Create adds one. |
21.2Post a journal entry
Accountants
On the Open work tab, select Journal.
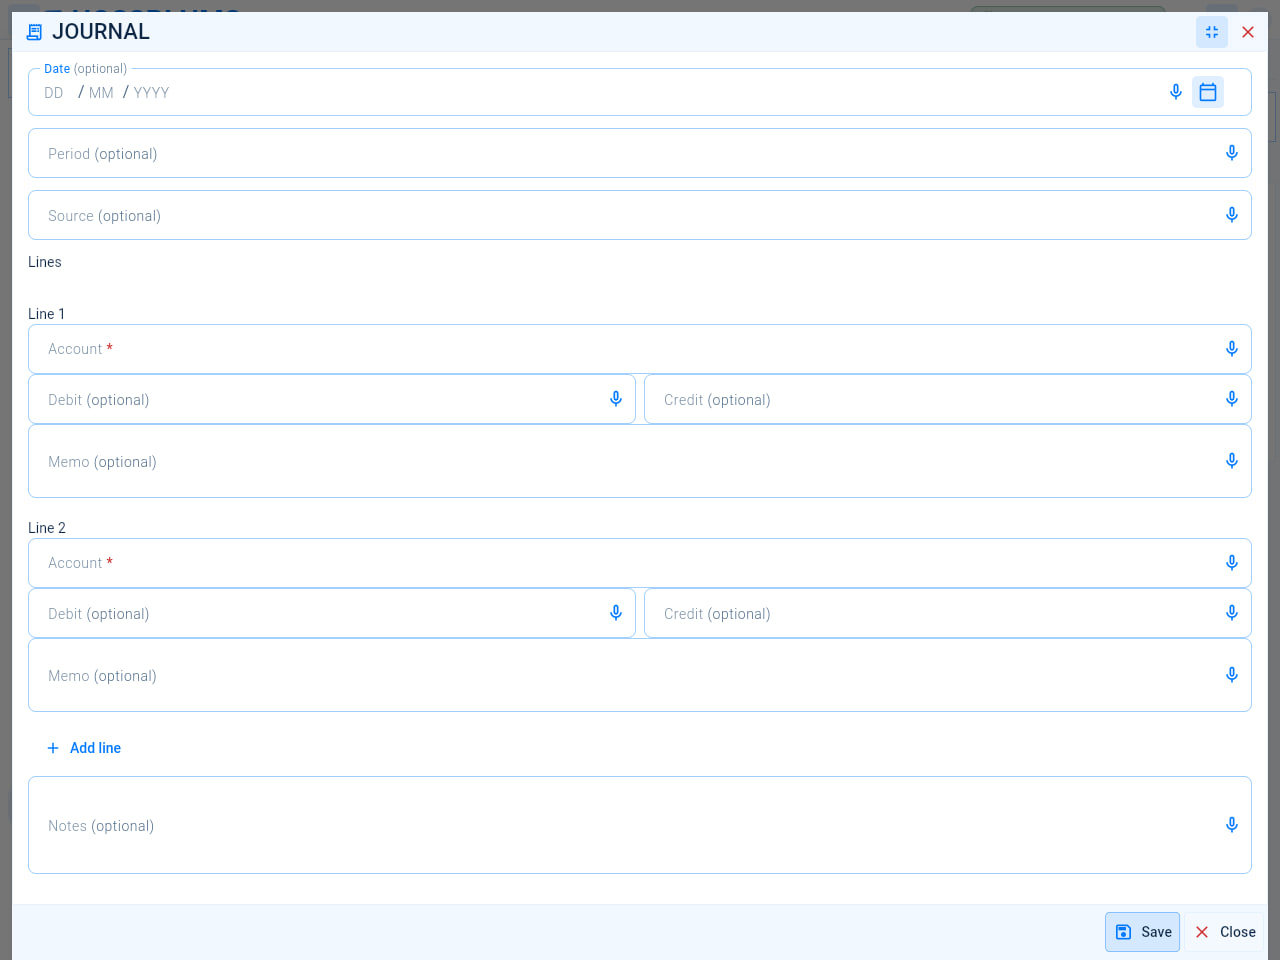
- Set the Date of the entry.
- Choose the accounting Period.
- Enter the Source, such as the document the entry comes from.
- On Line 1, choose the Account and enter either a Debit or a Credit amount, with a Memo if you wish.
- Complete Line 2 in the same way, and select Add line if you need more lines. Total debits must equal total credits.
- Add Notes, if needed.
- Select Save. The entry waits under To post until it is posted.
21.3Accounting setup and controls
Finance managers
Select Accounts in the menu, then Setup & Controls.
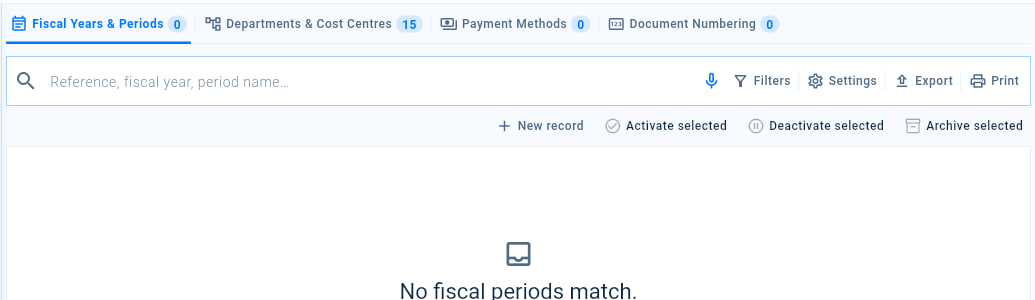
- Choose a tab, as described in the table below.
- New record adds a record to the tab you are on.
- Tick records in the list, then select Activate selected, Deactivate selected or Archive selected.
| Tab | What it holds |
|---|---|
| Fiscal Years & Periods | The fiscal calendar, and when each period opens, closes and is locked. |
| Departments & Cost Centres | Departments with their cost centres, default posting accounts and owners. |
| Payment Methods | The payment methods you accept, with their settlement accounts, fees and evidence rules. |
| Document Numbering | The prefixes, padding and reset rules for the reference numbers each kind of document uses. |
Chapter 22
Human resources
Keep staff records up to date, plan rosters, handle leave and run payroll.
22.1Staff records
HR staff and managers
Select Human resources in the menu.
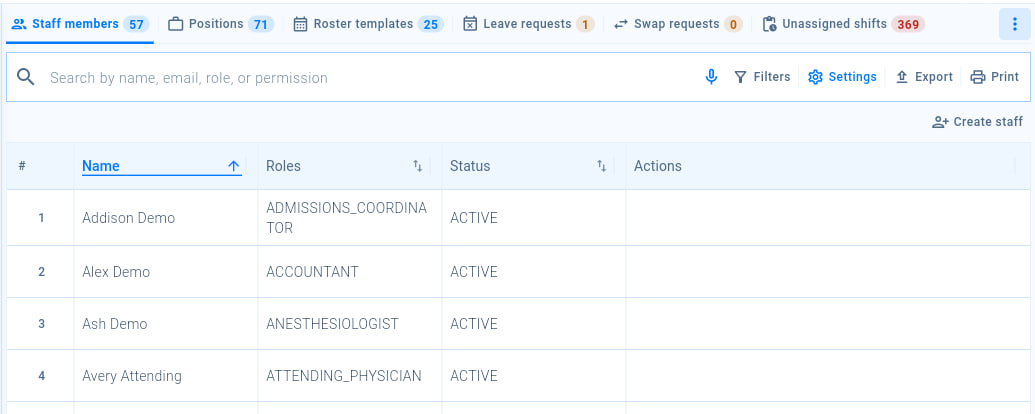
- Choose a tab: Staff members, Positions, Roster templates, Leave requests, Swap requests or Unassigned shifts. More tabs holds Pay & Compensation and Manage staff and roles.
- Search by name, email, role or permission.
- Create staff adds a staff account, as described in Create a staff account.
- Select a staff member to open their profile.
To add a job title, open the Positions tab and select Create Position. Enter the Position and, if you wish, a Description, keep Active ticked, and select Create Position.
22.2A staff profile
HR staff and managers
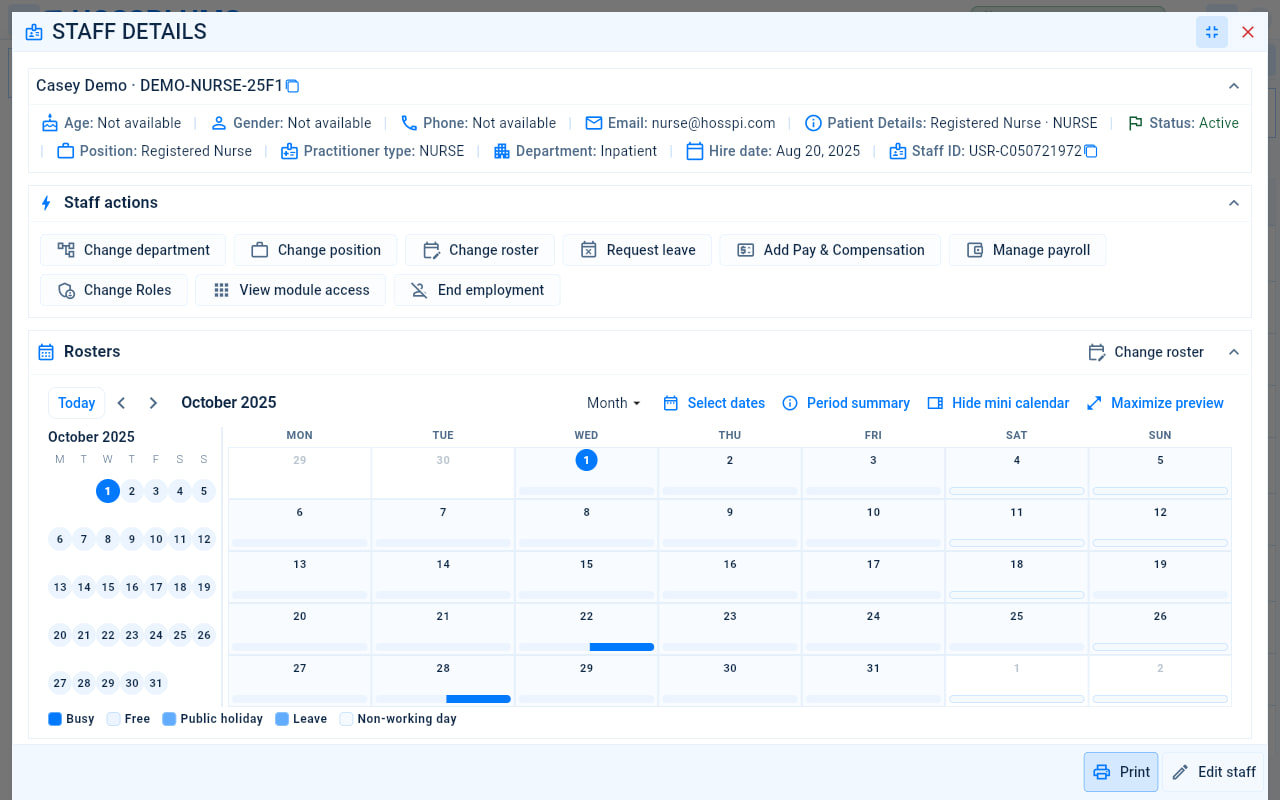
- Staff details: the person’s name, staff number, staff ID and other details.
- Staff actions: Change department, Change position, Change roster, Request leave, Add Pay & Compensation, Manage payroll, Change Roles, View module access and End employment, which records that the person has left and can also end their access.
- Rosters shows the person’s shifts on a calendar. Select Change roster to change them.
- Change the calendar with Month, Select dates, Period summary, Hide mini calendar and Maximize preview. The key below it marks busy, free, leave, public holiday and non-working days.
- Select Edit staff to change the person’s details, or Print to print the profile.
Further down are Leaves, Payroll, Roles and access (select Change Roles) and Permissions (select Manage staff permissions).
22.3Plan rosters
HR staff and managers
Open the Roster templates tab and select Create roster template.
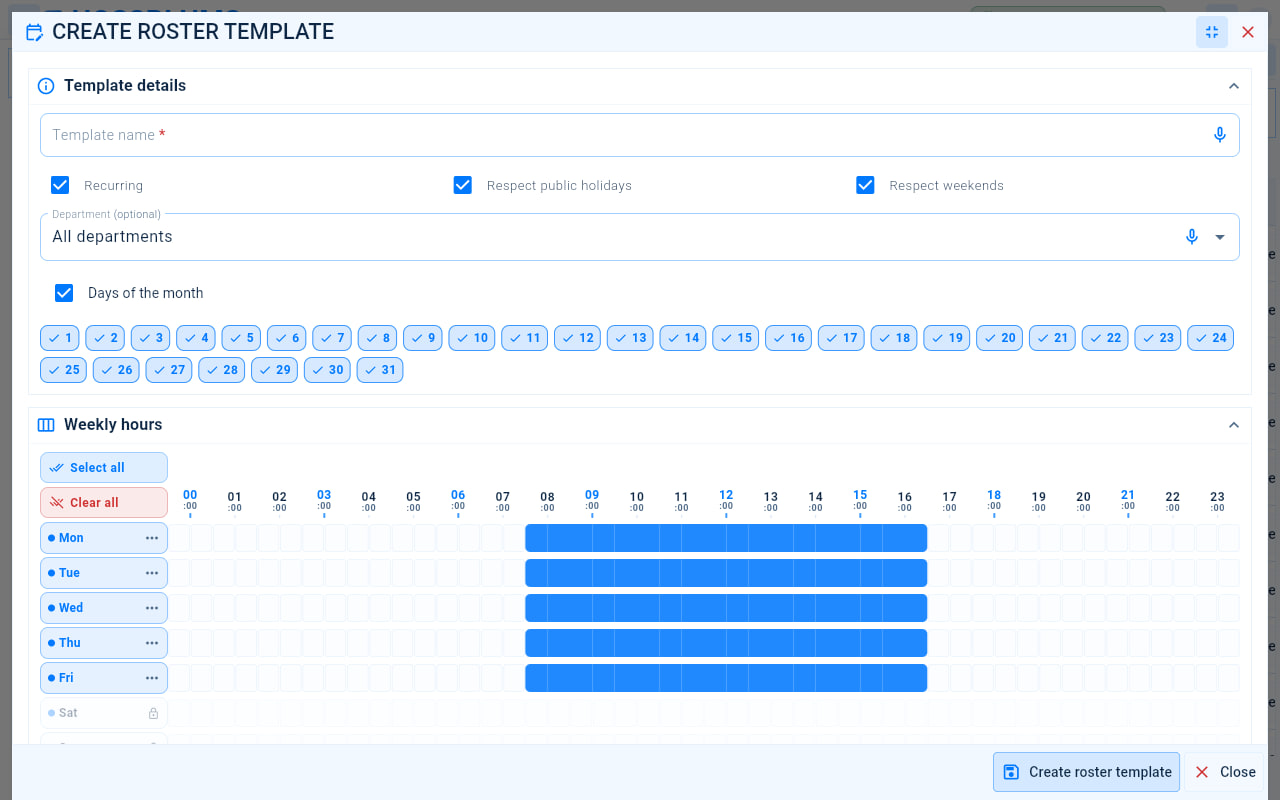
- Enter the Template name.
- Choose the rules that apply: Recurring, Respect public holidays and Respect weekends.
- Choose the Department, if the template is for one department.
- Keep Days of the month ticked and select the days the template covers.
- Under Weekly hours, mark the working hours for each day of the week. Select all and Clear all speed this up.
- Select Create roster template.
Unassigned shifts lists shifts that nobody has been given yet; select Override shift to change one. Swap requests lists requests from staff to swap shifts.
22.4Manage leave
HR staff and managers
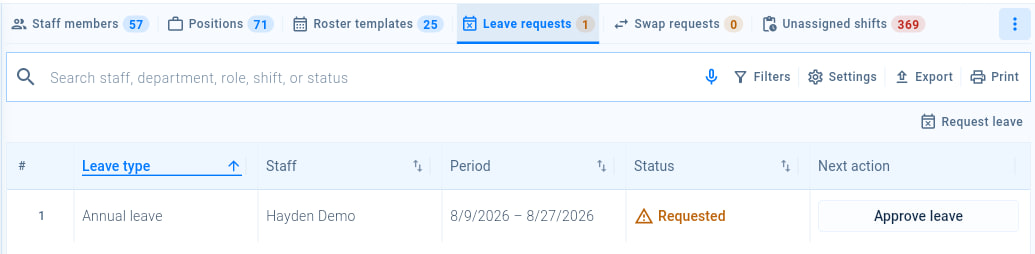
- Open the Leave requests tab.
- Search by staff, department, role, shift or status.
- Select Request leave to record leave for a staff member.
- Select a request to see its details, then Approve leave to approve it.
Staff can also ask for leave themselves. See Request leave.
22.5Run payroll
HR and finance staff
Open More tabs, then Pay & Compensation.
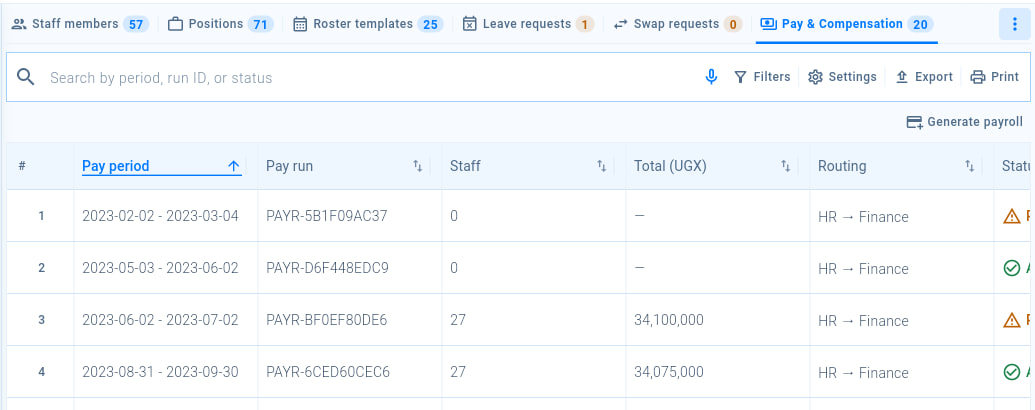
- The Pay & Compensation tab lists each pay run.
- Search by period, run ID or status.
- Select Generate payroll to prepare the pay run for a period.
- Each pay run shows its Pay period, the number of staff, the Total (UGX), its Routing from HR to Finance and its status, such as Pending review or Approved — Finance. Select a pay run to review it.
Chapter 23
Reporting and analytics
Track how the facility is doing with ready-made reports, dashboards and KPIs, and review the audit and access logs.
23.1The reporting overview
Managers and administrators
Select Reporting and Analytics in the menu.
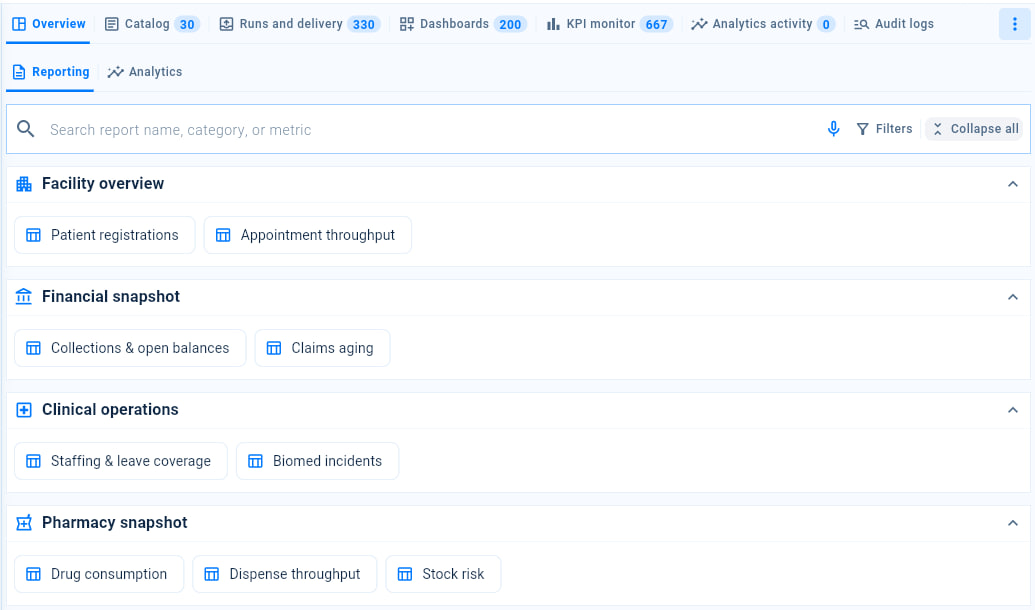
- The tabs: Overview, Catalog, Runs and delivery, Dashboards, KPI monitor, Analytics activity and Audit logs. More tabs holds the rest, such as PHI access.
- Switch between Reporting and Analytics.
- Search by report name, category or metric.
- Reports are grouped into snapshots, such as Facility overview, Financial snapshot, Clinical operations and Pharmacy snapshot. Select a group’s heading to expand or collapse it.
- Select a report, such as Patient registrations, to view it. Collapse all closes every group.
23.2Run a report
Managers and administrators
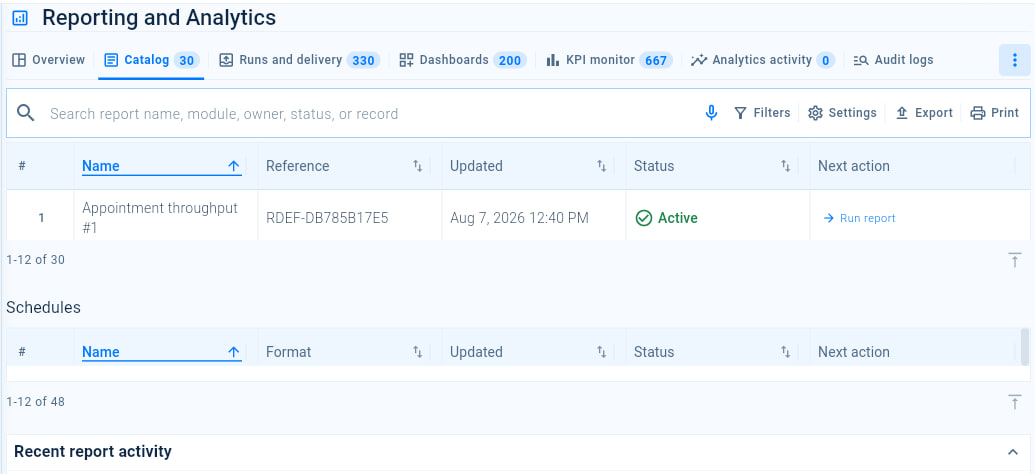
- Open the Catalog tab, which lists every report with its reference, when it was last updated and its status.
- Search by report name, module, owner, status or record.
- Select Run report on an active report to run it now.
- Select a report to see its details.
Runs and delivery lists each report run with its status; select Retry on a run that failed. Scheduled reports are listed under Schedules.
23.3Monitor KPIs and logs
Managers and administrators
| Tab | What it shows |
|---|---|
| Dashboards | Ready-made dashboards for the facility. |
| KPI monitor | Key performance indicators, each marked Normal, Warning or Critical. |
| Analytics activity | Events recorded across HOSSPI HMS, such as check-ins, payments and lab results. |
| Audit logs | Who did what and when, for compliance checks. Search by user, action, record, patient, purpose or reason. |
| PHI access | Each time someone opened or used protected patient information. |
Chapter 24
Troubleshooting and getting help
Answers to common problems, the meaning of the terms used in HOSSPI HMS, and how to reach the HOSSPI team.
24.1Common problems
Everyone
| Problem | What to do |
|---|---|
| I cannot sign in. | Check that you chose Email or Phone correctly under Sign in with, and that Caps Lock is off. If you have forgotten your password, select Reset password. If your account is new, ask your administrator to check that it is Active. |
| The sign-in screen says Account pending approval. | Your facility is waiting for approval from HOSSPI. Contact one of the platform administrators listed in the message. |
| A menu item, tab or button in this manual is missing on my screen. | Your role, or your organisation’s subscription package, does not include it. Ask your administrator to check your roles and the package. |
| A list does not show a record I expect. | Clear the search box, then select Filters and Clear filters. Check that the record belongs to your facility. |
| A form will not save. | Look for fields highlighted with a message beneath them. Fields marked with an asterisk (*) must be completed. |
| The connection indicator shows Offline. | Check your internet connection, and wait until it shows Online again before you continue working. |
| I see a message that the subscription has expired. | Ask an administrator to renew it. See Renew or change your subscription. |
| I cannot find a screen. | Type part of its name in Search menu. See Find a screen with Search menu. |
| Text is too small to read comfortably. | Increase the Text size or switch on Bold text. See Make the screen easier to read. |
24.2Glossary
Everyone
| Term | Meaning |
|---|---|
| Tenant | Your organisation as a whole, including all its facilities. |
| Facility | A hospital, clinic, laboratory or pharmacy that belongs to your organisation. |
| Department and unit | A department groups related services, such as the laboratory. A unit is a team within a department. |
| Ward, room and bed | The places where admitted patients stay. A ward contains rooms and beds. |
| Role | A named set of permissions for a job, such as Receptionist or Nurse. |
| Permission | One thing a person is allowed to see or do, such as reading patient records. |
| Module | An area of HOSSPI HMS, such as Laboratory or Billing. Your subscription package decides which modules you can use. |
| Patient registry | The list of every patient registered at your organisation. |
| MRN | Medical Record Number: the number that identifies a patient’s record. |
| Encounter | One visit or episode of care, from the patient’s arrival until the visit is completed. |
| OPD | Outpatient department: care for patients who are not admitted. |
| IPD | Inpatient department: care for patients admitted to a ward. |
| ICU | Intensive care unit. |
| Triage | Deciding how urgently a patient needs care, usually with their vital signs. |
| Vitals | Measurements such as blood pressure, temperature, pulse, breathing rate, oxygen saturation, weight and height. |
| Disposition | The decision at the end of a consultation, such as sending the patient home, admitting them or referring them. |
| Order or request | A request for a laboratory test, imaging study or medicine made during an encounter. |
| Formulary | The medicines your facility has approved for use. |
| Price book | The prices your facility charges for services and items. |
| Invoice | A bill for the services a patient received. |
| Pre-authorisation | An insurer’s approval for a service before it is provided. |
| Claim | A request to an insurer to pay for the services a patient received. |
| Journal | An accounting entry recorded in your books. |
| Fiscal period | An accounting period, such as a month, that can be closed once its books are complete. |
| Roster | The schedule of shifts assigned to staff. |
24.3Getting help
Everyone
Start with your facility administrator, who manages your account, your roles and your facility’s settings.
For help with registration, your subscription or anything your administrator cannot resolve, contact the HOSSPI team:
- Email: wasswawilson0002@gmail.com
- Phone and WhatsApp: +256783230321
- Website: www.hosspi.com/contact